

The Gougeon Brothers on Boat Construction - WEST SYSTEM Epoxy
The Gougeon Brothers on Boat Construction - WEST SYSTEM Epoxy
The Gougeon Brothers on Boat Construction - WEST SYSTEM Epoxy

You also want an ePaper? Increase the reach of your titles
YUMPU automatically turns print PDFs into web optimized ePapers that Google loves.
242 Hull C<strong>on</strong>structi<strong>on</strong> Methods<br />
edge of a permanently positi<strong>on</strong>ed veneer. This veneer<br />
acts as a guide <strong>on</strong> which the tool rides. It’s important,<br />
of course, that the machine cut exactly 1 ⁄8" deep, so it<br />
will not cut into the veneer under it. <str<strong>on</strong>g>The</str<strong>on</strong>g>re can be no<br />
gaps between veneers wider than the 2" the tool can<br />
cut. Since typical planks are about 3 ⁄4" (18mm) apart<br />
at the ends and 13 ⁄4" (45mm) apart at the middle, this is<br />
not a serious limitati<strong>on</strong>. Whichever tool you use, make<br />
sure that it is sharp. Otherwise, the blade will tend to<br />
follow the grain of the veneers, which, when it runs in<br />
the wr<strong>on</strong>g directi<strong>on</strong>, will pull the saw guide away from<br />
the true veneer edge.<br />
When we laminate our veneers with a mechanical spiler,<br />
we’re careful not to shoot any staples in the area where<br />
the machine will cut. We cut <strong>on</strong>e veneer with the spiler,<br />
using the opposing veneer as a guide. <str<strong>on</strong>g>The</str<strong>on</strong>g> tapered space<br />
between the pieces thus becomes a swath exactly 2"<br />
wide. We remove the wood that has been cut away and<br />
then carefully clean any sawdust and c<strong>on</strong>taminated<br />
adhesive from the gap and apply fresh adhesive. Next,<br />
we fit a 2" wide filler veneer, filling up the gap between<br />
the two veneers. This procedure is repeated over and<br />
over for each space between veneers over the entire hull.<br />
We usually have <strong>on</strong>e team that applies <strong>on</strong>ly veneers and<br />
moves down the hull quite rapidly, carefully setting<br />
each veneer so that a minimum amount of waste is<br />
generated in the spiling process. <str<strong>on</strong>g>The</str<strong>on</strong>g>se workers scribe<br />
the filler spacing and make a point of stapling outside<br />
the area of veneer that will be removed. <str<strong>on</strong>g>The</str<strong>on</strong>g> spiling<br />
team follows, sawing 2" gaps and immediately<br />
laminating 2" veneer strips in the slots they cut. Fitting<br />
and laminating in a single operati<strong>on</strong> is very fast and<br />
makes the laminated hull more ec<strong>on</strong>omically feasible<br />
from the standpoint of man hours required.<br />
We should point out that cutting and removing veneer<br />
to make the 2" gap must be d<strong>on</strong>e before the epoxy in<br />
the laminati<strong>on</strong> has cured. When the adhesive is allowed<br />
to set too l<strong>on</strong>g, it’s very difficult and time c<strong>on</strong>suming to<br />
remove excess veneer and epoxy to prepare the opening<br />
for the filler veneer.<br />
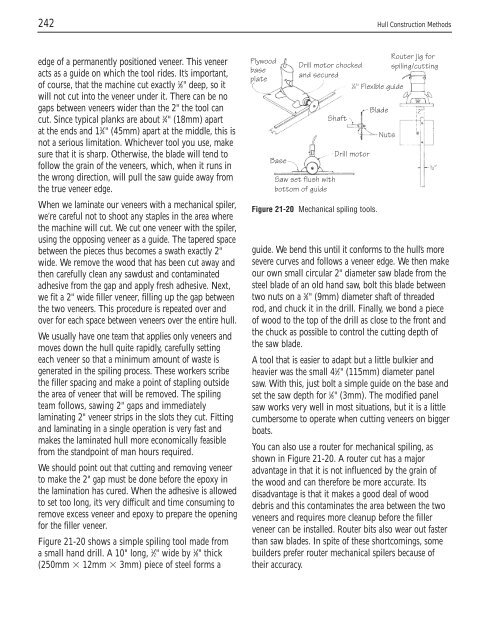
Figure 21-20 shows a simple spiling tool made from<br />
a small hand drill. A 10" l<strong>on</strong>g, 1 ⁄2" wide by 1 ⁄8" thick<br />
(250mm � 12mm � 3mm) piece of steel forms a<br />
Plywood<br />
base<br />
plate<br />
Base<br />
Drill motor chocked<br />
and secured<br />
Saw set flush with<br />
bottom of guide<br />
Shaft<br />
1 ⁄8" Flexible guide<br />
Drill motor<br />
Figure 21-20 Mechanical spiling tools.<br />
Blade<br />
Nuts<br />
Router jig for<br />
spiling/cutting<br />
guide. We bend this until it c<strong>on</strong>forms to the hull’s more<br />
severe curves and follows a veneer edge. We then make<br />
our own small circular 2" diameter saw blade from the<br />
steel blade of an old hand saw, bolt this blade between<br />
two nuts <strong>on</strong> a 3 ⁄8" (9mm) diameter shaft of threaded<br />
rod, and chuck it in the drill. Finally, we b<strong>on</strong>d a piece<br />
of wood to the top of the drill as close to the fr<strong>on</strong>t and<br />
the chuck as possible to c<strong>on</strong>trol the cutting depth of<br />
the saw blade.<br />
A tool that is easier to adapt but a little bulkier and<br />
heavier was the small 41 ⁄2" (115mm) diameter panel<br />
saw. With this, just bolt a simple guide <strong>on</strong> the base and<br />
set the saw depth for 1 ⁄8" (3mm). <str<strong>on</strong>g>The</str<strong>on</strong>g> modified panel<br />
saw works very well in most situati<strong>on</strong>s, but it is a little<br />
cumbersome to operate when cutting veneers <strong>on</strong> bigger<br />
boats.<br />
You can also use a router for mechanical spiling, as<br />
shown in Figure 21-20. A router cut has a major<br />
advantage in that it is not influenced by the grain of<br />
the wood and can therefore be more accurate. Its<br />
disadvantage is that it makes a good deal of wood<br />
debris and this c<strong>on</strong>taminates the area between the two<br />
veneers and requires more cleanup before the filler<br />
veneer can be installed. Router bits also wear out faster<br />
than saw blades. In spite of these shortcomings, some<br />
builders prefer router mechanical spilers because of<br />
their accuracy.


