

The Gougeon Brothers on Boat Construction - WEST SYSTEM Epoxy
The Gougeon Brothers on Boat Construction - WEST SYSTEM Epoxy
The Gougeon Brothers on Boat Construction - WEST SYSTEM Epoxy

You also want an ePaper? Increase the reach of your titles
YUMPU automatically turns print PDFs into web optimized ePapers that Google loves.
Chapter 19 – Keels, Stems, and Sheer Clamps 215<br />
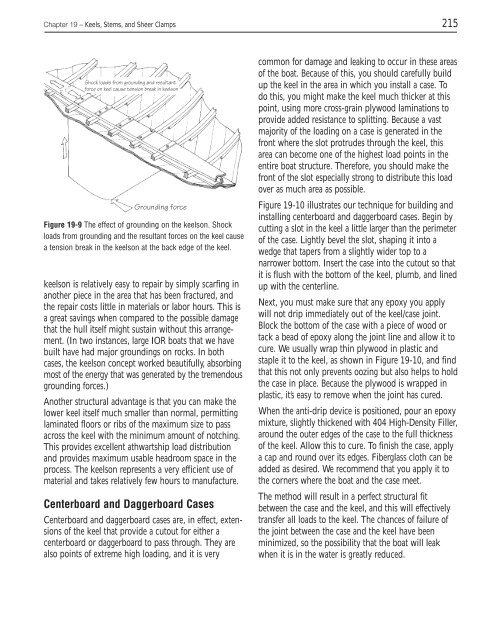
Shock loads from grounding and resultant<br />
force <strong>on</strong> keel cause tensi<strong>on</strong> break in keels<strong>on</strong><br />
Grounding force<br />
Figure 19-9 <str<strong>on</strong>g>The</str<strong>on</strong>g> effect of grounding <strong>on</strong> the keels<strong>on</strong>. Shock<br />
loads from grounding and the resultant forces <strong>on</strong> the keel cause<br />
a tensi<strong>on</strong> break in the keels<strong>on</strong> at the back edge of the keel.<br />
keels<strong>on</strong> is relatively easy to repair by simply scarfing in<br />
another piece in the area that has been fractured, and<br />
the repair costs little in materials or labor hours. This is<br />
a great savings when compared to the possible damage<br />
that the hull itself might sustain without this arrangement.<br />
(In two instances, large IOR boats that we have<br />
built have had major groundings <strong>on</strong> rocks. In both<br />
cases, the keels<strong>on</strong> c<strong>on</strong>cept worked beautifully, absorbing<br />
most of the energy that was generated by the tremendous<br />
grounding forces.)<br />
Another structural advantage is that you can make the<br />
lower keel itself much smaller than normal, permitting<br />
laminated floors or ribs of the maximum size to pass<br />
across the keel with the minimum amount of notching.<br />
This provides excellent athwartship load distributi<strong>on</strong><br />
and provides maximum usable headroom space in the<br />
process. <str<strong>on</strong>g>The</str<strong>on</strong>g> keels<strong>on</strong> represents a very efficient use of<br />
material and takes relatively few hours to manufacture.<br />
Centerboard and Daggerboard Cases<br />
Centerboard and daggerboard cases are, in effect, extensi<strong>on</strong>s<br />
of the keel that provide a cutout for either a<br />
centerboard or daggerboard to pass through. <str<strong>on</strong>g>The</str<strong>on</strong>g>y are<br />
also points of extreme high loading, and it is very<br />
comm<strong>on</strong> for damage and leaking to occur in these areas<br />
of the boat. Because of this, you should carefully build<br />
up the keel in the area in which you install a case. To<br />
do this, you might make the keel much thicker at this<br />
point, using more cross-grain plywood laminati<strong>on</strong>s to<br />
provide added resistance to splitting. Because a vast<br />
majority of the loading <strong>on</strong> a case is generated in the<br />
fr<strong>on</strong>t where the slot protrudes through the keel, this<br />
area can become <strong>on</strong>e of the highest load points in the<br />
entire boat structure. <str<strong>on</strong>g>The</str<strong>on</strong>g>refore, you should make the<br />
fr<strong>on</strong>t of the slot especially str<strong>on</strong>g to distribute this load<br />
over as much area as possible.<br />
Figure 19-10 illustrates our technique for building and<br />
installing centerboard and daggerboard cases. Begin by<br />
cutting a slot in the keel a little larger than the perimeter<br />
of the case. Lightly bevel the slot, shaping it into a<br />
wedge that tapers from a slightly wider top to a<br />
narrower bottom. Insert the case into the cutout so that<br />
it is flush with the bottom of the keel, plumb, and lined<br />
up with the centerline.<br />
Next, you must make sure that any epoxy you apply<br />
will not drip immediately out of the keel/case joint.<br />
Block the bottom of the case with a piece of wood or<br />
tack a bead of epoxy al<strong>on</strong>g the joint line and allow it to<br />
cure. We usually wrap thin plywood in plastic and<br />
staple it to the keel, as shown in Figure 19-10, and find<br />
that this not <strong>on</strong>ly prevents oozing but also helps to hold<br />
the case in place. Because the plywood is wrapped in<br />
plastic, it’s easy to remove when the joint has cured.<br />
When the anti-drip device is positi<strong>on</strong>ed, pour an epoxy<br />
mixture, slightly thickened with 404 High-Density Filler,<br />
around the outer edges of the case to the full thickness<br />
of the keel. Allow this to cure. To finish the case, apply<br />
a cap and round over its edges. Fiberglass cloth can be<br />
added as desired. We recommend that you apply it to<br />
the corners where the boat and the case meet.<br />
<str<strong>on</strong>g>The</str<strong>on</strong>g> method will result in a perfect structural fit<br />
between the case and the keel, and this will effectively<br />
transfer all loads to the keel. <str<strong>on</strong>g>The</str<strong>on</strong>g> chances of failure of<br />
the joint between the case and the keel have been<br />
minimized, so the possibility that the boat will leak<br />
when it is in the water is greatly reduced.


