

The Gougeon Brothers on Boat Construction - WEST SYSTEM Epoxy
The Gougeon Brothers on Boat Construction - WEST SYSTEM Epoxy
The Gougeon Brothers on Boat Construction - WEST SYSTEM Epoxy

Create successful ePaper yourself
Turn your PDF publications into a flip-book with our unique Google optimized e-Paper software.
246 Hull C<strong>on</strong>structi<strong>on</strong> Methods<br />
of 3 ⁄8" to 1 ⁄2" (9mm to 12mm) plywood, although for<br />
smaller, heavily curved hulls they may be as thin as 1 ⁄4"<br />
(6mm). Our sanding blocks are designed for ec<strong>on</strong>omical<br />
use of 11" � 71 ⁄2" (279mm � 190mm) sheets of<br />
sandpaper: we cut them in multiples of 11", up to 44"<br />
(1116mm) l<strong>on</strong>g. <str<strong>on</strong>g>The</str<strong>on</strong>g> width of the blocks is anywhere<br />
from 3" to 33 ⁄4" (75mm to 95mm) to fit a sheet of<br />
sandpaper cut in half lengthwise, and depends <strong>on</strong><br />
whether we want to attach paper to the block with<br />
staples <strong>on</strong> the edge or with feathering disc adhesive <strong>on</strong><br />
the flat area. We prefer to use adhesive because more of<br />
the sandpaper surface is exposed for use and it’s a little<br />
faster to change paper. While a 44" block may not be<br />
necessary in many cases, the 33" (840mm) block is a<br />
minimum for achieving overall fairness <strong>on</strong> hulls 15'<br />
(4.5m) and up.<br />
If you plan to clear coat your hull, you will want to<br />
avoid any deep sandpaper scratches, which may show<br />
<strong>on</strong> its surface. When you get to the point where you<br />
seem close to a final fairness, switch over to finer grit<br />
paper. Begin to direct your sanding strokes in the<br />
directi<strong>on</strong> of the grain rather than across it. When you<br />
are satisfied with your work, do final sanding with a<br />
shorter block. Work in the directi<strong>on</strong> of the grain to<br />
remove any cross-grain scratches.<br />
Even within a species of wood, sanding can be d<strong>on</strong>e<br />
at different rates. Lower density wood can be sanded<br />
a little easier than higher density wood, and a single<br />
piece of flat grain wood has hard and soft areas, which<br />
can end up rippled after sanding. <str<strong>on</strong>g>The</str<strong>on</strong>g>se factors can<br />
c<strong>on</strong>tribute to slight, yet difficult-to-remedy, variati<strong>on</strong>s in<br />
final fairing. C<strong>on</strong>tinued sanding sometimes <strong>on</strong>ly makes<br />
matters worse, as it removes material from softer areas<br />
and leaves slight “dishing” in the wood. When this<br />
happens, the best soluti<strong>on</strong> is to sand with sharp paper,<br />
changing it often, and to make liberal use of a block<br />
plane with a sharp, fine-set blade. You can usually<br />
avoid this whole problem, however, by choosing good,<br />
uniform, edge-grain veneers for the last layer of a<br />
laminated hull.<br />
Removing the Hull from the Mold<br />
Before you turn over the hull, make the cradles in which<br />
it will sit. To fit cradles perfectly, cover the hull with<br />
polyethylene and use it as a mold over which to laminate<br />
veneer, plywood, or fiberglass. This is a very good use<br />
of scrap veneer. Form two cradle seats, each 4" to 8"<br />
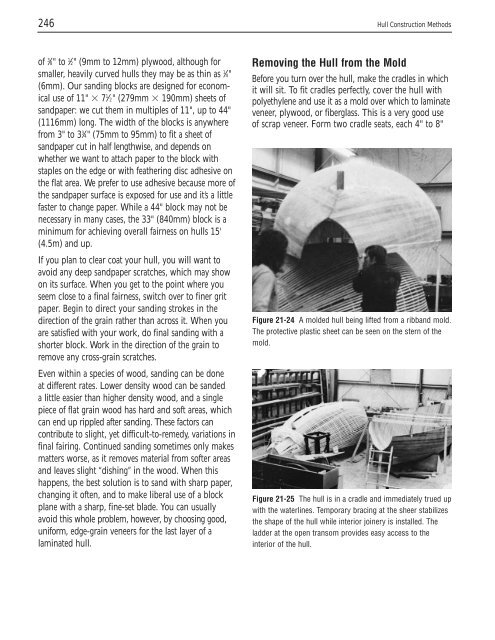
Figure 21-24 A molded hull being lifted from a ribband mold.<br />
<str<strong>on</strong>g>The</str<strong>on</strong>g> protective plastic sheet can be seen <strong>on</strong> the stern of the<br />
mold.<br />
Figure 21-25 <str<strong>on</strong>g>The</str<strong>on</strong>g> hull is in a cradle and immediately trued up<br />
with the waterlines. Temporary bracing at the sheer stabilizes<br />
the shape of the hull while interior joinery is installed. <str<strong>on</strong>g>The</str<strong>on</strong>g><br />
ladder at the open transom provides easy access to the<br />
interior of the hull.


