

The Gougeon Brothers on Boat Construction - WEST SYSTEM Epoxy
The Gougeon Brothers on Boat Construction - WEST SYSTEM Epoxy
The Gougeon Brothers on Boat Construction - WEST SYSTEM Epoxy

You also want an ePaper? Increase the reach of your titles
YUMPU automatically turns print PDFs into web optimized ePapers that Google loves.
200 First Producti<strong>on</strong> Steps<br />
<str<strong>on</strong>g>The</str<strong>on</strong>g> Centering Cable<br />
Before setting up the frames and jigging, run a cable the<br />
length of the boat to represent a centerline. This will be<br />
the reference for aligning frames and measuring stati<strong>on</strong><br />
lines. If you are building a large boat and can borrow or<br />
rent a transit, c<strong>on</strong>sider using it to make sure that your<br />
cable is accurately laid.<br />
A string will work for a centerline, but we prefer to<br />
use 1 ⁄16" or 3 ⁄32" (1.5mm or 2mm) diameter wire rope<br />
stretched to about 500-pounds (230kg) tensi<strong>on</strong>. <str<strong>on</strong>g>The</str<strong>on</strong>g><br />
cable stays taut and will not break or stretch if you trip<br />
<strong>on</strong> it. If your foundati<strong>on</strong> is the floor, run the centering<br />
cable an inch (25mm) or less above it. If you are using<br />
a str<strong>on</strong>gback, run it above the cross pieces. Anchor the<br />
centerline <strong>on</strong> guides outside bow and stern of the boat.<br />
For l<strong>on</strong>ger hulls you may want to add slotted support<br />
blocks at intervals al<strong>on</strong>g the length of the cable. Both<br />
guides and blocks should be indestructible. Set them<br />
so that even the clumsiest feet can’t move them after<br />
you’ve begun setting up.<br />
<str<strong>on</strong>g>The</str<strong>on</strong>g> centerline must be level so frames can be set up<br />
perpendicular to it. Use a line level, available at a<br />
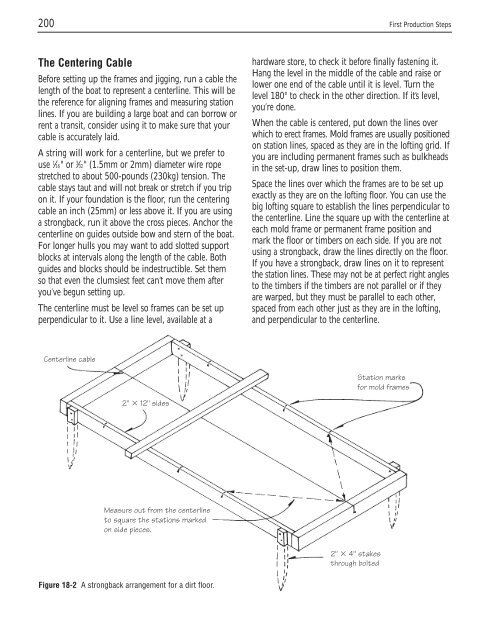
Centerline cable<br />
2" � 12" sides<br />
Measure out from the centerline<br />
to square the stati<strong>on</strong>s marked<br />
<strong>on</strong> side pieces.<br />
Figure 18-2 A str<strong>on</strong>gback arrangement for a dirt floor.<br />
hardware store, to check it before finally fastening it.<br />
Hang the level in the middle of the cable and raise or<br />
lower <strong>on</strong>e end of the cable until it is level. Turn the<br />
level 180° to check in the other directi<strong>on</strong>. If it’s level,<br />
you’re d<strong>on</strong>e.<br />
When the cable is centered, put down the lines over<br />
which to erect frames. Mold frames are usually positi<strong>on</strong>ed<br />
<strong>on</strong> stati<strong>on</strong> lines, spaced as they are in the lofting grid. If<br />
you are including permanent frames such as bulkheads<br />
in the set-up, draw lines to positi<strong>on</strong> them.<br />
Space the lines over which the frames are to be set up<br />
exactly as they are <strong>on</strong> the lofting floor. You can use the<br />
big lofting square to establish the lines perpendicular to<br />
the centerline. Line the square up with the centerline at<br />
each mold frame or permanent frame positi<strong>on</strong> and<br />
mark the floor or timbers <strong>on</strong> each side. If you are not<br />
using a str<strong>on</strong>gback, draw the lines directly <strong>on</strong> the floor.<br />
If you have a str<strong>on</strong>gback, draw lines <strong>on</strong> it to represent<br />
the stati<strong>on</strong> lines. <str<strong>on</strong>g>The</str<strong>on</strong>g>se may not be at perfect right angles<br />
to the timbers if the timbers are not parallel or if they<br />
are warped, but they must be parallel to each other,<br />
spaced from each other just as they are in the lofting,<br />
and perpendicular to the centerline.<br />
2" � 4" stakes<br />
through bolted<br />
Stati<strong>on</strong> marks<br />
for mold frames


