

The Gougeon Brothers on Boat Construction - WEST SYSTEM Epoxy
The Gougeon Brothers on Boat Construction - WEST SYSTEM Epoxy
The Gougeon Brothers on Boat Construction - WEST SYSTEM Epoxy

Create successful ePaper yourself
Turn your PDF publications into a flip-book with our unique Google optimized e-Paper software.
296 Hull C<strong>on</strong>structi<strong>on</strong> Methods<br />
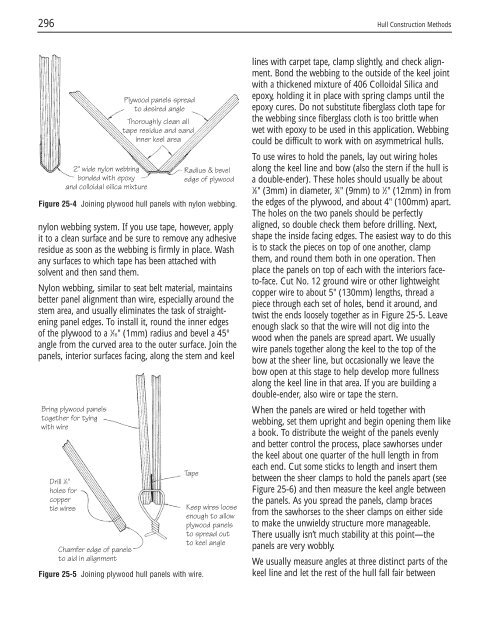
2" wide nyl<strong>on</strong> webbing<br />
b<strong>on</strong>ded with epoxy<br />
and colloidal silica mixture<br />
Figure 25-4 Joining plywood hull panels with nyl<strong>on</strong> webbing.<br />
nyl<strong>on</strong> webbing system. If you use tape, however, apply<br />
it to a clean surface and be sure to remove any adhesive<br />
residue as so<strong>on</strong> as the webbing is firmly in place. Wash<br />
any surfaces to which tape has been attached with<br />
solvent and then sand them.<br />
Nyl<strong>on</strong> webbing, similar to seat belt material, maintains<br />
better panel alignment than wire, especially around the<br />
stem area, and usually eliminates the task of straightening<br />
panel edges. To install it, round the inner edges<br />
of the plywood to a 1 ⁄16" (1mm) radius and bevel a 45°<br />
angle from the curved area to the outer surface. Join the<br />
panels, interior surfaces facing, al<strong>on</strong>g the stem and keel<br />
Bring plywood panels<br />
together for tying<br />
with wire<br />
Drill 1 ⁄8"<br />
holes for<br />
copper<br />
tie wires<br />
Chamfer edge of panels<br />
to aid in alignment<br />
Plywood panels spread<br />
to desired angle<br />
Thoroughly clean all<br />
tape residue and sand<br />
inner keel area<br />
Tape<br />
Figure 25-5 Joining plywood hull panels with wire.<br />
Radius & bevel<br />
edge of plywood<br />
Keep wires loose<br />
enough to allow<br />
plywood panels<br />
to spread out<br />
to keel angle<br />
lines with carpet tape, clamp slightly, and check alignment.<br />
B<strong>on</strong>d the webbing to the outside of the keel joint<br />
with a thickened mixture of 406 Colloidal Silica and<br />
epoxy, holding it in place with spring clamps until the<br />
epoxy cures. Do not substitute fiberglass cloth tape for<br />
the webbing since fiberglass cloth is too brittle when<br />
wet with epoxy to be used in this applicati<strong>on</strong>. Webbing<br />
could be difficult to work with <strong>on</strong> asymmetrical hulls.<br />
To use wires to hold the panels, lay out wiring holes<br />
al<strong>on</strong>g the keel line and bow (also the stern if the hull is<br />
a double-ender). <str<strong>on</strong>g>The</str<strong>on</strong>g>se holes should usually be about<br />
1 3 1 ⁄8" (3mm) in diameter, ⁄8" (9mm) to ⁄2" (12mm) in from<br />
the edges of the plywood, and about 4" (100mm) apart.<br />
<str<strong>on</strong>g>The</str<strong>on</strong>g> holes <strong>on</strong> the two panels should be perfectly<br />
aligned, so double check them before drilling. Next,<br />
shape the inside facing edges. <str<strong>on</strong>g>The</str<strong>on</strong>g> easiest way to do this<br />
is to stack the pieces <strong>on</strong> top of <strong>on</strong>e another, clamp<br />
them, and round them both in <strong>on</strong>e operati<strong>on</strong>. <str<strong>on</strong>g>The</str<strong>on</strong>g>n<br />
place the panels <strong>on</strong> top of each with the interiors faceto-face.<br />
Cut No. 12 ground wire or other lightweight<br />
copper wire to about 5" (130mm) lengths, thread a<br />
piece through each set of holes, bend it around, and<br />
twist the ends loosely together as in Figure 25-5. Leave<br />
enough slack so that the wire will not dig into the<br />
wood when the panels are spread apart. We usually<br />
wire panels together al<strong>on</strong>g the keel to the top of the<br />
bow at the sheer line, but occasi<strong>on</strong>ally we leave the<br />
bow open at this stage to help develop more fullness<br />
al<strong>on</strong>g the keel line in that area. If you are building a<br />
double-ender, also wire or tape the stern.<br />
When the panels are wired or held together with<br />
webbing, set them upright and begin opening them like<br />
a book. To distribute the weight of the panels evenly<br />
and better c<strong>on</strong>trol the process, place sawhorses under<br />
the keel about <strong>on</strong>e quarter of the hull length in from<br />
each end. Cut some sticks to length and insert them<br />
between the sheer clamps to hold the panels apart (see<br />
Figure 25-6) and then measure the keel angle between<br />
the panels. As you spread the panels, clamp braces<br />
from the sawhorses to the sheer clamps <strong>on</strong> either side<br />
to make the unwieldy structure more manageable.<br />
<str<strong>on</strong>g>The</str<strong>on</strong>g>re usually isn’t much stability at this point—the<br />
panels are very wobbly.<br />
We usually measure angles at three distinct parts of the<br />
keel line and let the rest of the hull fall fair between


