

The Gougeon Brothers on Boat Construction - WEST SYSTEM Epoxy
The Gougeon Brothers on Boat Construction - WEST SYSTEM Epoxy
The Gougeon Brothers on Boat Construction - WEST SYSTEM Epoxy

Create successful ePaper yourself
Turn your PDF publications into a flip-book with our unique Google optimized e-Paper software.
104 Core <strong>Boat</strong>building Techniques<br />
If the parts to be joined are uncoated, it’s a good idea to<br />
apply an initial coating of epoxy to the area of the joint.<br />
When fillets are made <strong>on</strong> bare wood, the substrate may<br />
absorb too much epoxy from the filleting mixture. <str<strong>on</strong>g>The</str<strong>on</strong>g>n,<br />
the mixture thickens and becomes almost impossible to<br />
work with. If the wood has been precoated, as described<br />
in Chapter 15, you will need <strong>on</strong>ly to sand the joint area<br />
to be sure of an adequate b<strong>on</strong>d.<br />
When the parts are ready, mix the epoxy and appropriate<br />
fillers. Good, smooth fillets depend <strong>on</strong> the correct thickness<br />
of the filleting mixture. With a little experience, you<br />
will quickly learn what works best for you. <str<strong>on</strong>g>The</str<strong>on</strong>g> viscosity<br />
of this mixture becomes more crucial with larger fillets.<br />
As the mass and weight of your epoxy/filler combinati<strong>on</strong><br />
increase, so does its tendency to sag.<br />
One soluti<strong>on</strong> to this problem is to make the mix even<br />
thicker, but this results in fillets which are difficult to<br />
apply and which will require a lot of clean up later. A<br />
thick filleting mixture may not properly penetrate the<br />
substrate and so may result in weak b<strong>on</strong>ding. We find<br />
that a two-step installati<strong>on</strong> procedure, applying about<br />
60% of the joint <strong>on</strong> the first pass and the remainder<br />
when this stiffens up, is effective in this situati<strong>on</strong>.<br />
Begin making your fillet by applying a liberal amount<br />
of fillet mixture to the mating edge of the joint. <str<strong>on</strong>g>The</str<strong>on</strong>g>n<br />
positi<strong>on</strong> the part so that its surmarks line up exactly,<br />
using staples, small nails, or clamps as appropriate to<br />
hold it temporarily in place. Much of the epoxy/filler<br />
mixture you use here will squeeze out and become part<br />
Figure 11-19 A disposable syringe being used to apply a<br />
bead of thickened epoxy.<br />
of the fillet; the rest will fill any gaps between the two<br />
parts. Next, apply fillet mixture all al<strong>on</strong>g the line of the<br />
joint in the quantity needed for the desired fillet size.<br />
Most often the mixing stick is used to move adhesive<br />
from pot to joint. <str<strong>on</strong>g>The</str<strong>on</strong>g> <strong>WEST</strong> <strong>SYSTEM</strong> 804 Mixing Stick<br />
has a round end for applying and shaping fillets and a<br />
beveled square end for scraping up excess epoxy.<br />
C<strong>on</strong>tinue using your stick to smooth out the fillet and<br />
to remove excess material and redeposit it where<br />
needed. Applying just the right amount of epoxy/filler<br />
blend to a joint is <strong>on</strong>e of the keys to filleting success. It<br />
is better to add just a little more than to end up short<br />
because it’s more difficult to add material later than to<br />
remove a little excess.<br />
In the past, we have recommended a variety of tools<br />
for fillet applicati<strong>on</strong>. Disposable cake decorating bags<br />
are clean and accurate for laying down a bead of fillet<br />
mixture, but they are difficult to find. Syringes, too,<br />
1<br />
2<br />
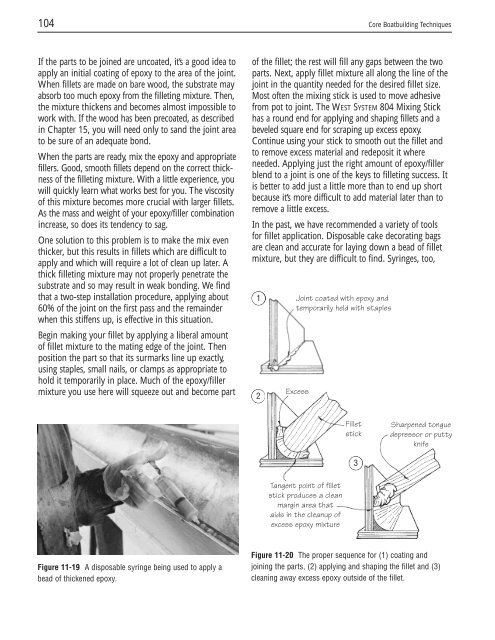
Joint coated with epoxy and<br />
temporarily held with staples<br />
Excess<br />
Tangent point of fillet<br />
stick produces a clean<br />
margin area that<br />
aids in the cleanup of<br />
excess epoxy mixture<br />
Fillet<br />
stick<br />
Sharpened t<strong>on</strong>gue<br />
depressor or putty<br />
knife<br />
Figure 11-20 <str<strong>on</strong>g>The</str<strong>on</strong>g> proper sequence for (1) coating and<br />
joining the parts, (2) applying and shaping the fillet and (3)<br />
cleaning away excess epoxy outside of the fillet.<br />
3


