

The Gougeon Brothers on Boat Construction - WEST SYSTEM Epoxy
The Gougeon Brothers on Boat Construction - WEST SYSTEM Epoxy
The Gougeon Brothers on Boat Construction - WEST SYSTEM Epoxy

You also want an ePaper? Increase the reach of your titles
YUMPU automatically turns print PDFs into web optimized ePapers that Google loves.
Chapter 22 – Stringer-Frame C<strong>on</strong>structi<strong>on</strong> 255<br />
a little easier to sight al<strong>on</strong>g the hull because you are<br />
dealing with a solid surface that offers more telltale signs<br />
of humps and hollows that might be present. With the<br />
stringer-frame method, the planing that you do <strong>on</strong> <strong>on</strong>e<br />
stringer or <strong>on</strong>e frame affects a large surface area in<br />
determining hull fairness. A good fairing batten and<br />
careful eyeballing will help you to achieve good overall<br />
fairness. Develop athwartship fairness by running the<br />
fairing battens at diag<strong>on</strong>al angles, as well as right angles,<br />
to the stringers. Check l<strong>on</strong>gitudinal fairness by sighting<br />
al<strong>on</strong>g your permanent stringers. In any areas of possible<br />
irregularity, clamp a large batten <strong>on</strong>to the offending<br />
stringer to see if it is, in fact, bending fair according to<br />
the batten. <str<strong>on</strong>g>The</str<strong>on</strong>g> favored tools for final fairing operati<strong>on</strong>s<br />
are a small hand-held block plane, a smoothing plane<br />
(keep both fine set and very sharp), and an 11" (280mm),<br />
flat wood sanding block with 50-grit sandpaper.<br />
I-Beam Frames<br />
With the stringer-frame system, it’s possible to build a<br />
permanent, I-beam-type frame. <str<strong>on</strong>g>The</str<strong>on</strong>g> benefit of doing<br />
this is that it can greatly stiffen the hull locally while<br />
taking up little interior space. This type of framing is<br />
not usually required throughout a hull, but it can be<br />
very useful in an area of hard curves. We sometimes use<br />
it, too, for deck c<strong>on</strong>structi<strong>on</strong>.<br />
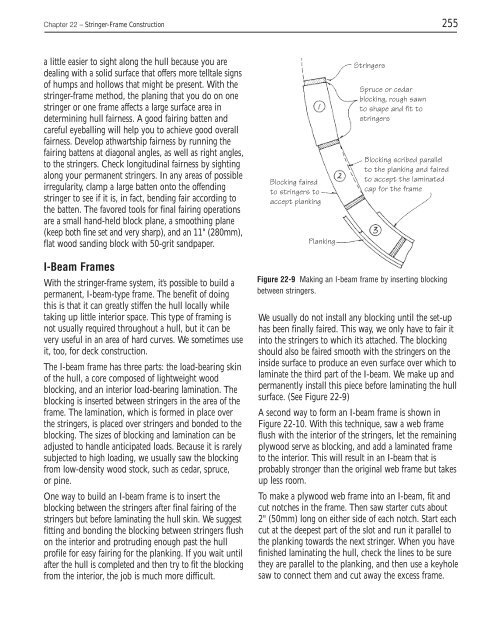
<str<strong>on</strong>g>The</str<strong>on</strong>g> I-beam frame has three parts: the load-bearing skin<br />
of the hull, a core composed of lightweight wood<br />
blocking, and an interior load-bearing laminati<strong>on</strong>. <str<strong>on</strong>g>The</str<strong>on</strong>g><br />
blocking is inserted between stringers in the area of the<br />
frame. <str<strong>on</strong>g>The</str<strong>on</strong>g> laminati<strong>on</strong>, which is formed in place over<br />
the stringers, is placed over stringers and b<strong>on</strong>ded to the<br />
blocking. <str<strong>on</strong>g>The</str<strong>on</strong>g> sizes of blocking and laminati<strong>on</strong> can be<br />
adjusted to handle anticipated loads. Because it is rarely<br />
subjected to high loading, we usually saw the blocking<br />
from low-density wood stock, such as cedar, spruce,<br />
or pine.<br />
One way to build an I-beam frame is to insert the<br />
blocking between the stringers after final fairing of the<br />
stringers but before laminating the hull skin. We suggest<br />
fitting and b<strong>on</strong>ding the blocking between stringers flush<br />
<strong>on</strong> the interior and protruding enough past the hull<br />
profile for easy fairing for the planking. If you wait until<br />
after the hull is completed and then try to fit the blocking<br />
from the interior, the job is much more difficult.<br />
Blocking faired<br />
to stringers to<br />
accept planking<br />
Planking<br />
Stringers<br />
Spruce or cedar<br />
blocking, rough sawn<br />
to shape and fit to<br />
stringers<br />
Blocking scribed parallel<br />
to the planking and faired<br />
to accept the laminated<br />
cap for the frame<br />
Figure 22-9 Making an I-beam frame by inserting blocking<br />
between stringers.<br />
We usually do not install any blocking until the set-up<br />
has been finally faired. This way, we <strong>on</strong>ly have to fair it<br />
into the stringers to which it’s attached. <str<strong>on</strong>g>The</str<strong>on</strong>g> blocking<br />
should also be faired smooth with the stringers <strong>on</strong> the<br />
inside surface to produce an even surface over which to<br />
laminate the third part of the I-beam. We make up and<br />
permanently install this piece before laminating the hull<br />
surface. (See Figure 22-9)<br />
A sec<strong>on</strong>d way to form an I-beam frame is shown in<br />
Figure 22-10. With this technique, saw a web frame<br />
flush with the interior of the stringers, let the remaining<br />
plywood serve as blocking, and add a laminated frame<br />
to the interior. This will result in an I-beam that is<br />
probably str<strong>on</strong>ger than the original web frame but takes<br />
up less room.<br />
To make a plywood web frame into an I-beam, fit and<br />
cut notches in the frame. <str<strong>on</strong>g>The</str<strong>on</strong>g>n saw starter cuts about<br />
2" (50mm) l<strong>on</strong>g <strong>on</strong> either side of each notch. Start each<br />
cut at the deepest part of the slot and run it parallel to<br />
the planking towards the next stringer. When you have<br />
finished laminating the hull, check the lines to be sure<br />
they are parallel to the planking, and then use a keyhole<br />
saw to c<strong>on</strong>nect them and cut away the excess frame.


