

The Gougeon Brothers on Boat Construction - WEST SYSTEM Epoxy
The Gougeon Brothers on Boat Construction - WEST SYSTEM Epoxy
The Gougeon Brothers on Boat Construction - WEST SYSTEM Epoxy

Create successful ePaper yourself
Turn your PDF publications into a flip-book with our unique Google optimized e-Paper software.
244 Hull C<strong>on</strong>structi<strong>on</strong> Methods<br />
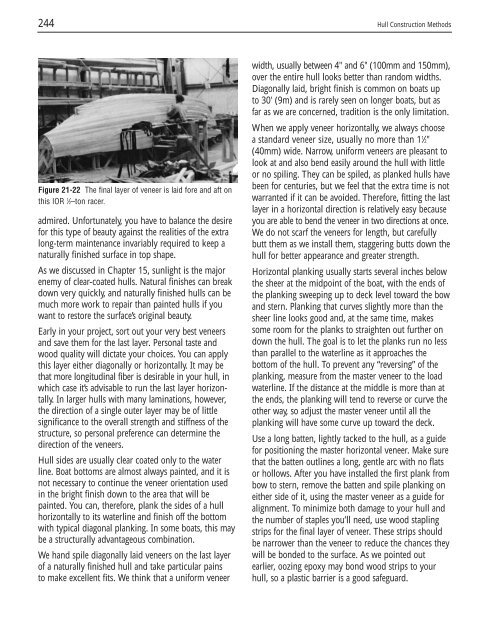
Figure 21-22 <str<strong>on</strong>g>The</str<strong>on</strong>g> final layer of veneer is laid fore and aft <strong>on</strong><br />
this IOR 1 ⁄2–t<strong>on</strong> racer.<br />
admired. Unfortunately, you have to balance the desire<br />
for this type of beauty against the realities of the extra<br />
l<strong>on</strong>g-term maintenance invariably required to keep a<br />
naturally finished surface in top shape.<br />
As we discussed in Chapter 15, sunlight is the major<br />
enemy of clear-coated hulls. Natural finishes can break<br />
down very quickly, and naturally finished hulls can be<br />
much more work to repair than painted hulls if you<br />
want to restore the surface’s original beauty.<br />
Early in your project, sort out your very best veneers<br />
and save them for the last layer. Pers<strong>on</strong>al taste and<br />
wood quality will dictate your choices. You can apply<br />
this layer either diag<strong>on</strong>ally or horiz<strong>on</strong>tally. It may be<br />
that more l<strong>on</strong>gitudinal fiber is desirable in your hull, in<br />
which case it’s advisable to run the last layer horiz<strong>on</strong>tally.<br />
In larger hulls with many laminati<strong>on</strong>s, however,<br />
the directi<strong>on</strong> of a single outer layer may be of little<br />
significance to the overall strength and stiffness of the<br />
structure, so pers<strong>on</strong>al preference can determine the<br />
directi<strong>on</strong> of the veneers.<br />
Hull sides are usually clear coated <strong>on</strong>ly to the water<br />
line. <strong>Boat</strong> bottoms are almost always painted, and it is<br />
not necessary to c<strong>on</strong>tinue the veneer orientati<strong>on</strong> used<br />
in the bright finish down to the area that will be<br />
painted. You can, therefore, plank the sides of a hull<br />
horiz<strong>on</strong>tally to its waterline and finish off the bottom<br />
with typical diag<strong>on</strong>al planking. In some boats, this may<br />
be a structurally advantageous combinati<strong>on</strong>.<br />
We hand spile diag<strong>on</strong>ally laid veneers <strong>on</strong> the last layer<br />
of a naturally finished hull and take particular pains<br />
to make excellent fits. We think that a uniform veneer<br />
width, usually between 4" and 6" (100mm and 150mm),<br />
over the entire hull looks better than random widths.<br />
Diag<strong>on</strong>ally laid, bright finish is comm<strong>on</strong> <strong>on</strong> boats up<br />
to 30' (9m) and is rarely seen <strong>on</strong> l<strong>on</strong>ger boats, but as<br />
far as we are c<strong>on</strong>cerned, traditi<strong>on</strong> is the <strong>on</strong>ly limitati<strong>on</strong>.<br />
When we apply veneer horiz<strong>on</strong>tally, we always choose<br />
a standard veneer size, usually no more than 11 ⁄2"<br />
(40mm) wide. Narrow, uniform veneers are pleasant to<br />
look at and also bend easily around the hull with little<br />
or no spiling. <str<strong>on</strong>g>The</str<strong>on</strong>g>y can be spiled, as planked hulls have<br />
been for centuries, but we feel that the extra time is not<br />
warranted if it can be avoided. <str<strong>on</strong>g>The</str<strong>on</strong>g>refore, fitting the last<br />
layer in a horiz<strong>on</strong>tal directi<strong>on</strong> is relatively easy because<br />
you are able to bend the veneer in two directi<strong>on</strong>s at <strong>on</strong>ce.<br />
We do not scarf the veneers for length, but carefully<br />
butt them as we install them, staggering butts down the<br />
hull for better appearance and greater strength.<br />
Horiz<strong>on</strong>tal planking usually starts several inches below<br />
the sheer at the midpoint of the boat, with the ends of<br />
the planking sweeping up to deck level toward the bow<br />
and stern. Planking that curves slightly more than the<br />
sheer line looks good and, at the same time, makes<br />
some room for the planks to straighten out further <strong>on</strong><br />
down the hull. <str<strong>on</strong>g>The</str<strong>on</strong>g> goal is to let the planks run no less<br />
than parallel to the waterline as it approaches the<br />
bottom of the hull. To prevent any “reversing” of the<br />
planking, measure from the master veneer to the load<br />
waterline. If the distance at the middle is more than at<br />
the ends, the planking will tend to reverse or curve the<br />
other way, so adjust the master veneer until all the<br />
planking will have some curve up toward the deck.<br />
Use a l<strong>on</strong>g batten, lightly tacked to the hull, as a guide<br />
for positi<strong>on</strong>ing the master horiz<strong>on</strong>tal veneer. Make sure<br />
that the batten outlines a l<strong>on</strong>g, gentle arc with no flats<br />
or hollows. After you have installed the first plank from<br />
bow to stern, remove the batten and spile planking <strong>on</strong><br />
either side of it, using the master veneer as a guide for<br />
alignment. To minimize both damage to your hull and<br />
the number of staples you’ll need, use wood stapling<br />
strips for the final layer of veneer. <str<strong>on</strong>g>The</str<strong>on</strong>g>se strips should<br />
be narrower than the veneer to reduce the chances they<br />
will be b<strong>on</strong>ded to the surface. As we pointed out<br />
earlier, oozing epoxy may b<strong>on</strong>d wood strips to your<br />
hull, so a plastic barrier is a good safeguard.


