

The Gougeon Brothers on Boat Construction - WEST SYSTEM Epoxy
The Gougeon Brothers on Boat Construction - WEST SYSTEM Epoxy
The Gougeon Brothers on Boat Construction - WEST SYSTEM Epoxy

You also want an ePaper? Increase the reach of your titles
YUMPU automatically turns print PDFs into web optimized ePapers that Google loves.
Chapter 11 – Laminating and B<strong>on</strong>ding Techniques 103<br />
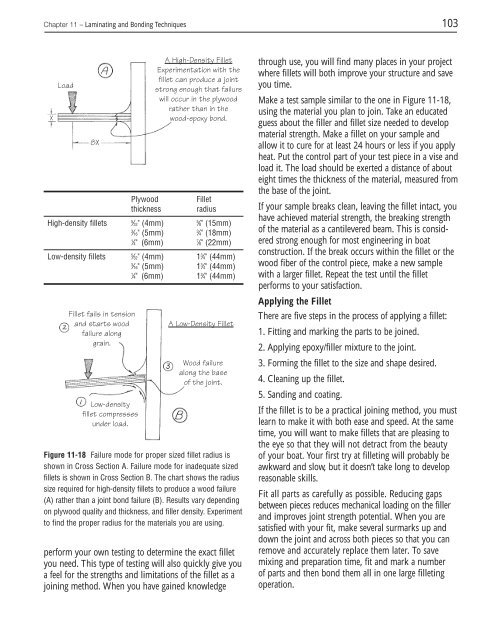
X<br />
Load<br />
8X<br />
A High-Density Fillet<br />
Experimentati<strong>on</strong> with the<br />
fillet can produce a joint<br />
str<strong>on</strong>g enough that failure<br />
will occur in the plywood<br />
rather than in the<br />
wood-epoxy b<strong>on</strong>d.<br />
Plywood Fillet<br />
thickness radius<br />
High-density fillets 5<br />
⁄32" (4mm) 5 ⁄8" (15mm)<br />
3<br />
⁄16" (5mm)<br />
3 ⁄4" (18mm)<br />
1 ⁄4" (6mm)<br />
7 ⁄8" (22mm)<br />
Low-density fillets 5<br />
⁄32" (4mm) 3 1 ⁄4" (44mm)<br />
3<br />
⁄16" (5mm) 3 1 ⁄4" (44mm)<br />
1 ⁄4" (6mm) 3 1 ⁄4" (44mm)<br />
Fillet fails in tensi<strong>on</strong><br />
and starts wood<br />
failure al<strong>on</strong>g<br />
grain.<br />
Low-density<br />
fillet compresses<br />
under load.<br />
A Low-Density Fillet<br />
Wood failure<br />
al<strong>on</strong>g the base<br />
of the joint.<br />
Figure 11-18 Failure mode for proper sized fillet radius is<br />
shown in Cross Secti<strong>on</strong> A. Failure mode for inadequate sized<br />
fillets is shown in Cross Secti<strong>on</strong> B. <str<strong>on</strong>g>The</str<strong>on</strong>g> chart shows the radius<br />
size required for high-density fillets to produce a wood failure<br />
(A) rather than a joint b<strong>on</strong>d failure (B). Results vary depending<br />
<strong>on</strong> plywood quality and thickness, and filler density. Experiment<br />
to find the proper radius for the materials you are using.<br />
perform your own testing to determine the exact fillet<br />
you need. This type of testing will also quickly give you<br />
a feel for the strengths and limitati<strong>on</strong>s of the fillet as a<br />
joining method. When you have gained knowledge<br />
through use, you will find many places in your project<br />
where fillets will both improve your structure and save<br />
you time.<br />
Make a test sample similar to the <strong>on</strong>e in Figure 11-18,<br />
using the material you plan to join. Take an educated<br />
guess about the filler and fillet size needed to develop<br />
material strength. Make a fillet <strong>on</strong> your sample and<br />
allow it to cure for at least 24 hours or less if you apply<br />
heat. Put the c<strong>on</strong>trol part of your test piece in a vise and<br />
load it. <str<strong>on</strong>g>The</str<strong>on</strong>g> load should be exerted a distance of about<br />
eight times the thickness of the material, measured from<br />
the base of the joint.<br />
If your sample breaks clean, leaving the fillet intact, you<br />
have achieved material strength, the breaking strength<br />
of the material as a cantilevered beam. This is c<strong>on</strong>sidered<br />
str<strong>on</strong>g enough for most engineering in boat<br />
c<strong>on</strong>structi<strong>on</strong>. If the break occurs within the fillet or the<br />
wood fiber of the c<strong>on</strong>trol piece, make a new sample<br />
with a larger fillet. Repeat the test until the fillet<br />
performs to your satisfacti<strong>on</strong>.<br />
Applying the Fillet<br />
<str<strong>on</strong>g>The</str<strong>on</strong>g>re are five steps in the process of applying a fillet:<br />
1. Fitting and marking the parts to be joined.<br />
2. Applying epoxy/filler mixture to the joint.<br />
3. Forming the fillet to the size and shape desired.<br />
4. Cleaning up the fillet.<br />
5. Sanding and coating.<br />
If the fillet is to be a practical joining method, you must<br />
learn to make it with both ease and speed. At the same<br />
time, you will want to make fillets that are pleasing to<br />
the eye so that they will not detract from the beauty<br />
of your boat. Your first try at filleting will probably be<br />
awkward and slow, but it doesn’t take l<strong>on</strong>g to develop<br />
reas<strong>on</strong>able skills.<br />
Fit all parts as carefully as possible. Reducing gaps<br />
between pieces reduces mechanical loading <strong>on</strong> the filler<br />
and improves joint strength potential. When you are<br />
satisfied with your fit, make several surmarks up and<br />
down the joint and across both pieces so that you can<br />
remove and accurately replace them later. To save<br />
mixing and preparati<strong>on</strong> time, fit and mark a number<br />
of parts and then b<strong>on</strong>d them all in <strong>on</strong>e large filleting<br />
operati<strong>on</strong>.


