

The Gougeon Brothers on Boat Construction - WEST SYSTEM Epoxy
The Gougeon Brothers on Boat Construction - WEST SYSTEM Epoxy
The Gougeon Brothers on Boat Construction - WEST SYSTEM Epoxy

Create successful ePaper yourself
Turn your PDF publications into a flip-book with our unique Google optimized e-Paper software.
Chapter 25 – Compounded Plywood C<strong>on</strong>structi<strong>on</strong> 303<br />
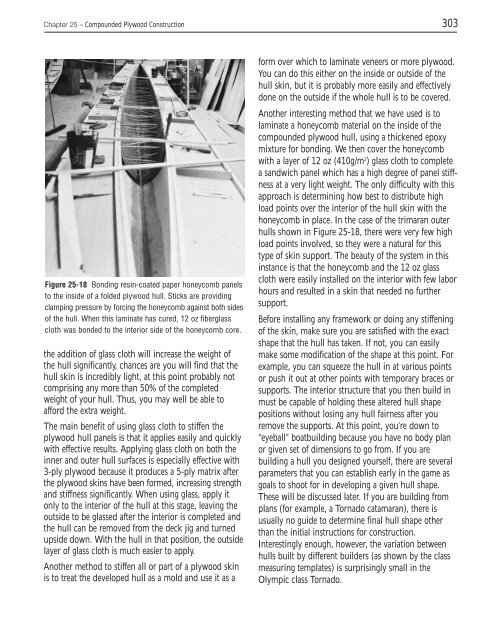
Figure 25-18 B<strong>on</strong>ding resin-coated paper h<strong>on</strong>eycomb panels<br />
to the inside of a folded plywood hull. Sticks are providing<br />
clamping pressure by forcing the h<strong>on</strong>eycomb against both sides<br />
of the hull. When this laminate has cured, 12 oz fiberglass<br />
cloth was b<strong>on</strong>ded to the interior side of the h<strong>on</strong>eycomb core.<br />
the additi<strong>on</strong> of glass cloth will increase the weight of<br />
the hull significantly, chances are you will find that the<br />
hull skin is incredibly light, at this point probably not<br />
comprising any more than 50% of the completed<br />
weight of your hull. Thus, you may well be able to<br />
afford the extra weight.<br />
<str<strong>on</strong>g>The</str<strong>on</strong>g> main benefit of using glass cloth to stiffen the<br />
plywood hull panels is that it applies easily and quickly<br />
with effective results. Applying glass cloth <strong>on</strong> both the<br />
inner and outer hull surfaces is especially effective with<br />
3-ply plywood because it produces a 5-ply matrix after<br />
the plywood skins have been formed, increasing strength<br />
and stiffness significantly. When using glass, apply it<br />
<strong>on</strong>ly to the interior of the hull at this stage, leaving the<br />
outside to be glassed after the interior is completed and<br />
the hull can be removed from the deck jig and turned<br />
upside down. With the hull in that positi<strong>on</strong>, the outside<br />
layer of glass cloth is much easier to apply.<br />
Another method to stiffen all or part of a plywood skin<br />
is to treat the developed hull as a mold and use it as a<br />
form over which to laminate veneers or more plywood.<br />
You can do this either <strong>on</strong> the inside or outside of the<br />
hull skin, but it is probably more easily and effectively<br />
d<strong>on</strong>e <strong>on</strong> the outside if the whole hull is to be covered.<br />
Another interesting method that we have used is to<br />
laminate a h<strong>on</strong>eycomb material <strong>on</strong> the inside of the<br />
compounded plywood hull, using a thickened epoxy<br />
mixture for b<strong>on</strong>ding. We then cover the h<strong>on</strong>eycomb<br />
with a layer of 12 oz (410g/m2 ) glass cloth to complete<br />
a sandwich panel which has a high degree of panel stiffness<br />
at a very light weight. <str<strong>on</strong>g>The</str<strong>on</strong>g> <strong>on</strong>ly difficulty with this<br />
approach is determining how best to distribute high<br />
load points over the interior of the hull skin with the<br />
h<strong>on</strong>eycomb in place. In the case of the trimaran outer<br />
hulls shown in Figure 25-18, there were very few high<br />
load points involved, so they were a natural for this<br />
type of skin support. <str<strong>on</strong>g>The</str<strong>on</strong>g> beauty of the system in this<br />
instance is that the h<strong>on</strong>eycomb and the 12 oz glass<br />
cloth were easily installed <strong>on</strong> the interior with few labor<br />
hours and resulted in a skin that needed no further<br />
support.<br />
Before installing any framework or doing any stiffening<br />
of the skin, make sure you are satisfied with the exact<br />
shape that the hull has taken. If not, you can easily<br />
make some modificati<strong>on</strong> of the shape at this point. For<br />
example, you can squeeze the hull in at various points<br />
or push it out at other points with temporary braces or<br />
supports. <str<strong>on</strong>g>The</str<strong>on</strong>g> interior structure that you then build in<br />
must be capable of holding these altered hull shape<br />
positi<strong>on</strong>s without losing any hull fairness after you<br />
remove the supports. At this point, you’re down to<br />
“eyeball” boatbuilding because you have no body plan<br />
or given set of dimensi<strong>on</strong>s to go from. If you are<br />
building a hull you designed yourself, there are several<br />
parameters that you can establish early in the game as<br />
goals to shoot for in developing a given hull shape.<br />
<str<strong>on</strong>g>The</str<strong>on</strong>g>se will be discussed later. If you are building from<br />
plans (for example, a Tornado catamaran), there is<br />
usually no guide to determine final hull shape other<br />
than the initial instructi<strong>on</strong>s for c<strong>on</strong>structi<strong>on</strong>.<br />
Interestingly enough, however, the variati<strong>on</strong> between<br />
hulls built by different builders (as shown by the class<br />
measuring templates) is surprisingly small in the<br />
Olympic class Tornado.


