

The Gougeon Brothers on Boat Construction - WEST SYSTEM Epoxy
The Gougeon Brothers on Boat Construction - WEST SYSTEM Epoxy
The Gougeon Brothers on Boat Construction - WEST SYSTEM Epoxy

You also want an ePaper? Increase the reach of your titles
YUMPU automatically turns print PDFs into web optimized ePapers that Google loves.
Chapter 14 – Hardware B<strong>on</strong>ding 145<br />
achieve optimum load distributi<strong>on</strong>, begin preparing for<br />
keel installati<strong>on</strong>. Do this well in advance so that when<br />
the time comes, the task of joining the keel and the hull<br />
can be accomplished with the least amount of grief.<br />
Pour the keel as so<strong>on</strong> as possible so that you will have<br />
plenty of time to prepare it for final installati<strong>on</strong>. Clean<br />
the casting and then rough up its surface with a wire<br />
brush to remove oxidati<strong>on</strong>. Coat the keel with epoxy<br />
and, while the epoxy is still wet, scrub it again with<br />
the wire brush. <strong>WEST</strong> <strong>SYSTEM</strong> epoxy b<strong>on</strong>ds well to clean<br />
lead surfaces. This coating will improve both paint<br />
adhesi<strong>on</strong> and the interface between the high-density<br />
lead and lower density epoxy, and it will also reduce<br />
immediate oxidati<strong>on</strong>. Fair the top of the keel where it<br />
will meet the hull. If it’s very heavy, you may want to<br />
build a special fixture for the keel so that you can roll<br />
it around the shop. (See Figures 14-23 and 14-24.)<br />
By far the easiest way to install bolts in a keel is to put<br />
them in a temporary fixture and pour the lead around<br />
them as the keel is made. When the bolts are in place,<br />
check them for dimensi<strong>on</strong>al accuracy. <str<strong>on</strong>g>The</str<strong>on</strong>g>y must be<br />
perpendicular to the b<strong>on</strong>ding surface of the keel and<br />
each must be parallel, both fore and aft and sideways,<br />
to the others.<br />
Centerline of ballast keel<br />
marked <strong>on</strong> the pattern<br />
Scrap plywood<br />
Plywood pads with holes drilled to the<br />
diameter of the keel bolts are dropped<br />
over the bolts and stapled to the main<br />
piece of the pattern<br />
Oversize holes in<br />
plywood<br />
Lead Keel<br />
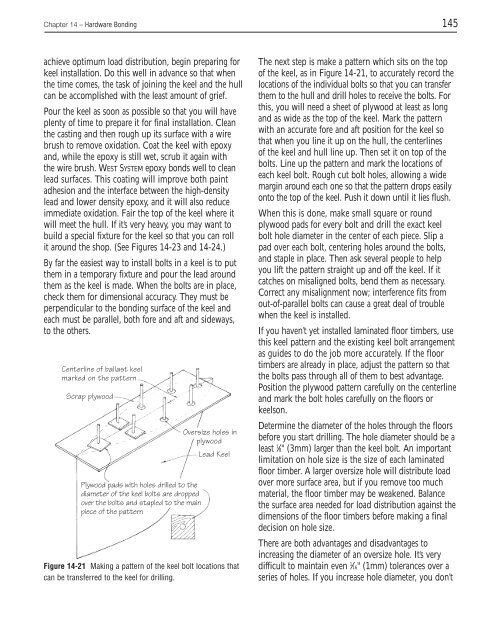
Figure 14-21 Making a pattern of the keel bolt locati<strong>on</strong>s that<br />
can be transferred to the keel for drilling.<br />
<str<strong>on</strong>g>The</str<strong>on</strong>g> next step is make a pattern which sits <strong>on</strong> the top<br />
of the keel, as in Figure 14-21, to accurately record the<br />
locati<strong>on</strong>s of the individual bolts so that you can transfer<br />
them to the hull and drill holes to receive the bolts. For<br />
this, you will need a sheet of plywood at least as l<strong>on</strong>g<br />
and as wide as the top of the keel. Mark the pattern<br />
with an accurate fore and aft positi<strong>on</strong> for the keel so<br />
that when you line it up <strong>on</strong> the hull, the centerlines<br />
of the keel and hull line up. <str<strong>on</strong>g>The</str<strong>on</strong>g>n set it <strong>on</strong> top of the<br />
bolts. Line up the pattern and mark the locati<strong>on</strong>s of<br />
each keel bolt. Rough cut bolt holes, allowing a wide<br />
margin around each <strong>on</strong>e so that the pattern drops easily<br />
<strong>on</strong>to the top of the keel. Push it down until it lies flush.<br />
When this is d<strong>on</strong>e, make small square or round<br />
plywood pads for every bolt and drill the exact keel<br />
bolt hole diameter in the center of each piece. Slip a<br />
pad over each bolt, centering holes around the bolts,<br />
and staple in place. <str<strong>on</strong>g>The</str<strong>on</strong>g>n ask several people to help<br />
you lift the pattern straight up and off the keel. If it<br />
catches <strong>on</strong> misaligned bolts, bend them as necessary.<br />
Correct any misalignment now; interference fits from<br />
out-of-parallel bolts can cause a great deal of trouble<br />
when the keel is installed.<br />
If you haven’t yet installed laminated floor timbers, use<br />
this keel pattern and the existing keel bolt arrangement<br />
as guides to do the job more accurately. If the floor<br />
timbers are already in place, adjust the pattern so that<br />
the bolts pass through all of them to best advantage.<br />
Positi<strong>on</strong> the plywood pattern carefully <strong>on</strong> the centerline<br />
and mark the bolt holes carefully <strong>on</strong> the floors or<br />
keels<strong>on</strong>.<br />
Determine the diameter of the holes through the floors<br />
before you start drilling. <str<strong>on</strong>g>The</str<strong>on</strong>g> hole diameter should be a<br />
least 1 ⁄8" (3mm) larger than the keel bolt. An important<br />
limitati<strong>on</strong> <strong>on</strong> hole size is the size of each laminated<br />
floor timber. A larger oversize hole will distribute load<br />
over more surface area, but if you remove too much<br />
material, the floor timber may be weakened. Balance<br />
the surface area needed for load distributi<strong>on</strong> against the<br />
dimensi<strong>on</strong>s of the floor timbers before making a final<br />
decisi<strong>on</strong> <strong>on</strong> hole size.<br />
<str<strong>on</strong>g>The</str<strong>on</strong>g>re are both advantages and disadvantages to<br />
increasing the diameter of an oversize hole. It’s very<br />
difficult to maintain even 1 ⁄16" (1mm) tolerances over a<br />
series of holes. If you increase hole diameter, you d<strong>on</strong>’t


