

The Gougeon Brothers on Boat Construction - WEST SYSTEM Epoxy
The Gougeon Brothers on Boat Construction - WEST SYSTEM Epoxy
The Gougeon Brothers on Boat Construction - WEST SYSTEM Epoxy

Create successful ePaper yourself
Turn your PDF publications into a flip-book with our unique Google optimized e-Paper software.
Chapter 23 – Strip Plank Laminated Veneer and Strip Composite C<strong>on</strong>structi<strong>on</strong> 271<br />
tub, such as the <strong>WEST</strong> <strong>SYSTEM</strong> 805 Mixing Pot, making<br />
up <strong>on</strong>ly enough at <strong>on</strong>e time to fill <strong>on</strong>e third of the tub’s<br />
volume. We apply it al<strong>on</strong>g the edge of the plank with<br />
the stick, applying a c<strong>on</strong>trolled amount of epoxy to the<br />
surface. If the epoxy is so thin that it runs easily off the<br />
stick, and perhaps off the edge of the plank, thicken it<br />
with more filler.<br />
After you have applied the thickened epoxy to <strong>on</strong>e edge<br />
of a plank, wet out the edge of the strip that has already<br />
been installed with a thin coat of unthickened epoxy.<br />
You can do this quickly with a foam roller cut to a good<br />
working width. Use the surmark you made earlier to<br />
line up the center of the new plank and the middle<br />
stati<strong>on</strong>. If the hull is very large, it’s difficult for <strong>on</strong>e<br />
pers<strong>on</strong> to install a plank without getting messy. Ideally,<br />
two or three people can work together, but if you are<br />
shorthanded, make some adjustable stands to hold the<br />
edges of the plank at the right height while you fasten<br />
its middle to the frames. As fastening progresses out<br />
towards the ends of the hull, move the stands inward<br />
and then remove them.<br />
Think of the plank that is being installed as the glue<br />
plank and the plank that has already been installed as<br />
the permanent plank. Begin by fastening the glue plank<br />
tight against the permanent plank about midway al<strong>on</strong>g<br />
the hull. Insert a screw through the glue plank into the<br />
mold frame. <str<strong>on</strong>g>The</str<strong>on</strong>g>n skip <strong>on</strong>e or two stati<strong>on</strong>s, depending<br />
<strong>on</strong> the size and curvature of the hull, and insert another<br />
screw into a mold frame. Hold the glue plank tight<br />
against the permanent plank so there is the best<br />
possible fit between them as you insert the screw. After<br />
you have fastened it at several mold frames <strong>on</strong> either<br />
side of the mid-hull frame, the glue plank will be under<br />
reas<strong>on</strong>able c<strong>on</strong>trol and you can fasten it easily to each<br />
frame in the set-up. If you have applied sufficient epoxy<br />
to the new plank, some should squeeze out. Most of<br />
this will be <strong>on</strong> the exterior of the hull because of the<br />
tapered gap between the planks, but some will invariably<br />
end up <strong>on</strong> the interior. Remove excess adhesive<br />
from both surfaces before it cures.<br />
Edge Fastening<br />
It is comm<strong>on</strong> to have some misalignment between<br />
planks in the areas between the mold frames. To keep<br />
this misalignment to a minimum, you should allow<br />
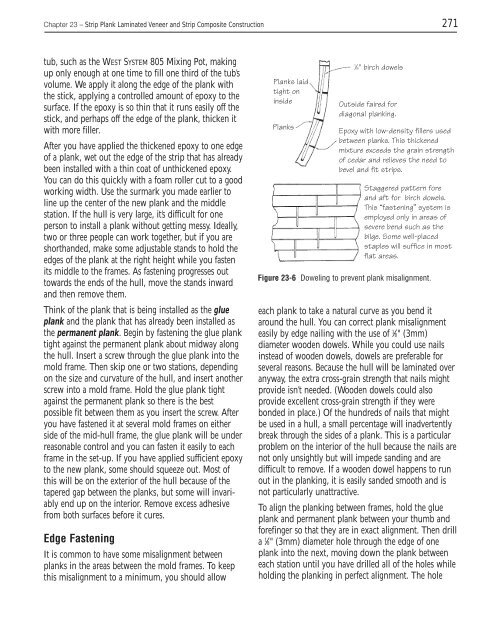
Planks laid<br />
tight <strong>on</strong><br />
inside<br />
Planks<br />
1 ⁄8" birch dowels<br />
Outside faired for<br />
diag<strong>on</strong>al planking.<br />
<strong>Epoxy</strong> with low-density fillers used<br />
between planks. This thickened<br />
mixture exceeds the grain strength<br />
of cedar and relieves the need to<br />
bevel and fit strips.<br />
Staggered pattern fore<br />
and aft for birch dowels.<br />
This “fastening” system is<br />
employed <strong>on</strong>ly in areas of<br />
severe bend such as the<br />
bilge. Some well-placed<br />
staples will suffice in most<br />
flat areas.<br />
Figure 23-6 Doweling to prevent plank misalignment.<br />
each plank to take a natural curve as you bend it<br />
around the hull. You can correct plank misalignment<br />
easily by edge nailing with the use of 1 ⁄8" (3mm)<br />
diameter wooden dowels. While you could use nails<br />
instead of wooden dowels, dowels are preferable for<br />
several reas<strong>on</strong>s. Because the hull will be laminated over<br />
anyway, the extra cross-grain strength that nails might<br />
provide isn’t needed. (Wooden dowels could also<br />
provide excellent cross-grain strength if they were<br />
b<strong>on</strong>ded in place.) Of the hundreds of nails that might<br />
be used in a hull, a small percentage will inadvertently<br />
break through the sides of a plank. This is a particular<br />
problem <strong>on</strong> the interior of the hull because the nails are<br />
not <strong>on</strong>ly unsightly but will impede sanding and are<br />
difficult to remove. If a wooden dowel happens to run<br />
out in the planking, it is easily sanded smooth and is<br />
not particularly unattractive.<br />
To align the planking between frames, hold the glue<br />
plank and permanent plank between your thumb and<br />
forefinger so that they are in exact alignment. <str<strong>on</strong>g>The</str<strong>on</strong>g>n drill<br />
a 1 ⁄8" (3mm) diameter hole through the edge of <strong>on</strong>e<br />
plank into the next, moving down the plank between<br />
each stati<strong>on</strong> until you have drilled all of the holes while<br />
holding the planking in perfect alignment. <str<strong>on</strong>g>The</str<strong>on</strong>g> hole


