

The Gougeon Brothers on Boat Construction - WEST SYSTEM Epoxy
The Gougeon Brothers on Boat Construction - WEST SYSTEM Epoxy
The Gougeon Brothers on Boat Construction - WEST SYSTEM Epoxy

Create successful ePaper yourself
Turn your PDF publications into a flip-book with our unique Google optimized e-Paper software.
210 First Producti<strong>on</strong> Steps<br />
Stem laminati<strong>on</strong>s are usually thicker and may present<br />
greater springback problems. If it’s impossible to push a<br />
stem into shape, you may have to laminate extra stock<br />
<strong>on</strong>to <strong>on</strong>e side and plane away wood from the other to<br />
regain the designed curve.<br />
Laminating Forms<br />
<str<strong>on</strong>g>The</str<strong>on</strong>g> stem may be the largest and most difficult laminated<br />
piece in your hull. It’s also usually <strong>on</strong>e of the first laminated<br />
comp<strong>on</strong>ents you’ll need. Practice with a dry run<br />
before applying <strong>WEST</strong> <strong>SYSTEM</strong> ® epoxy to the stem blank.<br />
We usually lay out and b<strong>on</strong>d stem blanks <strong>on</strong> the floor,<br />
using triangular blocks to make a form as described in<br />
Chapter 11. Take care to avoid any twisting in the<br />
laminate. <str<strong>on</strong>g>The</str<strong>on</strong>g> stem is aligned al<strong>on</strong>g the centerline of a<br />
boat so any distorti<strong>on</strong> will complicate marking the<br />
centerline and positi<strong>on</strong>ing the stem in the set-up.<br />
Triangular blocks may also be used to laminate keel<br />
blanks. We often laminate keels right <strong>on</strong> our set-ups,<br />
using mold frames as forms. <str<strong>on</strong>g>The</str<strong>on</strong>g> difficulty with this<br />
is that the laminating stock is usually wider than the<br />
trimmed keel will be, so the laminati<strong>on</strong> must be<br />
completed before any notches for the keel can be cut in<br />
the permanent or mold frames. <str<strong>on</strong>g>The</str<strong>on</strong>g> trick is to work out<br />
an adequate form without damaging the mold frames.<br />
We recommend the following procedure in this situati<strong>on</strong>.<br />
Measure up from the bottom of the marked keel<br />
notch enough to clear the notch. Draw a line across the<br />
frame, parallel to the base of the notch. Mark all frames<br />
in this way and saw them off flush with these lines.<br />
Screw or clamp 11 ⁄2" (38mm) square cleats or blocks<br />
to the c<strong>on</strong>trol sides of all mold frames. Clamp them to<br />
permanent frames. <str<strong>on</strong>g>The</str<strong>on</strong>g>se will be points that you can<br />
clamp to the keel blank. Include limber holes at the<br />
frame/keel joints by cutting notches a little wider than<br />
needed for the keel blank. Be careful not to remove so<br />
much stock that the frame becomes too weak to support<br />
and outline the hull shape. On thick keels, limber holes<br />
that do not extend the full depth of the notches can<br />
work effectively.<br />
You may need temporary jigging aft of the transom and<br />
up around the bow for laminating to help coax the keel<br />
blank into bending as it approaches these areas. This<br />
jigging can c<strong>on</strong>sist of a temporary additi<strong>on</strong> to a bow<br />
frame and a partial frame just aft of the transom.<br />
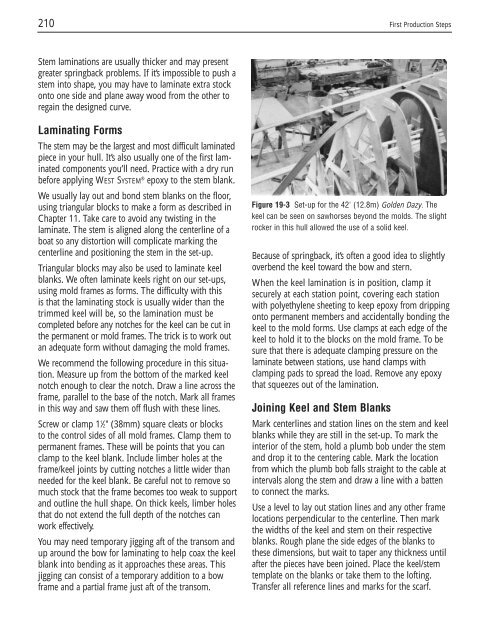
Figure 19-3 Set-up for the 42' (12.8m) Golden Dazy. <str<strong>on</strong>g>The</str<strong>on</strong>g><br />
keel can be seen <strong>on</strong> sawhorses bey<strong>on</strong>d the molds. <str<strong>on</strong>g>The</str<strong>on</strong>g> slight<br />
rocker in this hull allowed the use of a solid keel.<br />
Because of springback, it’s often a good idea to slightly<br />
overbend the keel toward the bow and stern.<br />
When the keel laminati<strong>on</strong> is in positi<strong>on</strong>, clamp it<br />
securely at each stati<strong>on</strong> point, covering each stati<strong>on</strong><br />
with polyethylene sheeting to keep epoxy from dripping<br />
<strong>on</strong>to permanent members and accidentally b<strong>on</strong>ding the<br />
keel to the mold forms. Use clamps at each edge of the<br />
keel to hold it to the blocks <strong>on</strong> the mold frame. To be<br />
sure that there is adequate clamping pressure <strong>on</strong> the<br />
laminate between stati<strong>on</strong>s, use hand clamps with<br />
clamping pads to spread the load. Remove any epoxy<br />
that squeezes out of the laminati<strong>on</strong>.<br />
Joining Keel and Stem Blanks<br />
Mark centerlines and stati<strong>on</strong> lines <strong>on</strong> the stem and keel<br />
blanks while they are still in the set-up. To mark the<br />
interior of the stem, hold a plumb bob under the stem<br />
and drop it to the centering cable. Mark the locati<strong>on</strong><br />
from which the plumb bob falls straight to the cable at<br />
intervals al<strong>on</strong>g the stem and draw a line with a batten<br />
to c<strong>on</strong>nect the marks.<br />
Use a level to lay out stati<strong>on</strong> lines and any other frame<br />
locati<strong>on</strong>s perpendicular to the centerline. <str<strong>on</strong>g>The</str<strong>on</strong>g>n mark<br />
the widths of the keel and stem <strong>on</strong> their respective<br />
blanks. Rough plane the side edges of the blanks to<br />
these dimensi<strong>on</strong>s, but wait to taper any thickness until<br />
after the pieces have been joined. Place the keel/stem<br />
template <strong>on</strong> the blanks or take them to the lofting.<br />
Transfer all reference lines and marks for the scarf.


