

The Gougeon Brothers on Boat Construction - WEST SYSTEM Epoxy
The Gougeon Brothers on Boat Construction - WEST SYSTEM Epoxy
The Gougeon Brothers on Boat Construction - WEST SYSTEM Epoxy

Create successful ePaper yourself
Turn your PDF publications into a flip-book with our unique Google optimized e-Paper software.
Chapter 24 – Hard Chine Plywood C<strong>on</strong>structi<strong>on</strong> 285<br />
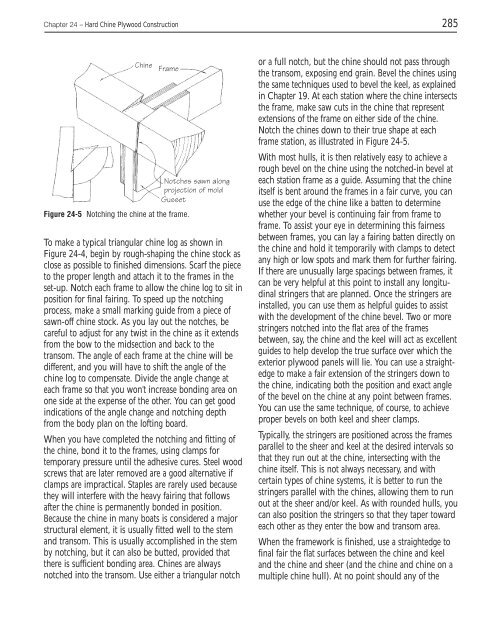
Chine Frame<br />
Figure 24-5 Notching the chine at the frame.<br />
Notches sawn al<strong>on</strong>g<br />
projecti<strong>on</strong> of mold<br />
Gusset<br />
To make a typical triangular chine log as shown in<br />
Figure 24-4, begin by rough-shaping the chine stock as<br />
close as possible to finished dimensi<strong>on</strong>s. Scarf the piece<br />
to the proper length and attach it to the frames in the<br />
set-up. Notch each frame to allow the chine log to sit in<br />
positi<strong>on</strong> for final fairing. To speed up the notching<br />
process, make a small marking guide from a piece of<br />
sawn-off chine stock. As you lay out the notches, be<br />
careful to adjust for any twist in the chine as it extends<br />
from the bow to the midsecti<strong>on</strong> and back to the<br />
transom. <str<strong>on</strong>g>The</str<strong>on</strong>g> angle of each frame at the chine will be<br />
different, and you will have to shift the angle of the<br />
chine log to compensate. Divide the angle change at<br />
each frame so that you w<strong>on</strong>’t increase b<strong>on</strong>ding area <strong>on</strong><br />
<strong>on</strong>e side at the expense of the other. You can get good<br />
indicati<strong>on</strong>s of the angle change and notching depth<br />
from the body plan <strong>on</strong> the lofting board.<br />
When you have completed the notching and fitting of<br />
the chine, b<strong>on</strong>d it to the frames, using clamps for<br />
temporary pressure until the adhesive cures. Steel wood<br />
screws that are later removed are a good alternative if<br />
clamps are impractical. Staples are rarely used because<br />
they will interfere with the heavy fairing that follows<br />
after the chine is permanently b<strong>on</strong>ded in positi<strong>on</strong>.<br />
Because the chine in many boats is c<strong>on</strong>sidered a major<br />
structural element, it is usually fitted well to the stem<br />
and transom. This is usually accomplished in the stem<br />
by notching, but it can also be butted, provided that<br />
there is sufficient b<strong>on</strong>ding area. Chines are always<br />
notched into the transom. Use either a triangular notch<br />
or a full notch, but the chine should not pass through<br />
the transom, exposing end grain. Bevel the chines using<br />
the same techniques used to bevel the keel, as explained<br />
in Chapter 19. At each stati<strong>on</strong> where the chine intersects<br />
the frame, make saw cuts in the chine that represent<br />
extensi<strong>on</strong>s of the frame <strong>on</strong> either side of the chine.<br />
Notch the chines down to their true shape at each<br />
frame stati<strong>on</strong>, as illustrated in Figure 24-5.<br />
With most hulls, it is then relatively easy to achieve a<br />
rough bevel <strong>on</strong> the chine using the notched-in bevel at<br />
each stati<strong>on</strong> frame as a guide. Assuming that the chine<br />
itself is bent around the frames in a fair curve, you can<br />
use the edge of the chine like a batten to determine<br />
whether your bevel is c<strong>on</strong>tinuing fair from frame to<br />
frame. To assist your eye in determining this fairness<br />
between frames, you can lay a fairing batten directly <strong>on</strong><br />
the chine and hold it temporarily with clamps to detect<br />
any high or low spots and mark them for further fairing.<br />
If there are unusually large spacings between frames, it<br />
can be very helpful at this point to install any l<strong>on</strong>gitudinal<br />
stringers that are planned. Once the stringers are<br />
installed, you can use them as helpful guides to assist<br />
with the development of the chine bevel. Two or more<br />
stringers notched into the flat area of the frames<br />
between, say, the chine and the keel will act as excellent<br />
guides to help develop the true surface over which the<br />
exterior plywood panels will lie. You can use a straightedge<br />
to make a fair extensi<strong>on</strong> of the stringers down to<br />
the chine, indicating both the positi<strong>on</strong> and exact angle<br />
of the bevel <strong>on</strong> the chine at any point between frames.<br />
You can use the same technique, of course, to achieve<br />
proper bevels <strong>on</strong> both keel and sheer clamps.<br />
Typically, the stringers are positi<strong>on</strong>ed across the frames<br />
parallel to the sheer and keel at the desired intervals so<br />
that they run out at the chine, intersecting with the<br />
chine itself. This is not always necessary, and with<br />
certain types of chine systems, it is better to run the<br />
stringers parallel with the chines, allowing them to run<br />
out at the sheer and/or keel. As with rounded hulls, you<br />
can also positi<strong>on</strong> the stringers so that they taper toward<br />
each other as they enter the bow and transom area.<br />
When the framework is finished, use a straightedge to<br />
final fair the flat surfaces between the chine and keel<br />
and the chine and sheer (and the chine and chine <strong>on</strong> a<br />
multiple chine hull). At no point should any of the


