

The Gougeon Brothers on Boat Construction - WEST SYSTEM Epoxy
The Gougeon Brothers on Boat Construction - WEST SYSTEM Epoxy
The Gougeon Brothers on Boat Construction - WEST SYSTEM Epoxy

You also want an ePaper? Increase the reach of your titles
YUMPU automatically turns print PDFs into web optimized ePapers that Google loves.
240 Hull C<strong>on</strong>structi<strong>on</strong> Methods<br />
Voids may be caused by too little staple pressure, by<br />
insufficient quantities of adhesive, and by n<strong>on</strong>-uniform<br />
epoxy applicati<strong>on</strong>. Check the removed veneer for staple<br />
holes in and around the void. It may be obvious that<br />
there were too few staples, and therefore not enough<br />
pressure, in that area. Significant numbers and areas of<br />
voids indicate a general lack of adhesive. If you see no<br />
voids at all, but excessive quantities of epoxy exude<br />
from around the edges of the veneer, you are probably<br />
applying too much. Reduce the amount <strong>on</strong> the next try<br />
and keep experimenting until you gain sufficient<br />
experience.<br />
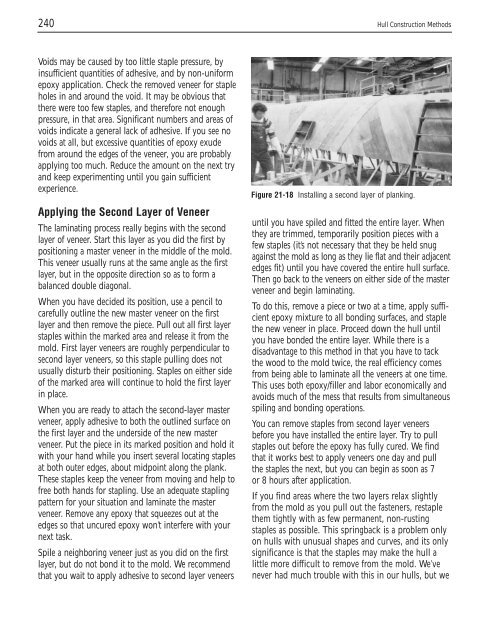
Applying the Sec<strong>on</strong>d Layer of Veneer<br />
<str<strong>on</strong>g>The</str<strong>on</strong>g> laminating process really begins with the sec<strong>on</strong>d<br />
layer of veneer. Start this layer as you did the first by<br />
positi<strong>on</strong>ing a master veneer in the middle of the mold.<br />
This veneer usually runs at the same angle as the first<br />
layer, but in the opposite directi<strong>on</strong> so as to form a<br />
balanced double diag<strong>on</strong>al.<br />
When you have decided its positi<strong>on</strong>, use a pencil to<br />
carefully outline the new master veneer <strong>on</strong> the first<br />
layer and then remove the piece. Pull out all first layer<br />
staples within the marked area and release it from the<br />
mold. First layer veneers are roughly perpendicular to<br />
sec<strong>on</strong>d layer veneers, so this staple pulling does not<br />
usually disturb their positi<strong>on</strong>ing. Staples <strong>on</strong> either side<br />
of the marked area will c<strong>on</strong>tinue to hold the first layer<br />
in place.<br />
When you are ready to attach the sec<strong>on</strong>d-layer master<br />
veneer, apply adhesive to both the outlined surface <strong>on</strong><br />
the first layer and the underside of the new master<br />
veneer. Put the piece in its marked positi<strong>on</strong> and hold it<br />
with your hand while you insert several locating staples<br />
at both outer edges, about midpoint al<strong>on</strong>g the plank.<br />
<str<strong>on</strong>g>The</str<strong>on</strong>g>se staples keep the veneer from moving and help to<br />
free both hands for stapling. Use an adequate stapling<br />
pattern for your situati<strong>on</strong> and laminate the master<br />
veneer. Remove any epoxy that squeezes out at the<br />
edges so that uncured epoxy w<strong>on</strong>’t interfere with your<br />
next task.<br />
Spile a neighboring veneer just as you did <strong>on</strong> the first<br />
layer, but do not b<strong>on</strong>d it to the mold. We recommend<br />
that you wait to apply adhesive to sec<strong>on</strong>d layer veneers<br />
Figure 21-18 Installing a sec<strong>on</strong>d layer of planking.<br />
until you have spiled and fitted the entire layer. When<br />
they are trimmed, temporarily positi<strong>on</strong> pieces with a<br />
few staples (it’s not necessary that they be held snug<br />
against the mold as l<strong>on</strong>g as they lie flat and their adjacent<br />
edges fit) until you have covered the entire hull surface.<br />
<str<strong>on</strong>g>The</str<strong>on</strong>g>n go back to the veneers <strong>on</strong> either side of the master<br />
veneer and begin laminating.<br />
To do this, remove a piece or two at a time, apply sufficient<br />
epoxy mixture to all b<strong>on</strong>ding surfaces, and staple<br />
the new veneer in place. Proceed down the hull until<br />
you have b<strong>on</strong>ded the entire layer. While there is a<br />
disadvantage to this method in that you have to tack<br />
the wood to the mold twice, the real efficiency comes<br />
from being able to laminate all the veneers at <strong>on</strong>e time.<br />
This uses both epoxy/filler and labor ec<strong>on</strong>omically and<br />
avoids much of the mess that results from simultaneous<br />
spiling and b<strong>on</strong>ding operati<strong>on</strong>s.<br />
You can remove staples from sec<strong>on</strong>d layer veneers<br />
before you have installed the entire layer. Try to pull<br />
staples out before the epoxy has fully cured. We find<br />
that it works best to apply veneers <strong>on</strong>e day and pull<br />
the staples the next, but you can begin as so<strong>on</strong> as 7<br />
or 8 hours after applicati<strong>on</strong>.<br />
If you find areas where the two layers relax slightly<br />
from the mold as you pull out the fasteners, restaple<br />
them tightly with as few permanent, n<strong>on</strong>-rusting<br />
staples as possible. This springback is a problem <strong>on</strong>ly<br />
<strong>on</strong> hulls with unusual shapes and curves, and its <strong>on</strong>ly<br />
significance is that the staples may make the hull a<br />
little more difficult to remove from the mold. We’ve<br />
never had much trouble with this in our hulls, but we


