

The Gougeon Brothers on Boat Construction - WEST SYSTEM Epoxy
The Gougeon Brothers on Boat Construction - WEST SYSTEM Epoxy
The Gougeon Brothers on Boat Construction - WEST SYSTEM Epoxy

Create successful ePaper yourself
Turn your PDF publications into a flip-book with our unique Google optimized e-Paper software.
168 First Producti<strong>on</strong> Steps<br />
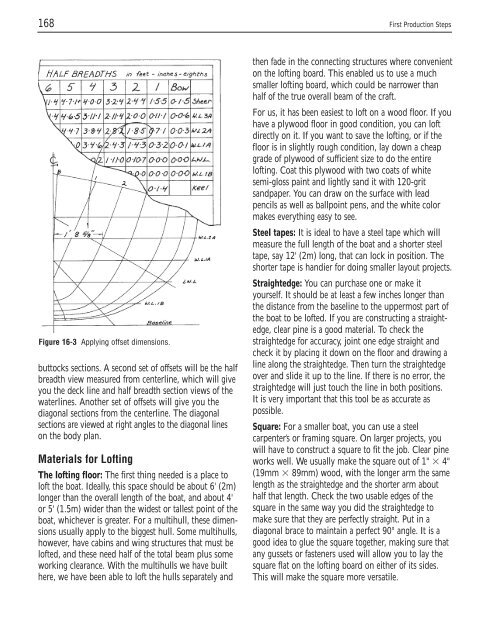
Figure 16-3 Applying offset dimensi<strong>on</strong>s.<br />
buttocks secti<strong>on</strong>s. A sec<strong>on</strong>d set of offsets will be the half<br />
breadth view measured from centerline, which will give<br />
you the deck line and half breadth secti<strong>on</strong> views of the<br />
waterlines. Another set of offsets will give you the<br />
diag<strong>on</strong>al secti<strong>on</strong>s from the centerline. <str<strong>on</strong>g>The</str<strong>on</strong>g> diag<strong>on</strong>al<br />
secti<strong>on</strong>s are viewed at right angles to the diag<strong>on</strong>al lines<br />
<strong>on</strong> the body plan.<br />
Materials for Lofting<br />
<str<strong>on</strong>g>The</str<strong>on</strong>g> lofting floor: <str<strong>on</strong>g>The</str<strong>on</strong>g> first thing needed is a place to<br />
loft the boat. Ideally, this space should be about 6' (2m)<br />
l<strong>on</strong>ger than the overall length of the boat, and about 4'<br />
or 5' (1.5m) wider than the widest or tallest point of the<br />
boat, whichever is greater. For a multihull, these dimensi<strong>on</strong>s<br />
usually apply to the biggest hull. Some multihulls,<br />
however, have cabins and wing structures that must be<br />
lofted, and these need half of the total beam plus some<br />
working clearance. With the multihulls we have built<br />
here, we have been able to loft the hulls separately and<br />
then fade in the c<strong>on</strong>necting structures where c<strong>on</strong>venient<br />
<strong>on</strong> the lofting board. This enabled us to use a much<br />
smaller lofting board, which could be narrower than<br />
half of the true overall beam of the craft.<br />
For us, it has been easiest to loft <strong>on</strong> a wood floor. If you<br />
have a plywood floor in good c<strong>on</strong>diti<strong>on</strong>, you can loft<br />
directly <strong>on</strong> it. If you want to save the lofting, or if the<br />
floor is in slightly rough c<strong>on</strong>diti<strong>on</strong>, lay down a cheap<br />
grade of plywood of sufficient size to do the entire<br />
lofting. Coat this plywood with two coats of white<br />
semi-gloss paint and lightly sand it with 120-grit<br />
sandpaper. You can draw <strong>on</strong> the surface with lead<br />
pencils as well as ballpoint pens, and the white color<br />
makes everything easy to see.<br />
Steel tapes: It is ideal to have a steel tape which will<br />
measure the full length of the boat and a shorter steel<br />
tape, say 12' (2m) l<strong>on</strong>g, that can lock in positi<strong>on</strong>. <str<strong>on</strong>g>The</str<strong>on</strong>g><br />
shorter tape is handier for doing smaller layout projects.<br />
Straightedge: You can purchase <strong>on</strong>e or make it<br />
yourself. It should be at least a few inches l<strong>on</strong>ger than<br />
the distance from the baseline to the uppermost part of<br />
the boat to be lofted. If you are c<strong>on</strong>structing a straightedge,<br />
clear pine is a good material. To check the<br />
straightedge for accuracy, joint <strong>on</strong>e edge straight and<br />
check it by placing it down <strong>on</strong> the floor and drawing a<br />
line al<strong>on</strong>g the straightedge. <str<strong>on</strong>g>The</str<strong>on</strong>g>n turn the straightedge<br />
over and slide it up to the line. If there is no error, the<br />
straightedge will just touch the line in both positi<strong>on</strong>s.<br />
It is very important that this tool be as accurate as<br />
possible.<br />
Square: For a smaller boat, you can use a steel<br />
carpenter’s or framing square. On larger projects, you<br />
will have to c<strong>on</strong>struct a square to fit the job. Clear pine<br />
works well. We usually make the square out of 1" � 4"<br />
(19mm � 89mm) wood, with the l<strong>on</strong>ger arm the same<br />
length as the straightedge and the shorter arm about<br />
half that length. Check the two usable edges of the<br />
square in the same way you did the straightedge to<br />
make sure that they are perfectly straight. Put in a<br />
diag<strong>on</strong>al brace to maintain a perfect 90° angle. It is a<br />
good idea to glue the square together, making sure that<br />
any gussets or fasteners used will allow you to lay the<br />
square flat <strong>on</strong> the lofting board <strong>on</strong> either of its sides.<br />
This will make the square more versatile.


