

The Gougeon Brothers on Boat Construction - WEST SYSTEM Epoxy
The Gougeon Brothers on Boat Construction - WEST SYSTEM Epoxy
The Gougeon Brothers on Boat Construction - WEST SYSTEM Epoxy

Create successful ePaper yourself
Turn your PDF publications into a flip-book with our unique Google optimized e-Paper software.
148 Core <strong>Boat</strong>building Techniques<br />
epoxy-protected surfaces, allowing water to seep<br />
harmlessly between them.<br />
<str<strong>on</strong>g>The</str<strong>on</strong>g> lead surface itself should already be fairly clean,<br />
but a light sanding with some sandpaper will expose<br />
fresh metal for good b<strong>on</strong>ding with the epoxy. <str<strong>on</strong>g>The</str<strong>on</strong>g><br />
mating surfaces are now ready for a final fitting. <str<strong>on</strong>g>The</str<strong>on</strong>g><br />
<strong>on</strong>ly thing left to do is to establish some reference<br />
measuring points to ensure that the keel itself is indeed<br />
in perfect positi<strong>on</strong> with the hull before any epoxy<br />
cures. Proper preparati<strong>on</strong> should help ensure the keel<br />
will settle in an accurate fore-and-aft positi<strong>on</strong> when the<br />
hull is set flush up<strong>on</strong> it, but sometimes a keel, rather<br />
than sitting perfectly true with a hull athwartship, will<br />
favor <strong>on</strong>e side or the other. If you have accurate waterlines<br />
inscribed <strong>on</strong> the hull, you can take measurements<br />
from these points a set distance aft <strong>on</strong> either side down<br />
to the very bottom of the keel and adjust the hull so<br />
that this dimensi<strong>on</strong> is the same <strong>on</strong> either side.<br />
<str<strong>on</strong>g>The</str<strong>on</strong>g> final setting of the keel requires the coordinated<br />
efforts of several people. Make up enough epoxy<br />
mixture at <strong>on</strong>e time to cover the entire b<strong>on</strong>ding surface<br />
of the keel, using equal proporti<strong>on</strong>s of 406 Colloidal<br />
Silica and 404 High-Density Filler. You need enough<br />
thickened epoxy to be sure that no gaps will remain<br />
anywhere between the hull and the keel, a quantity<br />
sometimes so large that two or three people mix<br />
separate pots simultaneously. <str<strong>on</strong>g>The</str<strong>on</strong>g> mixture should be<br />
so thick that it will not run.<br />
Liberally spread it over the entire mating surface.<br />
Lightly coat the bottom of the hull. Remember,<br />
however, that you begin to work with a time handicap<br />
the moment you apply the adhesive. <str<strong>on</strong>g>The</str<strong>on</strong>g> hull must be<br />
set down <strong>on</strong> the keel and trued up before the epoxy<br />
cures. In most situati<strong>on</strong>s, this means that you have<br />
from 20 minutes to 1 hour for the operati<strong>on</strong>. If you<br />
are well prepared, this should present no problems.<br />
When the hull is in final positi<strong>on</strong>, excess epoxy will<br />
squeeze out of the keel/hull joint. If the mixture is as<br />
thick as it should be, it will not run down the sides of<br />
the keel. Remove the excess and use it to make a fillet<br />
between the keel and the hull if desired. Use solvent<br />
and paper towels to clean up any leftover adhesive <strong>on</strong><br />
either the keel or the hull.<br />
When the epoxy between the hull and the keel has<br />
cured, begin the sec<strong>on</strong>d stage of b<strong>on</strong>ding the keel.<br />
Use a syringe to fill each keel bolt hole to the top<br />
with unthickened epoxy. Feed each hole c<strong>on</strong>tinually<br />
because large amounts will soak into the significant<br />
wood surface area in the hole. As you do this, it<br />
sometimes helps to run a piece of wire up and down<br />
around the keel bolts to help remove air bubbles and<br />
trapped air. When this epoxy cures, install washers and<br />
nuts to complete the keel.<br />
Removable B<strong>on</strong>ded Keels<br />
<str<strong>on</strong>g>The</str<strong>on</strong>g> biggest problem with b<strong>on</strong>ded keels is removing<br />
them. B<strong>on</strong>ded keel bolts can be extracted, but with<br />
difficulty. If for some reas<strong>on</strong> you decide to remove a<br />
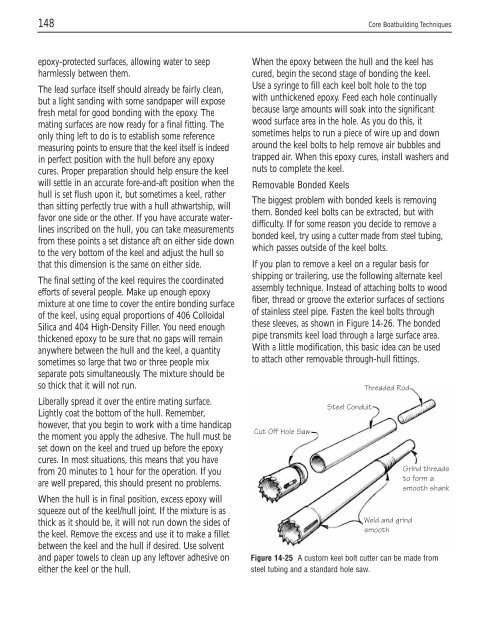
b<strong>on</strong>ded keel, try using a cutter made from steel tubing,<br />
which passes outside of the keel bolts.<br />
If you plan to remove a keel <strong>on</strong> a regular basis for<br />
shipping or trailering, use the following alternate keel<br />
assembly technique. Instead of attaching bolts to wood<br />
fiber, thread or groove the exterior surfaces of secti<strong>on</strong>s<br />
of stainless steel pipe. Fasten the keel bolts through<br />
these sleeves, as shown in Figure 14-26. <str<strong>on</strong>g>The</str<strong>on</strong>g> b<strong>on</strong>ded<br />
pipe transmits keel load through a large surface area.<br />
With a little modificati<strong>on</strong>, this basic idea can be used<br />
to attach other removable through-hull fittings.<br />
Cut Off Hole Saw<br />
Steel C<strong>on</strong>duit<br />
Threaded Rod<br />
Weld and grind<br />
smooth<br />
Grind threads<br />
to form a<br />
smooth shank<br />
Figure 14-25 A custom keel bolt cutter can be made from<br />
steel tubing and a standard hole saw.


