

The Gougeon Brothers on Boat Construction - WEST SYSTEM Epoxy
The Gougeon Brothers on Boat Construction - WEST SYSTEM Epoxy
The Gougeon Brothers on Boat Construction - WEST SYSTEM Epoxy

Create successful ePaper yourself
Turn your PDF publications into a flip-book with our unique Google optimized e-Paper software.
224 Hull C<strong>on</strong>structi<strong>on</strong> Methods<br />
Sheer<br />
W.L.6<br />
W.L.6<br />
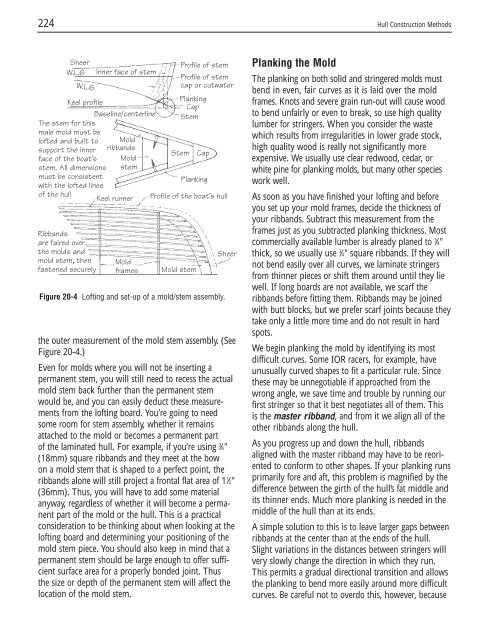
<str<strong>on</strong>g>The</str<strong>on</strong>g> stem for this<br />
male mold must be<br />
lofted and built to<br />
support the inner<br />
face of the boat’s<br />
stem. All dimensi<strong>on</strong>s<br />
must be c<strong>on</strong>sistent<br />
with the lofted lines<br />
of the hull<br />
Inner face of stem<br />
Keel profile<br />
Baseline/centerline<br />
Ribbands<br />
are faired over<br />
the molds and<br />
mold stem, then<br />
fastened securely<br />
Mold<br />
ribbands<br />
Mold<br />
stem<br />
Keel runner<br />
Mold<br />
frames<br />
Profile of stem<br />
Profile of stem<br />
cap or cutwater<br />
Planking<br />
Cap<br />
Stem<br />
Stem<br />
Cap<br />
Planking<br />
Profile of the boat’s hull<br />
Mold stem<br />
Figure 20-4 Lofting and set-up of a mold/stem assembly.<br />
Sheer<br />
the outer measurement of the mold stem assembly. (See<br />
Figure 20-4.)<br />
Even for molds where you will not be inserting a<br />
permanent stem, you will still need to recess the actual<br />
mold stem back further than the permanent stem<br />
would be, and you can easily deduct these measurements<br />
from the lofting board. You’re going to need<br />
some room for stem assembly, whether it remains<br />
attached to the mold or becomes a permanent part<br />
of the laminated hull. For example, if you’re using 3 ⁄4"<br />
(18mm) square ribbands and they meet at the bow<br />
<strong>on</strong> a mold stem that is shaped to a perfect point, the<br />
ribbands al<strong>on</strong>e will still project a fr<strong>on</strong>tal flat area of 11 ⁄2"<br />
(36mm). Thus, you will have to add some material<br />
anyway, regardless of whether it will become a permanent<br />
part of the mold or the hull. This is a practical<br />
c<strong>on</strong>siderati<strong>on</strong> to be thinking about when looking at the<br />
lofting board and determining your positi<strong>on</strong>ing of the<br />
mold stem piece. You should also keep in mind that a<br />
permanent stem should be large enough to offer sufficient<br />
surface area for a properly b<strong>on</strong>ded joint. Thus<br />
the size or depth of the permanent stem will affect the<br />
locati<strong>on</strong> of the mold stem.<br />
Planking the Mold<br />
<str<strong>on</strong>g>The</str<strong>on</strong>g> planking <strong>on</strong> both solid and stringered molds must<br />
bend in even, fair curves as it is laid over the mold<br />
frames. Knots and severe grain run-out will cause wood<br />
to bend unfairly or even to break, so use high quality<br />
lumber for stringers. When you c<strong>on</strong>sider the waste<br />
which results from irregularities in lower grade stock,<br />
high quality wood is really not significantly more<br />
expensive. We usually use clear redwood, cedar, or<br />
white pine for planking molds, but many other species<br />
work well.<br />
As so<strong>on</strong> as you have finished your lofting and before<br />
you set up your mold frames, decide the thickness of<br />
your ribbands. Subtract this measurement from the<br />
frames just as you subtracted planking thickness. Most<br />
commercially available lumber is already planed to 3 ⁄4"<br />
thick, so we usually use 3 ⁄4" square ribbands. If they will<br />
not bend easily over all curves, we laminate stringers<br />
from thinner pieces or shift them around until they lie<br />
well. If l<strong>on</strong>g boards are not available, we scarf the<br />
ribbands before fitting them. Ribbands may be joined<br />
with butt blocks, but we prefer scarf joints because they<br />
take <strong>on</strong>ly a little more time and do not result in hard<br />
spots.<br />
We begin planking the mold by identifying its most<br />
difficult curves. Some IOR racers, for example, have<br />
unusually curved shapes to fit a particular rule. Since<br />
these may be unnegotiable if approached from the<br />
wr<strong>on</strong>g angle, we save time and trouble by running our<br />
first stringer so that it best negotiates all of them. This<br />
is the master ribband, and from it we align all of the<br />
other ribbands al<strong>on</strong>g the hull.<br />
As you progress up and down the hull, ribbands<br />
aligned with the master ribband may have to be reoriented<br />
to c<strong>on</strong>form to other shapes. If your planking runs<br />
primarily fore and aft, this problem is magnified by the<br />
difference between the girth of the hull’s fat middle and<br />
its thinner ends. Much more planking is needed in the<br />
middle of the hull than at its ends.<br />
A simple soluti<strong>on</strong> to this is to leave larger gaps between<br />
ribbands at the center than at the ends of the hull.<br />
Slight variati<strong>on</strong>s in the distances between stringers will<br />
very slowly change the directi<strong>on</strong> in which they run.<br />
This permits a gradual directi<strong>on</strong>al transiti<strong>on</strong> and allows<br />
the planking to bend more easily around more difficult<br />
curves. Be careful not to overdo this, however, because


