

The Gougeon Brothers on Boat Construction - WEST SYSTEM Epoxy
The Gougeon Brothers on Boat Construction - WEST SYSTEM Epoxy
The Gougeon Brothers on Boat Construction - WEST SYSTEM Epoxy

You also want an ePaper? Increase the reach of your titles
YUMPU automatically turns print PDFs into web optimized ePapers that Google loves.
Chapter 17 – Mold Frames and Permanent Frames 191<br />
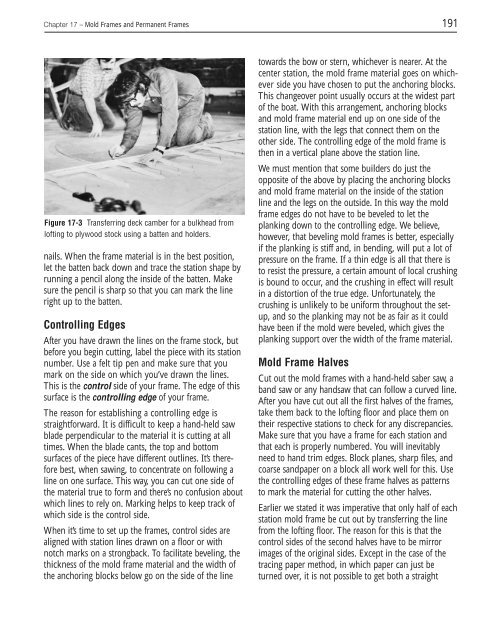
Figure 17-3 Transferring deck camber for a bulkhead from<br />
lofting to plywood stock using a batten and holders.<br />
nails. When the frame material is in the best positi<strong>on</strong>,<br />
let the batten back down and trace the stati<strong>on</strong> shape by<br />
running a pencil al<strong>on</strong>g the inside of the batten. Make<br />
sure the pencil is sharp so that you can mark the line<br />
right up to the batten.<br />
C<strong>on</strong>trolling Edges<br />
After you have drawn the lines <strong>on</strong> the frame stock, but<br />
before you begin cutting, label the piece with its stati<strong>on</strong><br />
number. Use a felt tip pen and make sure that you<br />
mark <strong>on</strong> the side <strong>on</strong> which you’ve drawn the lines.<br />
This is the c<strong>on</strong>trol side of your frame. <str<strong>on</strong>g>The</str<strong>on</strong>g> edge of this<br />
surface is the c<strong>on</strong>trolling edge of your frame.<br />
<str<strong>on</strong>g>The</str<strong>on</strong>g> reas<strong>on</strong> for establishing a c<strong>on</strong>trolling edge is<br />
straightforward. It is difficult to keep a hand-held saw<br />
blade perpendicular to the material it is cutting at all<br />
times. When the blade cants, the top and bottom<br />
surfaces of the piece have different outlines. It’s therefore<br />
best, when sawing, to c<strong>on</strong>centrate <strong>on</strong> following a<br />
line <strong>on</strong> <strong>on</strong>e surface. This way, you can cut <strong>on</strong>e side of<br />
the material true to form and there’s no c<strong>on</strong>fusi<strong>on</strong> about<br />
which lines to rely <strong>on</strong>. Marking helps to keep track of<br />
which side is the c<strong>on</strong>trol side.<br />
When it’s time to set up the frames, c<strong>on</strong>trol sides are<br />
aligned with stati<strong>on</strong> lines drawn <strong>on</strong> a floor or with<br />
notch marks <strong>on</strong> a str<strong>on</strong>gback. To facilitate beveling, the<br />
thickness of the mold frame material and the width of<br />
the anchoring blocks below go <strong>on</strong> the side of the line<br />
towards the bow or stern, whichever is nearer. At the<br />
center stati<strong>on</strong>, the mold frame material goes <strong>on</strong> whichever<br />
side you have chosen to put the anchoring blocks.<br />
This changeover point usually occurs at the widest part<br />
of the boat. With this arrangement, anchoring blocks<br />
and mold frame material end up <strong>on</strong> <strong>on</strong>e side of the<br />
stati<strong>on</strong> line, with the legs that c<strong>on</strong>nect them <strong>on</strong> the<br />
other side. <str<strong>on</strong>g>The</str<strong>on</strong>g> c<strong>on</strong>trolling edge of the mold frame is<br />
then in a vertical plane above the stati<strong>on</strong> line.<br />
We must menti<strong>on</strong> that some builders do just the<br />
opposite of the above by placing the anchoring blocks<br />
and mold frame material <strong>on</strong> the inside of the stati<strong>on</strong><br />
line and the legs <strong>on</strong> the outside. In this way the mold<br />
frame edges do not have to be beveled to let the<br />
planking down to the c<strong>on</strong>trolling edge. We believe,<br />
however, that beveling mold frames is better, especially<br />
if the planking is stiff and, in bending, will put a lot of<br />
pressure <strong>on</strong> the frame. If a thin edge is all that there is<br />
to resist the pressure, a certain amount of local crushing<br />
is bound to occur, and the crushing in effect will result<br />
in a distorti<strong>on</strong> of the true edge. Unfortunately, the<br />
crushing is unlikely to be uniform throughout the setup,<br />
and so the planking may not be as fair as it could<br />
have been if the mold were beveled, which gives the<br />
planking support over the width of the frame material.<br />
Mold Frame Halves<br />
Cut out the mold frames with a hand-held saber saw, a<br />
band saw or any handsaw that can follow a curved line.<br />
After you have cut out all the first halves of the frames,<br />
take them back to the lofting floor and place them <strong>on</strong><br />
their respective stati<strong>on</strong>s to check for any discrepancies.<br />
Make sure that you have a frame for each stati<strong>on</strong> and<br />
that each is properly numbered. You will inevitably<br />
need to hand trim edges. Block planes, sharp files, and<br />
coarse sandpaper <strong>on</strong> a block all work well for this. Use<br />
the c<strong>on</strong>trolling edges of these frame halves as patterns<br />
to mark the material for cutting the other halves.<br />
Earlier we stated it was imperative that <strong>on</strong>ly half of each<br />
stati<strong>on</strong> mold frame be cut out by transferring the line<br />
from the lofting floor. <str<strong>on</strong>g>The</str<strong>on</strong>g> reas<strong>on</strong> for this is that the<br />
c<strong>on</strong>trol sides of the sec<strong>on</strong>d halves have to be mirror<br />
images of the original sides. Except in the case of the<br />
tracing paper method, in which paper can just be<br />
turned over, it is not possible to get both a straight


