

The Gougeon Brothers on Boat Construction - WEST SYSTEM Epoxy
The Gougeon Brothers on Boat Construction - WEST SYSTEM Epoxy
The Gougeon Brothers on Boat Construction - WEST SYSTEM Epoxy

You also want an ePaper? Increase the reach of your titles
YUMPU automatically turns print PDFs into web optimized ePapers that Google loves.
Chapter 14 – Hardware B<strong>on</strong>ding 149<br />
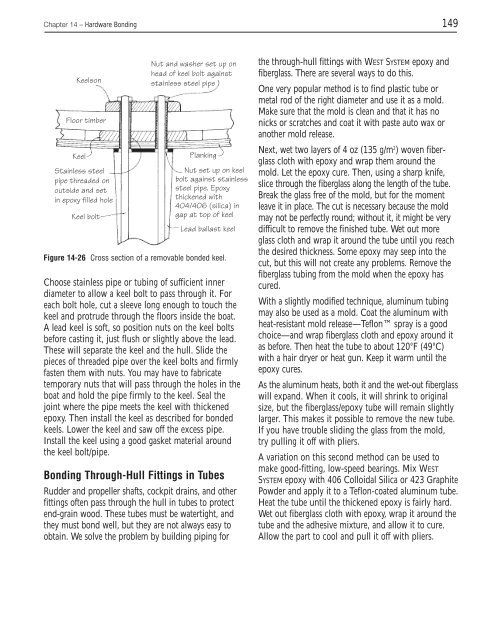
Keels<strong>on</strong><br />
Floor timber<br />
Keel<br />
Stainless steel<br />
pipe threaded <strong>on</strong><br />
outside and set<br />
in epoxy filled hole<br />
Keel bolt<br />
Nut and washer set up <strong>on</strong><br />
head of keel bolt against<br />
stainless steel pipe<br />
Planking<br />
Nut set up <strong>on</strong> keel<br />
bolt against stainless<br />
steel pipe. <strong>Epoxy</strong><br />
thickened with<br />
404/406 (silica) in<br />
gap at top of keel<br />
Lead ballast keel<br />
Figure 14-26 Cross secti<strong>on</strong> of a removable b<strong>on</strong>ded keel.<br />
Choose stainless pipe or tubing of sufficient inner<br />
diameter to allow a keel bolt to pass through it. For<br />
each bolt hole, cut a sleeve l<strong>on</strong>g enough to touch the<br />
keel and protrude through the floors inside the boat.<br />
A lead keel is soft, so positi<strong>on</strong> nuts <strong>on</strong> the keel bolts<br />
before casting it, just flush or slightly above the lead.<br />
<str<strong>on</strong>g>The</str<strong>on</strong>g>se will separate the keel and the hull. Slide the<br />
pieces of threaded pipe over the keel bolts and firmly<br />
fasten them with nuts. You may have to fabricate<br />
temporary nuts that will pass through the holes in the<br />
boat and hold the pipe firmly to the keel. Seal the<br />
joint where the pipe meets the keel with thickened<br />
epoxy. <str<strong>on</strong>g>The</str<strong>on</strong>g>n install the keel as described for b<strong>on</strong>ded<br />
keels. Lower the keel and saw off the excess pipe.<br />
Install the keel using a good gasket material around<br />
the keel bolt/pipe.<br />
B<strong>on</strong>ding Through-Hull Fittings in Tubes<br />
Rudder and propeller shafts, cockpit drains, and other<br />
fittings often pass through the hull in tubes to protect<br />
end-grain wood. <str<strong>on</strong>g>The</str<strong>on</strong>g>se tubes must be watertight, and<br />
they must b<strong>on</strong>d well, but they are not always easy to<br />
obtain. We solve the problem by building piping for<br />
the through-hull fittings with <strong>WEST</strong> <strong>SYSTEM</strong> epoxy and<br />
fiberglass. <str<strong>on</strong>g>The</str<strong>on</strong>g>re are several ways to do this.<br />
One very popular method is to find plastic tube or<br />
metal rod of the right diameter and use it as a mold.<br />
Make sure that the mold is clean and that it has no<br />
nicks or scratches and coat it with paste auto wax or<br />
another mold release.<br />
Next, wet two layers of 4 oz (135 g/m2 ) woven fiberglass<br />
cloth with epoxy and wrap them around the<br />
mold. Let the epoxy cure. <str<strong>on</strong>g>The</str<strong>on</strong>g>n, using a sharp knife,<br />
slice through the fiberglass al<strong>on</strong>g the length of the tube.<br />
Break the glass free of the mold, but for the moment<br />
leave it in place. <str<strong>on</strong>g>The</str<strong>on</strong>g> cut is necessary because the mold<br />
may not be perfectly round; without it, it might be very<br />
difficult to remove the finished tube. Wet out more<br />
glass cloth and wrap it around the tube until you reach<br />
the desired thickness. Some epoxy may seep into the<br />
cut, but this will not create any problems. Remove the<br />
fiberglass tubing from the mold when the epoxy has<br />
cured.<br />
With a slightly modified technique, aluminum tubing<br />
may also be used as a mold. Coat the aluminum with<br />
heat-resistant mold release—Tefl<strong>on</strong> spray is a good<br />
choice—and wrap fiberglass cloth and epoxy around it<br />
as before. <str<strong>on</strong>g>The</str<strong>on</strong>g>n heat the tube to about 120°F (49°C)<br />
with a hair dryer or heat gun. Keep it warm until the<br />
epoxy cures.<br />
As the aluminum heats, both it and the wet-out fiberglass<br />
will expand. When it cools, it will shrink to original<br />
size, but the fiberglass/epoxy tube will remain slightly<br />
larger. This makes it possible to remove the new tube.<br />
If you have trouble sliding the glass from the mold,<br />
try pulling it off with pliers.<br />
A variati<strong>on</strong> <strong>on</strong> this sec<strong>on</strong>d method can be used to<br />
make good-fitting, low-speed bearings. Mix <strong>WEST</strong><br />
<strong>SYSTEM</strong> epoxy with 406 Colloidal Silica or 423 Graphite<br />
Powder and apply it to a Tefl<strong>on</strong>-coated aluminum tube.<br />
Heat the tube until the thickened epoxy is fairly hard.<br />
Wet out fiberglass cloth with epoxy, wrap it around the<br />
tube and the adhesive mixture, and allow it to cure.<br />
Allow the part to cool and pull it off with pliers.


