

The Gougeon Brothers on Boat Construction - WEST SYSTEM Epoxy
The Gougeon Brothers on Boat Construction - WEST SYSTEM Epoxy
The Gougeon Brothers on Boat Construction - WEST SYSTEM Epoxy

You also want an ePaper? Increase the reach of your titles
YUMPU automatically turns print PDFs into web optimized ePapers that Google loves.
352 Later Producti<strong>on</strong> Steps<br />
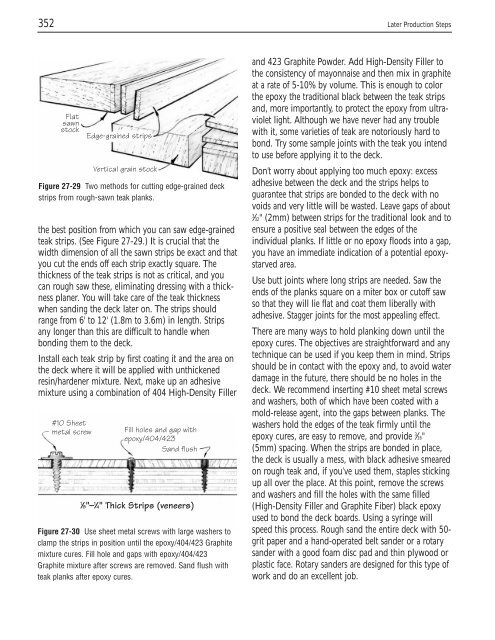
Flat<br />
sawn<br />
stock<br />
Figure 27-29 Two methods for cutting edge-grained deck<br />
strips from rough-sawn teak planks.<br />
the best positi<strong>on</strong> from which you can saw edge-grained<br />
teak strips. (See Figure 27-29.) It is crucial that the<br />
width dimensi<strong>on</strong> of all the sawn strips be exact and that<br />
you cut the ends off each strip exactly square. <str<strong>on</strong>g>The</str<strong>on</strong>g><br />
thickness of the teak strips is not as critical, and you<br />
can rough saw these, eliminating dressing with a thickness<br />
planer. You will take care of the teak thickness<br />
when sanding the deck later <strong>on</strong>. <str<strong>on</strong>g>The</str<strong>on</strong>g> strips should<br />
range from 6' to 12' (1.8m to 3.6m) in length. Strips<br />
any l<strong>on</strong>ger than this are difficult to handle when<br />
b<strong>on</strong>ding them to the deck.<br />
Install each teak strip by first coating it and the area <strong>on</strong><br />
the deck where it will be applied with unthickened<br />
resin/hardener mixture. Next, make up an adhesive<br />
mixture using a combinati<strong>on</strong> of 404 High-Density Filler<br />
#10 Sheet<br />
metal screw<br />
Edge-grained strips<br />
Vertical grain stock<br />
Fill holes and gap with<br />
epoxy/404/423<br />
Sand flush<br />
1 ⁄8"– 1 ⁄4" Thick Strips (veneers)<br />
Figure 27-30 Use sheet metal screws with large washers to<br />
clamp the strips in positi<strong>on</strong> until the epoxy/404/423 Graphite<br />
mixture cures. Fill hole and gaps with epoxy/404/423<br />
Graphite mixture after screws are removed. Sand flush with<br />
teak planks after epoxy cures.<br />
and 423 Graphite Powder. Add High-Density Filler to<br />
the c<strong>on</strong>sistency of may<strong>on</strong>naise and then mix in graphite<br />
at a rate of 5-10% by volume. This is enough to color<br />
the epoxy the traditi<strong>on</strong>al black between the teak strips<br />
and, more importantly, to protect the epoxy from ultraviolet<br />
light. Although we have never had any trouble<br />
with it, some varieties of teak are notoriously hard to<br />
b<strong>on</strong>d. Try some sample joints with the teak you intend<br />
to use before applying it to the deck.<br />
D<strong>on</strong>’t worry about applying too much epoxy: excess<br />
adhesive between the deck and the strips helps to<br />
guarantee that strips are b<strong>on</strong>ded to the deck with no<br />
voids and very little will be wasted. Leave gaps of about<br />
3<br />
⁄32" (2mm) between strips for the traditi<strong>on</strong>al look and to<br />
ensure a positive seal between the edges of the<br />
individual planks. If little or no epoxy floods into a gap,<br />
you have an immediate indicati<strong>on</strong> of a potential epoxystarved<br />
area.<br />
Use butt joints where l<strong>on</strong>g strips are needed. Saw the<br />
ends of the planks square <strong>on</strong> a miter box or cutoff saw<br />
so that they will lie flat and coat them liberally with<br />
adhesive. Stagger joints for the most appealing effect.<br />
<str<strong>on</strong>g>The</str<strong>on</strong>g>re are many ways to hold planking down until the<br />
epoxy cures. <str<strong>on</strong>g>The</str<strong>on</strong>g> objectives are straightforward and any<br />
technique can be used if you keep them in mind. Strips<br />
should be in c<strong>on</strong>tact with the epoxy and, to avoid water<br />
damage in the future, there should be no holes in the<br />
deck. We recommend inserting #10 sheet metal screws<br />
and washers, both of which have been coated with a<br />
mold-release agent, into the gaps between planks. <str<strong>on</strong>g>The</str<strong>on</strong>g><br />
washers hold the edges of the teak firmly until the<br />
epoxy cures, are easy to remove, and provide 3 ⁄16"<br />
(5mm) spacing. When the strips are b<strong>on</strong>ded in place,<br />
the deck is usually a mess, with black adhesive smeared<br />
<strong>on</strong> rough teak and, if you’ve used them, staples sticking<br />
up all over the place. At this point, remove the screws<br />
and washers and fill the holes with the same filled<br />
(High-Density Filler and Graphite Fiber) black epoxy<br />
used to b<strong>on</strong>d the deck boards. Using a syringe will<br />
speed this process. Rough sand the entire deck with 50grit<br />
paper and a hand-operated belt sander or a rotary<br />
sander with a good foam disc pad and thin plywood or<br />
plastic face. Rotary sanders are designed for this type of<br />
work and do an excellent job.


