

The Gougeon Brothers on Boat Construction - WEST SYSTEM Epoxy
The Gougeon Brothers on Boat Construction - WEST SYSTEM Epoxy
The Gougeon Brothers on Boat Construction - WEST SYSTEM Epoxy

Create successful ePaper yourself
Turn your PDF publications into a flip-book with our unique Google optimized e-Paper software.
254 Hull C<strong>on</strong>structi<strong>on</strong> Methods<br />
Figure 22-7 Fairing the molds <strong>on</strong> a stringer-frame set-up.<br />
notches in it as you did the bow so that the end grain<br />
of the stringers is not exposed.<br />
When you have temporarily installed all of the stringers<br />
and they lie fair, mark them at various points so that<br />
you can remove them in preparati<strong>on</strong> for final assembly.<br />
If you have not already d<strong>on</strong>e so, round off the exposed<br />
interior stringer edges between the frames, and sand<br />
and coat them. Prefinishing individual parts before they<br />
are installed is particularly important with this<br />
laminating method because a stringer-frame interior is<br />
difficult to coat and sand adequately later <strong>on</strong>.<br />
Before reinserting stringers, apply a thick, high-density<br />
epoxy mixture to the inside edges of all of the stringer<br />
slots in the frames. It is not necessary to apply epoxy to<br />
prefinished stringers before installing them, although in<br />
some situati<strong>on</strong>s coating both surfaces ensures better<br />
c<strong>on</strong>tact. If you have cut the notches carefully and the<br />
stringers fit snugly, you will need very little outside help<br />
to keep the joints together until the adhesive cures.<br />
Usually, a few staples or a couple of clamps in the right<br />
places <strong>on</strong> each stringer will hold it in positi<strong>on</strong>. On<br />
permanent frames, remove all adhesive which has<br />
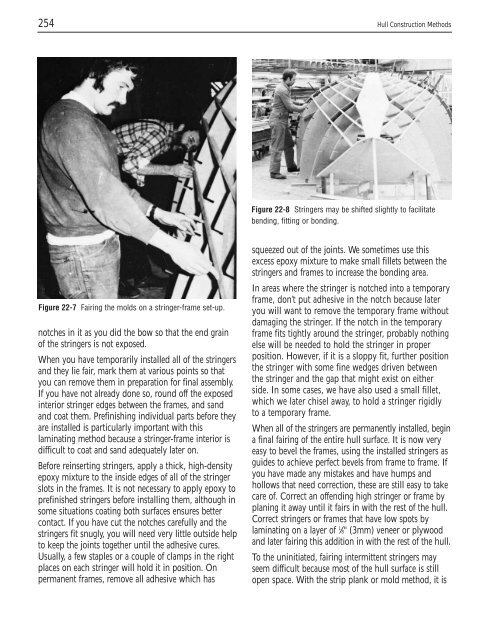
Figure 22-8 Stringers may be shifted slightly to facilitate<br />
bending, fitting or b<strong>on</strong>ding.<br />
squeezed out of the joints. We sometimes use this<br />
excess epoxy mixture to make small fillets between the<br />
stringers and frames to increase the b<strong>on</strong>ding area.<br />
In areas where the stringer is notched into a temporary<br />
frame, d<strong>on</strong>’t put adhesive in the notch because later<br />
you will want to remove the temporary frame without<br />
damaging the stringer. If the notch in the temporary<br />
frame fits tightly around the stringer, probably nothing<br />
else will be needed to hold the stringer in proper<br />
positi<strong>on</strong>. However, if it is a sloppy fit, further positi<strong>on</strong><br />
the stringer with some fine wedges driven between<br />
the stringer and the gap that might exist <strong>on</strong> either<br />
side. In some cases, we have also used a small fillet,<br />
which we later chisel away, to hold a stringer rigidly<br />
to a temporary frame.<br />
When all of the stringers are permanently installed, begin<br />
a final fairing of the entire hull surface. It is now very<br />
easy to bevel the frames, using the installed stringers as<br />
guides to achieve perfect bevels from frame to frame. If<br />
you have made any mistakes and have humps and<br />
hollows that need correcti<strong>on</strong>, these are still easy to take<br />
care of. Correct an offending high stringer or frame by<br />
planing it away until it fairs in with the rest of the hull.<br />
Correct stringers or frames that have low spots by<br />
laminating <strong>on</strong> a layer of 1 ⁄8" (3mm) veneer or plywood<br />
and later fairing this additi<strong>on</strong> in with the rest of the hull.<br />
To the uninitiated, fairing intermittent stringers may<br />
seem difficult because most of the hull surface is still<br />
open space. With the strip plank or mold method, it is


