

The Gougeon Brothers on Boat Construction - WEST SYSTEM Epoxy
The Gougeon Brothers on Boat Construction - WEST SYSTEM Epoxy
The Gougeon Brothers on Boat Construction - WEST SYSTEM Epoxy

Create successful ePaper yourself
Turn your PDF publications into a flip-book with our unique Google optimized e-Paper software.
146 Core <strong>Boat</strong>building Techniques<br />
have to worry so much about close tolerances as you<br />
drill. Increasing the diameter by 1 ⁄4" (6mm), for an<br />
annulus radius of 1 ⁄8" (3mm) makes the job of final<br />
fitting the hull and keel much easier.<br />
To drill the marked keel bolt holes, either use a drilling<br />
jig or ask a few friends to help you do it by eye. In<br />
either case, you need a drill which has a big motor and<br />
in which you can chuck a large bit. <str<strong>on</strong>g>The</str<strong>on</strong>g> drill bit should<br />
have a l<strong>on</strong>g shank: in some situati<strong>on</strong>s 20" to 30" (500-<br />
750 mm) is an ideal length range. If you can’t purchase<br />
drill bits that are l<strong>on</strong>g enough, have a machine shop<br />
weld a shank <strong>on</strong>to a standard bit.<br />
<str<strong>on</strong>g>The</str<strong>on</strong>g> main goal of the drilling operati<strong>on</strong> is to make all<br />
of the keel bolt holes exactly parallel, matching the bolt<br />
arrangement <strong>on</strong> the keel. Although it takes some time<br />
to fabricate, a drilling jig produces maximum accuracy.<br />
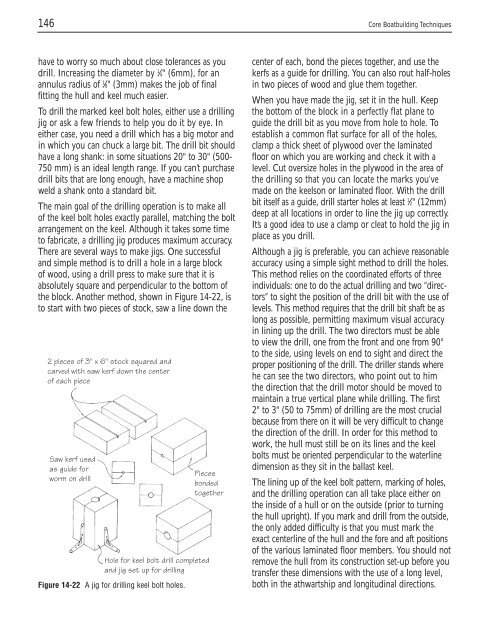
<str<strong>on</strong>g>The</str<strong>on</strong>g>re are several ways to make jigs. One successful<br />
and simple method is to drill a hole in a large block<br />
of wood, using a drill press to make sure that it is<br />
absolutely square and perpendicular to the bottom of<br />
the block. Another method, shown in Figure 14-22, is<br />
to start with two pieces of stock, saw a line down the<br />
2 pieces of 3" x 6" stock squared and<br />
carved with saw kerf down the center<br />
of each piece<br />
Saw kerf used<br />
as guide for<br />
worm <strong>on</strong> drill<br />
Figure 14-22 A jig for drilling keel bolt holes.<br />
Pieces<br />
b<strong>on</strong>ded<br />
together<br />
Hole for keel bolt drill completed<br />
and jig set up for drilling<br />
center of each, b<strong>on</strong>d the pieces together, and use the<br />
kerfs as a guide for drilling. You can also rout half-holes<br />
in two pieces of wood and glue them together.<br />
When you have made the jig, set it in the hull. Keep<br />
the bottom of the block in a perfectly flat plane to<br />
guide the drill bit as you move from hole to hole. To<br />
establish a comm<strong>on</strong> flat surface for all of the holes,<br />
clamp a thick sheet of plywood over the laminated<br />
floor <strong>on</strong> which you are working and check it with a<br />
level. Cut oversize holes in the plywood in the area of<br />
the drilling so that you can locate the marks you’ve<br />
made <strong>on</strong> the keels<strong>on</strong> or laminated floor. With the drill<br />
bit itself as a guide, drill starter holes at least 1 ⁄2" (12mm)<br />
deep at all locati<strong>on</strong>s in order to line the jig up correctly.<br />
It’s a good idea to use a clamp or cleat to hold the jig in<br />
place as you drill.<br />
Although a jig is preferable, you can achieve reas<strong>on</strong>able<br />
accuracy using a simple sight method to drill the holes.<br />
This method relies <strong>on</strong> the coordinated efforts of three<br />
individuals: <strong>on</strong>e to do the actual drilling and two “directors”<br />
to sight the positi<strong>on</strong> of the drill bit with the use of<br />
levels. This method requires that the drill bit shaft be as<br />
l<strong>on</strong>g as possible, permitting maximum visual accuracy<br />
in lining up the drill. <str<strong>on</strong>g>The</str<strong>on</strong>g> two directors must be able<br />
to view the drill, <strong>on</strong>e from the fr<strong>on</strong>t and <strong>on</strong>e from 90°<br />
to the side, using levels <strong>on</strong> end to sight and direct the<br />
proper positi<strong>on</strong>ing of the drill. <str<strong>on</strong>g>The</str<strong>on</strong>g> driller stands where<br />
he can see the two directors, who point out to him<br />
the directi<strong>on</strong> that the drill motor should be moved to<br />
maintain a true vertical plane while drilling. <str<strong>on</strong>g>The</str<strong>on</strong>g> first<br />
2" to 3" (50 to 75mm) of drilling are the most crucial<br />
because from there <strong>on</strong> it will be very difficult to change<br />
the directi<strong>on</strong> of the drill. In order for this method to<br />
work, the hull must still be <strong>on</strong> its lines and the keel<br />
bolts must be oriented perpendicular to the waterline<br />
dimensi<strong>on</strong> as they sit in the ballast keel.<br />
<str<strong>on</strong>g>The</str<strong>on</strong>g> lining up of the keel bolt pattern, marking of holes,<br />
and the drilling operati<strong>on</strong> can all take place either <strong>on</strong><br />
the inside of a hull or <strong>on</strong> the outside (prior to turning<br />
the hull upright). If you mark and drill from the outside,<br />
the <strong>on</strong>ly added difficulty is that you must mark the<br />
exact centerline of the hull and the fore and aft positi<strong>on</strong>s<br />
of the various laminated floor members. You should not<br />
remove the hull from its c<strong>on</strong>structi<strong>on</strong> set-up before you<br />
transfer these dimensi<strong>on</strong>s with the use of a l<strong>on</strong>g level,<br />
both in the athwartship and l<strong>on</strong>gitudinal directi<strong>on</strong>s.


