

The Gougeon Brothers on Boat Construction - WEST SYSTEM Epoxy
The Gougeon Brothers on Boat Construction - WEST SYSTEM Epoxy
The Gougeon Brothers on Boat Construction - WEST SYSTEM Epoxy

Create successful ePaper yourself
Turn your PDF publications into a flip-book with our unique Google optimized e-Paper software.
Chapter 23 – Strip Plank Laminated Veneer and Strip Composite C<strong>on</strong>structi<strong>on</strong> 277<br />
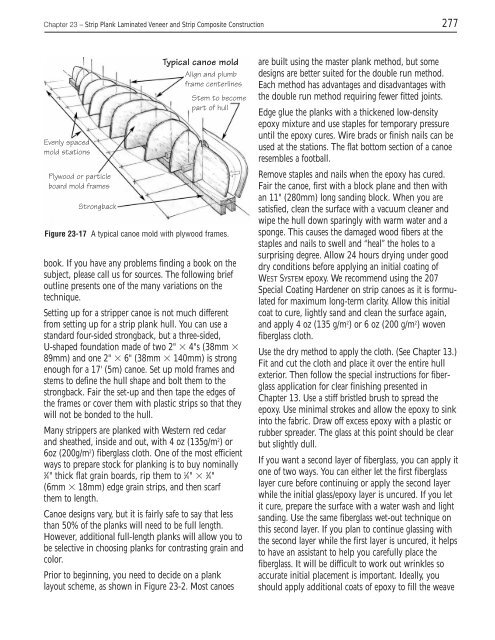
Evenly spaced<br />
mold stati<strong>on</strong>s<br />
Plywood or particle<br />
board mold frames<br />
Str<strong>on</strong>gback<br />
Typical canoe mold<br />
Align and plumb<br />
frame centerlines<br />
Stem to become<br />
part of hull<br />
Figure 23-17 A typical canoe mold with plywood frames.<br />
book. If you have any problems finding a book <strong>on</strong> the<br />
subject, please call us for sources. <str<strong>on</strong>g>The</str<strong>on</strong>g> following brief<br />
outline presents <strong>on</strong>e of the many variati<strong>on</strong>s <strong>on</strong> the<br />
technique.<br />
Setting up for a stripper canoe is not much different<br />
from setting up for a strip plank hull. You can use a<br />
standard four-sided str<strong>on</strong>gback, but a three-sided,<br />
U-shaped foundati<strong>on</strong> made of two 2" � 4"s (38mm �<br />
89mm) and <strong>on</strong>e 2" � 6" (38mm � 140mm) is str<strong>on</strong>g<br />
enough for a 17' (5m) canoe. Set up mold frames and<br />
stems to define the hull shape and bolt them to the<br />
str<strong>on</strong>gback. Fair the set-up and then tape the edges of<br />
the frames or cover them with plastic strips so that they<br />
will not be b<strong>on</strong>ded to the hull.<br />
Many strippers are planked with Western red cedar<br />
and sheathed, inside and out, with 4 oz (135g/m2 ) or<br />
6oz (200g/m2 ) fiberglass cloth. One of the most efficient<br />
ways to prepare stock for planking is to buy nominally<br />
3 1 3 ⁄4" thick flat grain boards, rip them to ⁄4" � ⁄4"<br />
(6mm � 18mm) edge grain strips, and then scarf<br />
them to length.<br />
Canoe designs vary, but it is fairly safe to say that less<br />
than 50% of the planks will need to be full length.<br />
However, additi<strong>on</strong>al full-length planks will allow you to<br />
be selective in choosing planks for c<strong>on</strong>trasting grain and<br />
color.<br />
Prior to beginning, you need to decide <strong>on</strong> a plank<br />
layout scheme, as shown in Figure 23-2. Most canoes<br />
are built using the master plank method, but some<br />
designs are better suited for the double run method.<br />
Each method has advantages and disadvantages with<br />
the double run method requiring fewer fitted joints.<br />
Edge glue the planks with a thickened low-density<br />
epoxy mixture and use staples for temporary pressure<br />
until the epoxy cures. Wire brads or finish nails can be<br />
used at the stati<strong>on</strong>s. <str<strong>on</strong>g>The</str<strong>on</strong>g> flat bottom secti<strong>on</strong> of a canoe<br />
resembles a football.<br />
Remove staples and nails when the epoxy has cured.<br />
Fair the canoe, first with a block plane and then with<br />
an 11" (280mm) l<strong>on</strong>g sanding block. When you are<br />
satisfied, clean the surface with a vacuum cleaner and<br />
wipe the hull down sparingly with warm water and a<br />
sp<strong>on</strong>ge. This causes the damaged wood fibers at the<br />
staples and nails to swell and “heal” the holes to a<br />
surprising degree. Allow 24 hours drying under good<br />
dry c<strong>on</strong>diti<strong>on</strong>s before applying an initial coating of<br />
<strong>WEST</strong> <strong>SYSTEM</strong> epoxy. We recommend using the 207<br />
Special Coating Hardener <strong>on</strong> strip canoes as it is formulated<br />
for maximum l<strong>on</strong>g-term clarity. Allow this initial<br />
coat to cure, lightly sand and clean the surface again,<br />
and apply 4 oz (135 g/m2 ) or 6 oz (200 g/m2 ) woven<br />
fiberglass cloth.<br />
Use the dry method to apply the cloth. (See Chapter 13.)<br />
Fit and cut the cloth and place it over the entire hull<br />
exterior. <str<strong>on</strong>g>The</str<strong>on</strong>g>n follow the special instructi<strong>on</strong>s for fiberglass<br />
applicati<strong>on</strong> for clear finishing presented in<br />
Chapter 13. Use a stiff bristled brush to spread the<br />
epoxy. Use minimal strokes and allow the epoxy to sink<br />
into the fabric. Draw off excess epoxy with a plastic or<br />
rubber spreader. <str<strong>on</strong>g>The</str<strong>on</strong>g> glass at this point should be clear<br />
but slightly dull.<br />
If you want a sec<strong>on</strong>d layer of fiberglass, you can apply it<br />
<strong>on</strong>e of two ways. You can either let the first fiberglass<br />
layer cure before c<strong>on</strong>tinuing or apply the sec<strong>on</strong>d layer<br />
while the initial glass/epoxy layer is uncured. If you let<br />
it cure, prepare the surface with a water wash and light<br />
sanding. Use the same fiberglass wet-out technique <strong>on</strong><br />
this sec<strong>on</strong>d layer. If you plan to c<strong>on</strong>tinue glassing with<br />
the sec<strong>on</strong>d layer while the first layer is uncured, it helps<br />
to have an assistant to help you carefully place the<br />
fiberglass. It will be difficult to work out wrinkles so<br />
accurate initial placement is important. Ideally, you<br />
should apply additi<strong>on</strong>al coats of epoxy to fill the weave


