

The Gougeon Brothers on Boat Construction - WEST SYSTEM Epoxy
The Gougeon Brothers on Boat Construction - WEST SYSTEM Epoxy
The Gougeon Brothers on Boat Construction - WEST SYSTEM Epoxy

Create successful ePaper yourself
Turn your PDF publications into a flip-book with our unique Google optimized e-Paper software.
Chapter 21 – Laminating Veneer Over a Mold or Plug 245<br />
When you have completed the last veneer, laminate and<br />
install a stem cap. Further layers of wood may be<br />
needed to complete the keel profile. In most cases, you<br />
can hold these in place with screws until the epoxy<br />
cures. For extreme curves, use washers under the screw<br />
heads for extra pressure. If this is not practical, make a<br />
temporary form in the shape of the stem or keel,<br />
allowing for a bit of springback, and laminate the part<br />
<strong>on</strong> this. <str<strong>on</strong>g>The</str<strong>on</strong>g>n rough saw and b<strong>on</strong>d the piece in positi<strong>on</strong><br />
for final fairing.<br />
Final Fairing<br />
Fairing is <strong>on</strong>e of the arts of boatbuilding. We doubt that<br />
any<strong>on</strong>e has ever built a perfectly fair hull, but we’ve<br />
seen some that have been close to it. Up to a certain<br />
point, fairness is a necessity because fair hulls offer less<br />
resistance than hulls with humps and hollows. After<br />
this, fairness is no l<strong>on</strong>ger important as far as movement<br />
through the water is c<strong>on</strong>cerned, but becomes a point of<br />
pers<strong>on</strong>al and professi<strong>on</strong>al pride.<br />
You should usually complete final fairing and finishing<br />
before you remove a laminated hull from its mold. <str<strong>on</strong>g>The</str<strong>on</strong>g><br />
excepti<strong>on</strong> to this is a thin-skinned hull, which needs<br />
additi<strong>on</strong>al support from internal framework. In this<br />
case, you would final fair the hull after installing the<br />
framework.<br />
Before final fairing, rough fair the last layer of veneer to<br />
remove lumps of epoxy and obvious high spots as you<br />
have <strong>on</strong> previous layers. Block or smoothing planes and<br />
slightly flexible sanding blocks with 60 or 80-grit paper<br />
are good tools for rough fairing. D<strong>on</strong>’t use air files and<br />
other power machines to rough fair hulls that will be<br />
naturally finished. Unless you have a lot of experience<br />
with power tools, you run a high risk of leaving<br />
scratches in the wood and these may show up in the<br />
finished surface.<br />
<str<strong>on</strong>g>The</str<strong>on</strong>g>re are two parts to final fairing. <str<strong>on</strong>g>The</str<strong>on</strong>g> first, local<br />
fairing, is the process of making the hull smooth to the<br />
touch in a specific area. Overall fairing, the sec<strong>on</strong>d job,<br />
is more difficult. A hull may be sanded until it is very<br />
smooth, but it still may not be fair overall. It’s usually at<br />
this point that large overall hollows and bumps are<br />
visible. It’s important that you do everything you can to<br />
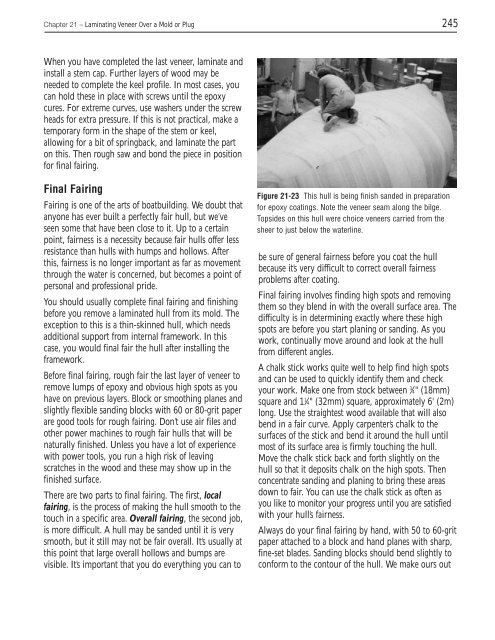
Figure 21-23 This hull is being finish sanded in preparati<strong>on</strong><br />
for epoxy coatings. Note the veneer seam al<strong>on</strong>g the bilge.<br />
Topsides <strong>on</strong> this hull were choice veneers carried from the<br />
sheer to just below the waterline.<br />
be sure of general fairness before you coat the hull<br />
because it’s very difficult to correct overall fairness<br />
problems after coating.<br />
Final fairing involves finding high spots and removing<br />
them so they blend in with the overall surface area. <str<strong>on</strong>g>The</str<strong>on</strong>g><br />
difficulty is in determining exactly where these high<br />
spots are before you start planing or sanding. As you<br />
work, c<strong>on</strong>tinually move around and look at the hull<br />
from different angles.<br />
A chalk stick works quite well to help find high spots<br />
and can be used to quickly identify them and check<br />
your work. Make <strong>on</strong>e from stock between 3 ⁄4" (18mm)<br />
square and 11 ⁄4" (32mm) square, approximately 6' (2m)<br />
l<strong>on</strong>g. Use the straightest wood available that will also<br />
bend in a fair curve. Apply carpenter’s chalk to the<br />
surfaces of the stick and bend it around the hull until<br />
most of its surface area is firmly touching the hull.<br />
Move the chalk stick back and forth slightly <strong>on</strong> the<br />
hull so that it deposits chalk <strong>on</strong> the high spots. <str<strong>on</strong>g>The</str<strong>on</strong>g>n<br />
c<strong>on</strong>centrate sanding and planing to bring these areas<br />
down to fair. You can use the chalk stick as often as<br />
you like to m<strong>on</strong>itor your progress until you are satisfied<br />
with your hull’s fairness.<br />
Always do your final fairing by hand, with 50 to 60-grit<br />
paper attached to a block and hand planes with sharp,<br />
fine-set blades. Sanding blocks should bend slightly to<br />
c<strong>on</strong>form to the c<strong>on</strong>tour of the hull. We make ours out


