

SIREC D Display Recorder 7ND4000
SIREC D Display Recorder 7ND4000
SIREC D Display Recorder 7ND4000

Sie wollen auch ein ePaper? Erhöhen Sie die Reichweite Ihrer Titel.
YUMPU macht aus Druck-PDFs automatisch weboptimierte ePaper, die Google liebt.
103693MA<br />
NOTE<br />
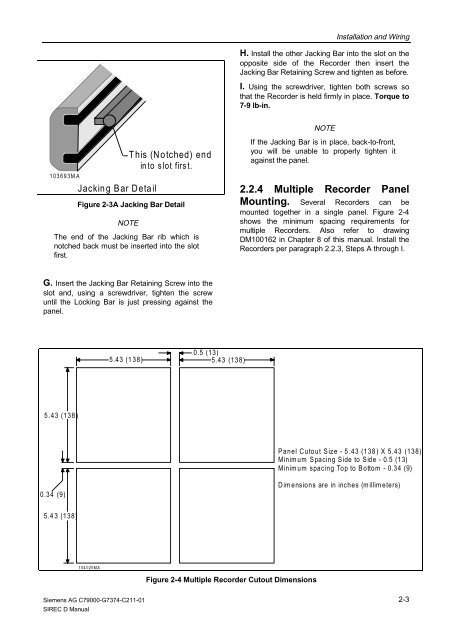
The end of the Jacking Bar rib which is<br />
notched back must be inserted into the slot<br />
first.<br />
G. Insert the Jacking Bar Retaining Screw into the<br />
slot and, using a screwdriver, tighten the screw<br />
until the Locking Bar is just pressing against the<br />
panel.<br />
5.43 (138)<br />
0.34 (9)<br />
5.43 (138)<br />
Jacking Bar Detail<br />
Siemens AG C79000-G7374-C211-01<br />
<strong>SIREC</strong> D Manual<br />
This (Notched) end<br />
into slot first.<br />
Figure 2-3A Jacking Bar Detail<br />
104 020MA<br />
5.43 (138)<br />
0.5 (13)<br />
5.43 (138)<br />
Figure 2-4 Multiple <strong>Recorder</strong> Cutout Dimensions<br />
Installation and Wiring<br />
H. Install the other Jacking Bar into the slot on the<br />
opposite side of the <strong>Recorder</strong> then insert the<br />
Jacking Bar Retaining Screw and tighten as before.<br />
I. Using the screwdriver, tighten both screws so<br />
that the <strong>Recorder</strong> is held firmly in place. Torque to<br />
7-9 lb-in.<br />
NOTE<br />
If the Jacking Bar is in place, back-to-front,<br />
you will be unable to properly tighten it<br />
against the panel.<br />
2.2.4 Multiple <strong>Recorder</strong> Panel<br />
Mounting. Several <strong>Recorder</strong>s can be<br />
mounted together in a single panel. Figure 2-4<br />
shows the minimum spacing requirements for<br />
multiple <strong>Recorder</strong>s. Also refer to drawing<br />
DM100162 in Chapter 8 of this manual. Install the<br />
<strong>Recorder</strong>s per paragraph 2.2.3, Steps A through I.<br />
Panel Cutout Size - 5.43 (138) X 5.43 (138)<br />
Minimum Spacing Side to Side - 0.5 (13)<br />
Minimum spacing Top to Bottom - 0.34 (9)<br />
Dim ensions are in inches (millimeters)<br />
2-3


