

SIREC D Display Recorder 7ND4000
SIREC D Display Recorder 7ND4000
SIREC D Display Recorder 7ND4000

Sie wollen auch ein ePaper? Erhöhen Sie die Reichweite Ihrer Titel.
YUMPU macht aus Druck-PDFs automatisch weboptimierte ePaper, die Google liebt.
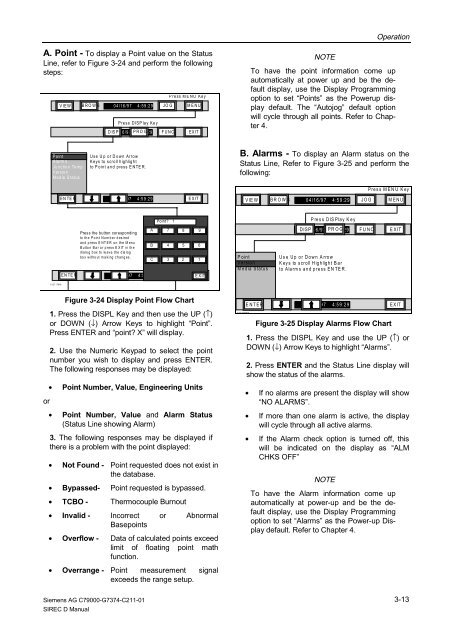
A. Point - To display a Point value on the Status<br />
Line, refer to Figure 3-24 and perform the following<br />
steps:<br />
or<br />
VIEW BROWS 04/16/97 4:59:29 JO G M ENU<br />
Point<br />
Alarms<br />
Junction Temp<br />
Version<br />
Media Status<br />
103717MA<br />
ENTER<br />
ENTER<br />
1. Press the DISPL Key and then use the UP (↑)<br />
or DOWN (↓) Arrow Keys to highlight “Point”.<br />
Press ENTER and “point? X” will display.<br />
2. Use the Numeric Keypad to select the point<br />
number you wish to display and press ENTER.<br />
The following responses may be displayed:<br />
• Point Number, Value, Engineering Units<br />
• Point Number, Value and Alarm Status<br />
(Status Line showing Alarm)<br />
3. The following responses may be displayed if<br />
there is a problem with the point displayed:<br />
• Not Found - Point requested does not exist in<br />
the database.<br />
• Bypassed- Point requested is bypassed.<br />
• TCBO - Thermocouple Burnout<br />
• Invalid - Incorrect<br />
Basepoints<br />
or Abnormal<br />
• Overflow - Data of calculated points exceed<br />
limit of floating point math<br />
• Overrange -<br />
function.<br />
Point measurement signal<br />
exceeds the range setup.<br />
Siemens AG C79000-G7374-C211-01<br />
<strong>SIREC</strong> D Manual<br />
Press DISPlay Key<br />
DISP 04/16/97 PROG 4:59:29 FUNC EXIT<br />
Use Up or Down Arrow<br />
Keys to scroll highligh t<br />
to Point and press ENTER.<br />
Press the button coresponding<br />
to th e P o in t Nu m b e r d esired<br />
and press E NT ER on the M enu<br />
B utto n B a r o r p ress E X IT in th e<br />
dialog box to leave the dialog<br />
box without making changes.<br />
P ress M E N U Key<br />
04/16/97 4:59:29 EXIT<br />
A<br />
B<br />
C<br />
Point? 1<br />
7 8 9<br />
4 5 6<br />
3 2 1<br />
04/16/97 4:59:29 EXIT EXIT<br />
Figure 3-24 <strong>Display</strong> Point Flow Chart<br />
NOTE<br />
Operation<br />
To have the point information come up<br />
automatically at power up and be the default<br />
display, use the <strong>Display</strong> Programming<br />
option to set “Points” as the Powerup display<br />
default. The “Autojog” default option<br />
will cycle through all points. Refer to Chapter<br />
4.<br />
B. Alarms - To display an Alarm status on the<br />
Status Line, Refer to Figure 3-25 and perform the<br />
following:<br />
VIEW BROW S 04/16/97 4:59:29 JOG MENU<br />
Point<br />
Version<br />
Media Status<br />
1 0 3 71 8 M A<br />
ENTER<br />
Press DISPlay Key<br />
DISP 04/16/97 PROG 4:59:29 FUNC EXIT<br />
Use Up or Down Arrow<br />
K ey s to scroll Highlight B ar<br />
to Alarms and press ENTER.<br />
1. Press the DISPL Key and use the UP (↑) or<br />
DOWN (↓) Arrow Keys to highlight “Alarms”.<br />
2. Press ENTER and the Status Line display will<br />
show the status of the alarms.<br />
• If no alarms are present the display will show<br />
“NO ALARMS”.<br />
• If more than one alarm is active, the display<br />
will cycle through all active alarms.<br />
• If the Alarm check option is turned off, this<br />
will be indicated on the display as “ALM<br />
CHKS OFF”<br />
NOTE<br />
Press MENU Key<br />
04/16/97 4:59:29 EXIT<br />
Figure 3-25 <strong>Display</strong> Alarms Flow Chart<br />
To have the Alarm information come up<br />
automatically at power-up and be the default<br />
display, use the <strong>Display</strong> Programming<br />
option to set “Alarms” as the Power-up <strong>Display</strong><br />
default. Refer to Chapter 4.<br />
3-13


