SIREC D Display Recorder 7ND4000
SIREC D Display Recorder 7ND4000
SIREC D Display Recorder 7ND4000
Sie wollen auch ein ePaper? Erhöhen Sie die Reichweite Ihrer Titel.
YUMPU macht aus Druck-PDFs automatisch weboptimierte ePaper, die Google liebt.
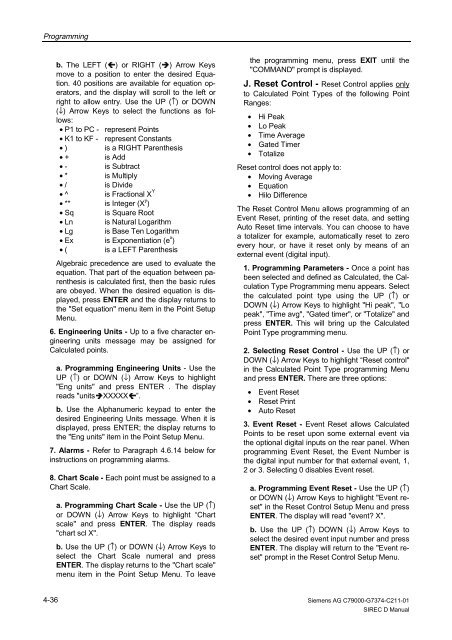
Programming<br />
b. The LEFT (�) or RIGHT (�) Arrow Keys<br />
move to a position to enter the desired Equation.<br />
40 positions are available for equation operators,<br />
and the display will scroll to the left or<br />
right to allow entry. Use the UP (↑) or DOWN<br />
(↓) Arrow Keys to select the functions as follows:<br />
• P1 to PC - represent Points<br />
• K1 to KF - represent Constants<br />
• ) is a RIGHT Parenthesis<br />
• + is Add<br />
• - is Subtract<br />
• * is Multiply<br />
• / is Divide<br />
• ^ is Fractional X Y<br />
• ** is Integer (X y )<br />
• Sq is Square Root<br />
• Ln is Natural Logarithm<br />
• Lg is Base Ten Logarithm<br />
• Ex is Exponentiation (e x )<br />
• ( is a LEFT Parenthesis<br />
Algebraic precedence are used to evaluate the<br />
equation. That part of the equation between parenthesis<br />
is calculated first, then the basic rules<br />
are obeyed. When the desired equation is displayed,<br />
press ENTER and the display returns to<br />
the "Set equation" menu item in the Point Setup<br />
Menu.<br />
6. Engineering Units - Up to a five character engineering<br />
units message may be assigned for<br />
Calculated points.<br />
a. Programming Engineering Units - Use the<br />
UP (↑) or DOWN (↓) Arrow Keys to highlight<br />
"Eng units" and press ENTER . The display<br />
reads "units�XXXXX�”.<br />
b. Use the Alphanumeric keypad to enter the<br />
desired Engineering Units message. When it is<br />
displayed, press ENTER; the display returns to<br />
the "Eng units" item in the Point Setup Menu.<br />
7. Alarms - Refer to Paragraph 4.6.14 below for<br />
instructions on programming alarms.<br />
8. Chart Scale - Each point must be assigned to a<br />
Chart Scale.<br />
4-36<br />
a. Programming Chart Scale - Use the UP (↑)<br />
or DOWN (↓) Arrow Keys to highlight “Chart<br />
scale" and press ENTER. The display reads<br />
"chart scl X".<br />
b. Use the UP (↑) or DOWN (↓) Arrow Keys to<br />
select the Chart Scale numeral and press<br />
ENTER. The display returns to the "Chart scale"<br />
menu item in the Point Setup Menu. To leave<br />
the programming menu, press EXIT until the<br />
"COMMAND" prompt is displayed.<br />
J. Reset Control - Reset Control applies only<br />
to Calculated Point Types of the following Point<br />
Ranges:<br />
• Hi Peak<br />
• Lo Peak<br />
• Time Average<br />
• Gated Timer<br />
• Totalize<br />
Reset control does not apply to:<br />
• Moving Average<br />
• Equation<br />
• Hilo Difference<br />
The Reset Control Menu allows programming of an<br />
Event Reset, printing of the reset data, and setting<br />
Auto Reset time intervals. You can choose to have<br />
a totalizer for example, automatically reset to zero<br />
every hour, or have it reset only by means of an<br />
external event (digital input).<br />
1. Programming Parameters - Once a point has<br />
been selected and defined as Calculated, the Calculation<br />
Type Programming menu appears. Select<br />
the calculated point type using the UP (↑) or<br />
DOWN (↓) Arrow Keys to highlight "Hi peak", "Lo<br />
peak", "Time avg", "Gated timer", or "Totalize" and<br />
press ENTER. This will bring up the Calculated<br />
Point Type programming menu.<br />
2. Selecting Reset Control - Use the UP (↑) or<br />
DOWN (↓) Arrow Keys to highlight “Reset control"<br />
in the Calculated Point Type programming Menu<br />
and press ENTER. There are three options:<br />
• Event Reset<br />
• Reset Print<br />
• Auto Reset<br />
3. Event Reset - Event Reset allows Calculated<br />
Points to be reset upon some external event via<br />
the optional digital inputs on the rear panel. When<br />
programming Event Reset, the Event Number is<br />
the digital input number for that external event, 1,<br />
2 or 3. Selecting 0 disables Event reset.<br />
a. Programming Event Reset - Use the UP (↑)<br />
or DOWN (↓) Arrow Keys to highlight "Event reset"<br />
in the Reset Control Setup Menu and press<br />
ENTER. The display will read "event? X".<br />
b. Use the UP (↑) DOWN (↓) Arrow Keys to<br />
select the desired event input number and press<br />
ENTER. The display will return to the "Event reset"<br />
prompt in the Reset Control Setup Menu.<br />
Siemens AG C79000-G7374-C211-01<br />
<strong>SIREC</strong> D Manual


