SIREC D Display Recorder 7ND4000
SIREC D Display Recorder 7ND4000
SIREC D Display Recorder 7ND4000
Erfolgreiche ePaper selbst erstellen
Machen Sie aus Ihren PDF Publikationen ein blätterbares Flipbook mit unserer einzigartigen Google optimierten e-Paper Software.
Programming<br />
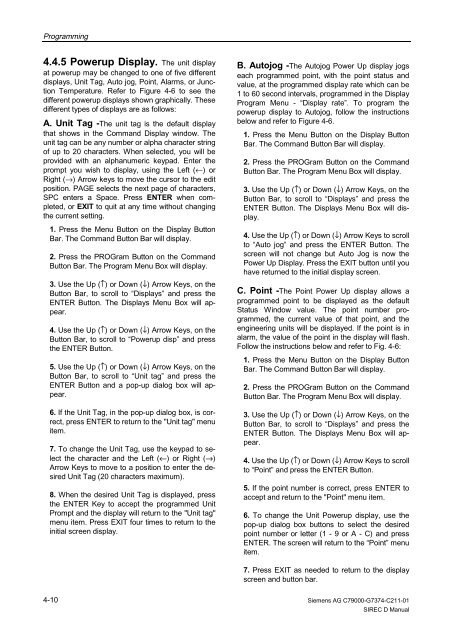
4.4.5 Powerup <strong>Display</strong>. The unit display<br />
at powerup may be changed to one of five different<br />
displays, Unit Tag, Auto jog, Point, Alarms, or Junction<br />
Temperature. Refer to Figure 4-6 to see the<br />
different powerup displays shown graphically. These<br />
different types of displays are as follows:<br />
A. Unit Tag -The unit tag is the default display<br />
that shows in the Command <strong>Display</strong> window. The<br />
unit tag can be any number or alpha character string<br />
of up to 20 characters. When selected, you will be<br />
provided with an alphanumeric keypad. Enter the<br />
prompt you wish to display, using the Left (←) or<br />
Right (→) Arrow keys to move the cursor to the edit<br />
position. PAGE selects the next page of characters,<br />
SPC enters a Space. Press ENTER when completed,<br />
or EXIT to quit at any time without changing<br />
the current setting.<br />
1. Press the Menu Button on the <strong>Display</strong> Button<br />
Bar. The Command Button Bar will display.<br />
2. Press the PROGram Button on the Command<br />
Button Bar. The Program Menu Box will display.<br />
3. Use the Up (↑) or Down (↓) Arrow Keys, on the<br />
Button Bar, to scroll to “<strong>Display</strong>s” and press the<br />
ENTER Button. The <strong>Display</strong>s Menu Box will appear.<br />
4. Use the Up (↑) or Down (↓) Arrow Keys, on the<br />
Button Bar, to scroll to “Powerup disp” and press<br />
the ENTER Button.<br />
5. Use the Up (↑) or Down (↓) Arrow Keys, on the<br />
Button Bar, to scroll to “Unit tag” and press the<br />
ENTER Button and a pop-up dialog box will appear.<br />
6. If the Unit Tag, in the pop-up dialog box, is correct,<br />
press ENTER to return to the "Unit tag" menu<br />
item.<br />
7. To change the Unit Tag, use the keypad to select<br />
the character and the Left (←) or Right (→)<br />
Arrow Keys to move to a position to enter the desired<br />
Unit Tag (20 characters maximum).<br />
8. When the desired Unit Tag is displayed, press<br />
the ENTER Key to accept the programmed Unit<br />
Prompt and the display will return to the "Unit tag"<br />
menu item. Press EXIT four times to return to the<br />
initial screen display.<br />
4-10<br />
B. Autojog -The Autojog Power Up display jogs<br />
each programmed point, with the point status and<br />
value, at the programmed display rate which can be<br />
1 to 60 second intervals, programmed in the <strong>Display</strong><br />
Program Menu - “<strong>Display</strong> rate”. To program the<br />
powerup display to Autojog, follow the instructions<br />
below and refer to Figure 4-6.<br />
1. Press the Menu Button on the <strong>Display</strong> Button<br />
Bar. The Command Button Bar will display.<br />
2. Press the PROGram Button on the Command<br />
Button Bar. The Program Menu Box will display.<br />
3. Use the Up (↑) or Down (↓) Arrow Keys, on the<br />
Button Bar, to scroll to “<strong>Display</strong>s” and press the<br />
ENTER Button. The <strong>Display</strong>s Menu Box will display.<br />
4. Use the Up (↑) or Down (↓) Arrow Keys to scroll<br />
to “Auto jog” and press the ENTER Button. The<br />
screen will not change but Auto Jog is now the<br />
Power Up <strong>Display</strong>. Press the EXIT button until you<br />
have returned to the initial display screen.<br />
C. Point -The Point Power Up display allows a<br />
programmed point to be displayed as the default<br />
Status Window value. The point number programmed,<br />
the current value of that point, and the<br />
engineering units will be displayed. If the point is in<br />
alarm, the value of the point in the display will flash.<br />
Follow the instructions below and refer to Fig. 4-6:<br />
1. Press the Menu Button on the <strong>Display</strong> Button<br />
Bar. The Command Button Bar will display.<br />
2. Press the PROGram Button on the Command<br />
Button Bar. The Program Menu Box will display.<br />
3. Use the Up (↑) or Down (↓) Arrow Keys, on the<br />
Button Bar, to scroll to “<strong>Display</strong>s” and press the<br />
ENTER Button. The <strong>Display</strong>s Menu Box will appear.<br />
4. Use the Up (↑) or Down (↓) Arrow Keys to scroll<br />
to “Point” and press the ENTER Button.<br />
5. If the point number is correct, press ENTER to<br />
accept and return to the "Point" menu item.<br />
6. To change the Unit Powerup display, use the<br />
pop-up dialog box buttons to select the desired<br />
point number or letter (1 - 9 or A - C) and press<br />
ENTER. The screen will return to the “Point” menu<br />
item.<br />
7. Press EXIT as needed to return to the display<br />
screen and button bar.<br />
Siemens AG C79000-G7374-C211-01<br />
<strong>SIREC</strong> D Manual


