

SIREC D Display Recorder 7ND4000
SIREC D Display Recorder 7ND4000
SIREC D Display Recorder 7ND4000

Erfolgreiche ePaper selbst erstellen
Machen Sie aus Ihren PDF Publikationen ein blätterbares Flipbook mit unserer einzigartigen Google optimierten e-Paper Software.
Programming<br />
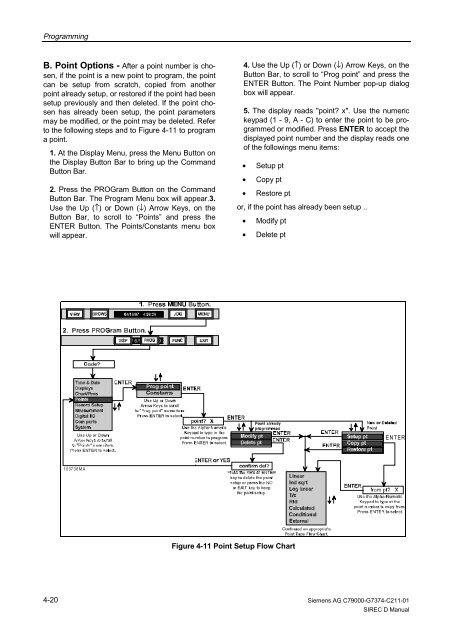
B. Point Options - After a point number is chosen,<br />
if the point is a new point to program, the point<br />
can be setup from scratch, copied from another<br />
point already setup, or restored if the point had been<br />
setup previously and then deleted. If the point chosen<br />
has already been setup, the point parameters<br />
may be modified, or the point may be deleted. Refer<br />
to the following steps and to Figure 4-11 to program<br />
a point.<br />
1. At the <strong>Display</strong> Menu, press the Menu Button on<br />
the <strong>Display</strong> Button Bar to bring up the Command<br />
Button Bar.<br />
2. Press the PROGram Button on the Command<br />
Button Bar. The Program Menu box will appear.3.<br />
Use the Up (↑) or Down (↓) Arrow Keys, on the<br />
Button Bar, to scroll to “Points” and press the<br />
ENTER Button. The Points/Constants menu box<br />
will appear.<br />
4-20<br />
103736MA<br />
04/16/97 4:59:29<br />
4. Use the Up (↑) or Down (↓) Arrow Keys, on the<br />
Button Bar, to scroll to “Prog point” and press the<br />
ENTER Button. The Point Number pop-up dialog<br />
box will appear.<br />
5. The display reads "point? x". Use the numeric<br />
keypad (1 - 9, A - C) to enter the point to be programmed<br />
or modified. Press ENTER to accept the<br />
displayed point number and the display reads one<br />
of the followings menu items:<br />
• Setup pt<br />
• Copy pt<br />
• Restore pt<br />
or, if the point has already been setup ..<br />
• Modify pt<br />
• Delete pt<br />
Figure 4-11 Point Setup Flow Chart<br />
ENTER<br />
Siemens AG C79000-G7374-C211-01<br />
<strong>SIREC</strong> D Manual


