

SIREC D Display Recorder 7ND4000
SIREC D Display Recorder 7ND4000
SIREC D Display Recorder 7ND4000

Sie wollen auch ein ePaper? Erhöhen Sie die Reichweite Ihrer Titel.
YUMPU macht aus Druck-PDFs automatisch weboptimierte ePaper, die Google liebt.
Programming<br />
4.3 Time and Date Menu Item<br />
4.3.1 General. The Time and Date menu item<br />
sets the <strong>Recorder</strong>'s internal clock for time and date<br />
dependent features such as recording to disk, alarm<br />
annotation, and rec documentation. The time is programmed<br />
and displayed in a 24-hour format. The<br />
date is programmed and displayed in a user programmable<br />
American or European format. It is recommended<br />
that you set the time and date upon<br />
system start-up. Time & date are stored in the battery<br />
backed up real time clock. If the time and date<br />
are not set or are lost, it defaults to midnight<br />
(00:00:00) on January 01, 1995 (01/01/95).<br />
103731MA<br />
4-6<br />
NOTE<br />
Changing the Time or Date will reset all resettable<br />
point types.<br />
04/16/97 4:59:29<br />
0<br />
04/16/97 SPC 4:59:29<br />
04/16/97 4:59:29<br />
7 8 9<br />
4 5 6<br />
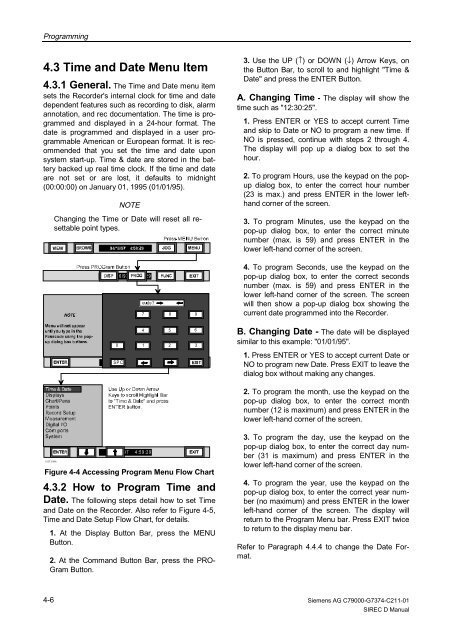
Figure 4-4 Accessing Program Menu Flow Chart<br />
4.3.2 How to Program Time and<br />
Date. The following steps detail how to set Time<br />
and Date on the <strong>Recorder</strong>. Also refer to Figure 4-5,<br />
Time and Date Setup Flow Chart, for details.<br />
1. At the <strong>Display</strong> Button Bar, press the MENU<br />
Button.<br />
2. At the Command Button Bar, press the PRO-<br />
Gram Button.<br />
1<br />
2<br />
3<br />
3. Use the UP (↑) or DOWN (↓) Arrow Keys, on<br />
the Button Bar, to scroll to and highlight "Time &<br />
Date" and press the ENTER Button.<br />
A. Changing Time - The display will show the<br />
time such as "12:30:25".<br />
1. Press ENTER or YES to accept current Time<br />
and skip to Date or NO to program a new time. If<br />
NO is pressed, continue with steps 2 through 4.<br />
The display will pop up a dialog box to set the<br />
hour.<br />
2. To program Hours, use the keypad on the popup<br />
dialog box, to enter the correct hour number<br />
(23 is max.) and press ENTER in the lower lefthand<br />
corner of the screen.<br />
3. To program Minutes, use the keypad on the<br />
pop-up dialog box, to enter the correct minute<br />
number (max. is 59) and press ENTER in the<br />
lower left-hand corner of the screen.<br />
4. To program Seconds, use the keypad on the<br />
pop-up dialog box, to enter the correct seconds<br />
number (max. is 59) and press ENTER in the<br />
lower left-hand corner of the screen. The screen<br />
will then show a pop-up dialog box showing the<br />
current date programmed into the <strong>Recorder</strong>.<br />
B. Changing Date - The date will be displayed<br />
similar to this example: "01/01/95".<br />
1. Press ENTER or YES to accept current Date or<br />
NO to program new Date. Press EXIT to leave the<br />
dialog box without making any changes.<br />
2. To program the month, use the keypad on the<br />
pop-up dialog box, to enter the correct month<br />
number (12 is maximum) and press ENTER in the<br />
lower left-hand corner of the screen.<br />
3. To program the day, use the keypad on the<br />
pop-up dialog box, to enter the correct day number<br />
(31 is maximum) and press ENTER in the<br />
lower left-hand corner of the screen.<br />
4. To program the year, use the keypad on the<br />
pop-up dialog box, to enter the correct year number<br />
(no maximum) and press ENTER in the lower<br />
left-hand corner of the screen. The display will<br />
return to the Program Menu bar. Press EXIT twice<br />
to return to the display menu bar.<br />
Refer to Paragraph 4.4.4 to change the Date Format.<br />
Siemens AG C79000-G7374-C211-01<br />
<strong>SIREC</strong> D Manual


