SIREC D Display Recorder 7ND4000
SIREC D Display Recorder 7ND4000
SIREC D Display Recorder 7ND4000
Erfolgreiche ePaper selbst erstellen
Machen Sie aus Ihren PDF Publikationen ein blätterbares Flipbook mit unserer einzigartigen Google optimierten e-Paper Software.
Operation<br />
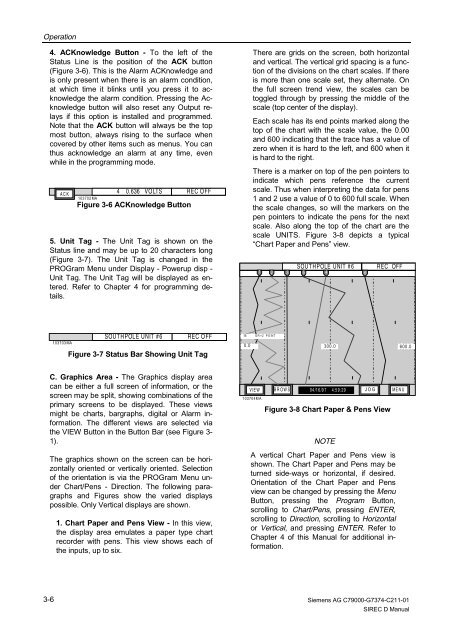
4. ACKnowledge Button - To the left of the<br />
Status Line is the position of the ACK button<br />
(Figure 3-6). This is the Alarm ACKnowledge and<br />
is only present when there is an alarm condition,<br />
at which time it blinks until you press it to acknowledge<br />
the alarm condition. Pressing the Acknowledge<br />
button will also reset any Output relays<br />
if this option is installed and programmed.<br />
Note that the ACK button will always be the top<br />
most button, always rising to the surface when<br />
covered by other items such as menus. You can<br />
thus acknowledge an alarm at any time, even<br />
while in the programming mode.<br />
5. Unit Tag - The Unit Tag is shown on the<br />
Status line and may be up to 20 characters long<br />
(Figure 3-7). The Unit Tag is changed in the<br />
PROGram Menu under <strong>Display</strong> - Powerup disp -<br />
Unit Tag. The Unit Tag will be displayed as entered.<br />
Refer to Chapter 4 for programming details.<br />
C. Graphics Area - The Graphics display area<br />
can be either a full screen of information, or the<br />
screen may be split, showing combinations of the<br />
primary screens to be displayed. These views<br />
might be charts, bargraphs, digital or Alarm information.<br />
The different views are selected via<br />
the VIEW Button in the Button Bar (see Figure 3-<br />
1).<br />
The graphics shown on the screen can be horizontally<br />
oriented or vertically oriented. Selection<br />
of the orientation is via the PROGram Menu under<br />
Chart/Pens - Direction. The following paragraphs<br />
and Figures show the varied displays<br />
possible. Only Vertical displays are shown.<br />
3-6<br />
A C K<br />
103703MA<br />
103702MA<br />
4 0.636 VOLTS REC OFF<br />
Figure 3-6 ACKnowledge Button<br />
SOUT HPOLE UNIT #6 REC OFF<br />
Figure 3-7 Status Bar Showing Unit Tag<br />
1. Chart Paper and Pens View - In this view,<br />
the display area emulates a paper type chart<br />
recorder with pens. This view shows each of<br />
the inputs, up to six.<br />
There are grids on the screen, both horizontal<br />
and vertical. The vertical grid spacing is a function<br />
of the divisions on the chart scales. If there<br />
is more than one scale set, they alternate. On<br />
the full screen trend view, the scales can be<br />
toggled through by pressing the middle of the<br />
scale (top center of the display).<br />
Each scale has its end points marked along the<br />
top of the chart with the scale value, the 0.00<br />
and 600 indicating that the trace has a value of<br />
zero when it is hard to the left, and 600 when it<br />
is hard to the right.<br />
There is a marker on top of the pen pointers to<br />
indicate which pens reference the current<br />
scale. Thus when interpreting the data for pens<br />
1 and 2 use a value of 0 to 600 full scale. When<br />
the scale changes, so will the markers on the<br />
pen pointers to indicate the pens for the next<br />
scale. Also along the top of the chart are the<br />
scale UNITS. Figure 3-8 depicts a typical<br />
“Chart Paper and Pens” view.<br />
1<br />
1B G R =2 P O INT<br />
SOUT HPOLE UNIT # 6 REC OFF<br />
V IE W B R O W S 04 /16 /9 7 4:5 9: 29 JOG M E N U<br />
103704MA<br />
2 3 5 4<br />
6<br />
0.0 300.0 600.0<br />
Figure 3-8 Chart Paper & Pens View<br />
NOTE<br />
A vertical Chart Paper and Pens view is<br />
shown. The Chart Paper and Pens may be<br />
turned side-ways or horizontal, if desired.<br />
Orientation of the Chart Paper and Pens<br />
view can be changed by pressing the Menu<br />
Button, pressing the Program Button,<br />
scrolling to Chart/Pens, pressing ENTER,<br />
scrolling to Direction, scrolling to Horizontal<br />
or Vertical, and pressing ENTER. Refer to<br />
Chapter 4 of this Manual for additional information.<br />
Siemens AG C79000-G7374-C211-01<br />
<strong>SIREC</strong> D Manual


