

SIREC D Display Recorder 7ND4000
SIREC D Display Recorder 7ND4000
SIREC D Display Recorder 7ND4000

Sie wollen auch ein ePaper? Erhöhen Sie die Reichweite Ihrer Titel.
YUMPU macht aus Druck-PDFs automatisch weboptimierte ePaper, die Google liebt.
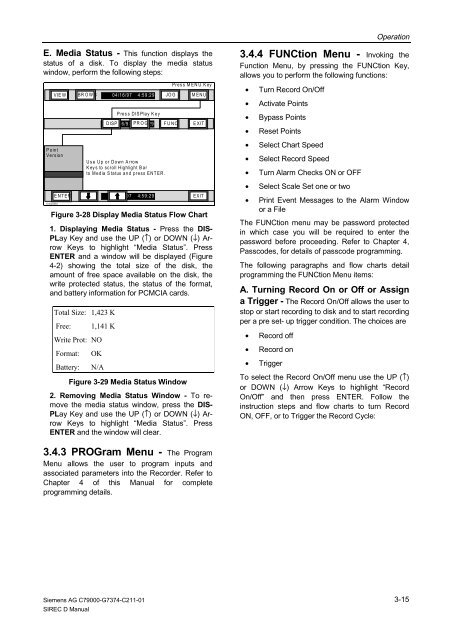
E. Media Status - This function displays the<br />
status of a disk. To display the media status<br />
window, perform the following steps:<br />
VIEW BR OW S 04/16/97 4:59:29 JOG MENU<br />
Point<br />
Version<br />
104025MA<br />
ENTER<br />
1. <strong>Display</strong>ing Media Status - Press the DIS-<br />
PLay Key and use the UP (↑) or DOWN (↓) Arrow<br />
Keys to highlight “Media Status”. Press<br />
ENTER and a window will be displayed (Figure<br />
4-2) showing the total size of the disk, the<br />
amount of free space available on the disk, the<br />
write protected status, the status of the format,<br />
and battery information for PCMCIA cards.<br />
Total Size: 1,423 K<br />
Free: 1,141 K<br />
Write Prot: NO<br />
Format: OK<br />
Battery: N/A<br />
Figure 3-29 Media Status Window<br />
2. Removing Media Status Window - To remove<br />
the media status window, press the DIS-<br />
PLay Key and use the UP (↑) or DOWN (↓) Arrow<br />
Keys to highlight “Media Status”. Press<br />
ENTER and the window will clear.<br />
3.4.3 PROGram Menu - The Program<br />
Menu allows the user to program inputs and<br />
associated parameters into the <strong>Recorder</strong>. Refer to<br />
Chapter 4 of this Manual for complete<br />
programming details.<br />
Siemens AG C79000-G7374-C211-01<br />
<strong>SIREC</strong> D Manual<br />
Press DISPlay Key<br />
DISP 04/16/97 PROG 4:59:29 FUNC EXIT<br />
Use Up or Down Arrow<br />
K ey s to scroll Highlight Bar<br />
to Media Status and press ENTER.<br />
Press M E N U K ey<br />
04/16/97 4:59:29 EXIT<br />
Figure 3-28 <strong>Display</strong> Media Status Flow Chart<br />
Operation<br />
3.4.4 FUNCtion Menu - Invoking the<br />
Function Menu, by pressing the FUNCtion Key,<br />
allows you to perform the following functions:<br />
• Turn Record On/Off<br />
• Activate Points<br />
• Bypass Points<br />
• Reset Points<br />
• Select Chart Speed<br />
• Select Record Speed<br />
• Turn Alarm Checks ON or OFF<br />
• Select Scale Set one or two<br />
• Print Event Messages to the Alarm Window<br />
or a File<br />
The FUNCtion menu may be password protected<br />
in which case you will be required to enter the<br />
password before proceeding. Refer to Chapter 4,<br />
Passcodes, for details of passcode programming.<br />
The following paragraphs and flow charts detail<br />
programming the FUNCtion Menu items:<br />
A. Turning Record On or Off or Assign<br />
a Trigger - The Record On/Off allows the user to<br />
stop or start recording to disk and to start recording<br />
per a pre set- up trigger condition. The choices are<br />
• Record off<br />
• Record on<br />
• Trigger<br />
To select the Record On/Off menu use the UP (↑)<br />
or DOWN (↓) Arrow Keys to highlight “Record<br />
On/Off” and then press ENTER. Follow the<br />
instruction steps and flow charts to turn Record<br />
ON, OFF, or to Trigger the Record Cycle:<br />
3-15


