

Bravo & Brava • 1995 To 2000
Bravo & Brava • 1995 To 2000
Bravo & Brava • 1995 To 2000

You also want an ePaper? Increase the reach of your titles
YUMPU automatically turns print PDFs into web optimized ePapers that Google loves.
19 Power steering gear<br />
assembly -<br />
Removal<br />
removal and refitting 3Q<br />
1 Apply the handbrake, then jack up the front<br />
of the vehicle and support it on axle stands<br />
(see Jacking and vehicle support). Remove<br />
both front roadwheels.<br />
2 Disconnect the battery negative (earth) lead<br />
(see Disconnecting the battery).<br />
3 Syphon as much fluid as possible from the<br />
power steering reservoir, using a pipette or an<br />
old poultry baster. Alternatively, fit a hose<br />
clamp to the hose leading to the steering<br />
gear.<br />
4 Undo the screws and remove the foot rest<br />
located next to the clutch pedal.<br />
5 Unscrew and remove the clamp bolt at the<br />
base of the steering column, to release the<br />
lower universal joint from the steering gear<br />
pinion.<br />
6 Unscrew the nuts from the track-rod ends<br />
on each side, then use a balljoint removal tool<br />
to separate the track-rod ends from the<br />
steering arms on the hub carriers.<br />
7 Disconnect the gearchange socket from the<br />
ball on the transmission lever, then pull up the<br />
clip and disconnect the gearchange outer<br />
cable. Position it to one side.<br />
8 Where applicable, disconnect the reverse<br />
inhibition wiring from the retaining clip on top<br />
of the transmission.<br />
9 On the front of the engine, disconnect the<br />
oxygen sensor wiring, then unbolt the exhaust<br />
bracket from the cylinder block. Remove the<br />
front exhaust downpipe by unscrewing the<br />
nuts securing it to the exhaust manifold, and<br />
also unscrewing the bolts securing it to the<br />
catalytic converter (see Chapter 4C).<br />
10 Support the engine using a trolley jack<br />
and piece of wood beneath the sump,<br />
then unbolt and remove the rear engine<br />
mounting from the transmission and<br />
underbody.<br />
11 From under the engine, prise off the<br />
gearchange from the transmission mounting.<br />
12 Position a container beneath the steering<br />
gear, then unscrew the nut and bolts and<br />
detach the hydraulic fluid line support<br />
brackets from the subframe and steering<br />
gear.<br />
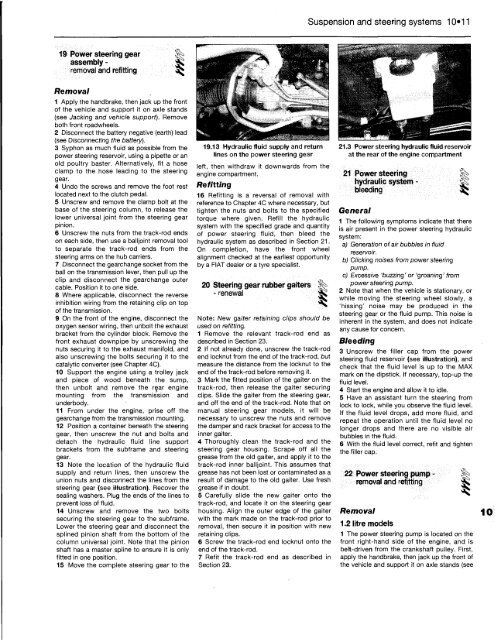
13 Note the location of the hydraulic fluid<br />
supply and return lines, then unscrew the<br />
union nuts and disconnect the lines from the<br />
steering gear (see illustration). Recover the<br />
sealing washers. Plug the ends of the lines to<br />
prevent loss of fluid.<br />
14 Unscrew and remove the two bolts<br />
securing the steering gear to the subframe.<br />
Lower the steering gear and disconnect the<br />
splined pinion shaft from the bottom of the<br />
column universal joint. Note that the pinion<br />
shaft has a master spline to ensure it is only<br />
fitted in one position.<br />
15 Move the complete steering gear to the<br />
19.13 Hydraulic fluid supply and return<br />
lines on the power steering gear<br />
left, then withdraw it downwards from the<br />
engine compartment.<br />
Refitting<br />
16 Refitting is a reversal of removal with<br />
reference to Chapter 4C where necessary, but<br />
tighten the nuts and bolts to the specified<br />
torque where given. Refill the hydraulic<br />
system with the specified grade and quantity<br />
of power steering fluid, then bleed the<br />
hydraulic system as described in Section 21.<br />
On completion, have the front wheel<br />
alignment checked at the earliest opportunity<br />
by a FIAT dealer or a tyre specialist.<br />
20 Steering gear rubber gaiters %<br />
- renewal Sfc<br />
Note: New gaiter retaining clips should be<br />
used on refitting.<br />
1 Remove the relevant track-rod end as<br />
described in Section 23.<br />
2 If not already done, unscrew the track-rod<br />
end locknut from the end of the track-rod, but<br />
measure the distance from the locknut to the<br />
end of the track-rod before removing it.<br />
3 Mark the fitted position of the gaiter on the<br />
track-rod, then release the gaiter securing<br />
clips. Slide the gaiter from the steering gear,<br />
and off the end of the track-rod. Note that on<br />
manual steering gear models, it will be<br />
necessary to unscrew the nuts and remove<br />
the damper and rack bracket for access to the<br />
inner gaiter.<br />
4 Thoroughly clean the track-rod and the<br />
steering gear housing. Scrape off all the<br />
grease from the old gaiter, and apply it to the<br />
track-rod inner balljoint. This assumes that<br />
grease has not been lost or contaminated as a<br />
result of damage to the old gaiter. Use fresh<br />
grease if in doubt.<br />
5 Carefully slide the new gaiter onto the<br />
track-rod, and locate it on the steering gear<br />
housing. Align the outer edge of the gaiter<br />
with the mark made on the track-rod prior to<br />
removal, then secure it in position with new<br />
retaining clips.<br />
6 Screw the track-rod end locknut onto the<br />
end of the track-rod.<br />
7 Refit the track-rod end as described in<br />
Section 23.<br />
Suspension and steering systems 10*11<br />
21.3 Power steering hydraulic fluid reservoir<br />
at the rear of the engine compartment<br />
21 Power steering |^<br />
hydraulic system -<br />
bleeding 3^<br />
General<br />
1 The following symptoms indicate that there<br />
is air present in the power steering hydraulic<br />
system:<br />
a) Generation of air bubbles in fluid<br />
reservoir.<br />
b) Clicking noises from power steering<br />
pump.<br />
c) Excessive 'buzzing' or 'groaning' from<br />
power steering pump.<br />
2 Note that when the vehicle is stationary, or<br />
while moving the steering wheel slowly, a<br />
'hissing' noise may be produced in the<br />
steering gear or the fluid pump. This noise is<br />
inherent in the system, and does not indicate<br />
any cause for concern.<br />
Bleeding<br />
3 Unscrew the filler cap from the power<br />
steering fluid reservoir (see illustration), and<br />
check that the fluid level is up to the MAX<br />
mark on the dipstick. If necessary, top-up the<br />
fluid level.<br />
4 Start the engine and allow it to idle.<br />
5 Have an assistant turn the steering from<br />
lock to lock, while you observe the fluid level.<br />
If the fluid level drops, add more fluid, and<br />
repeat the operation until the fluid level no<br />
longer drops and there are no visible air<br />
bubbles in the fluid.<br />
6 With the fluid level correct, refit and tighten<br />
the filler cap.<br />
22 Power steering pump - f|><br />
removal and refitting<br />
Removal<br />
1.2 litre models<br />
1 The power steering pump is located on the<br />
front right-hand side of the engine, and is<br />
belt-driven from the crankshaft pulley. First,<br />
apply the handbrake, then jack up the front of<br />
the vehicle and support it on axle stands (see


