

Bravo & Brava • 1995 To 2000
Bravo & Brava • 1995 To 2000
Bravo & Brava • 1995 To 2000

Create successful ePaper yourself
Turn your PDF publications into a flip-book with our unique Google optimized e-Paper software.
2018 1.6 litre engine in-car repair procedures<br />
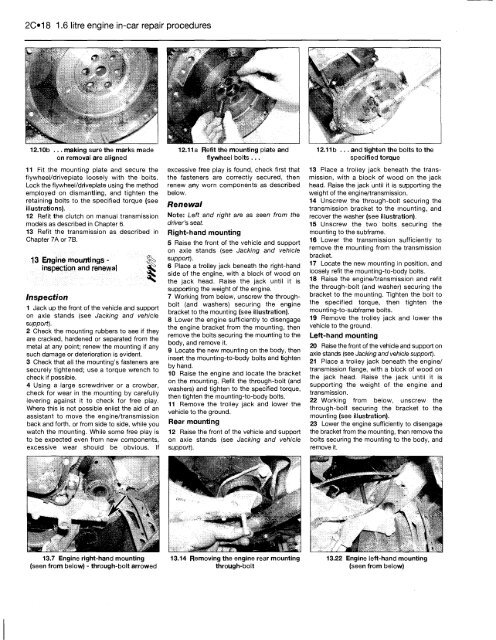
12.10b ... making sure the marks made<br />
on removal are aligned<br />
11 Fit the mounting plate and secure the<br />
flywheel/driveplate loosely with the bolts.<br />
Lock the flywheel/driveplate using the method<br />
employed on dismantling, and tighten the<br />
retaining bolts to the specified torque (see<br />
illustrations).<br />
12 Refit the clutch on manual transmission<br />
models as described in Chapter 6.<br />
13 Refit the transmission as described in<br />
Chapter 7A or 7B.<br />
13 Engine mountings -<br />
inspection and renewal<br />
Inspection<br />
1 Jack up the front of the vehicle and support<br />
on axle stands (see Jacking and vehicle<br />
support).<br />
2 Check the mounting rubbers to see if they<br />
are cracked, hardened or separated from the<br />
metal at any point; renew the mounting if any<br />
such damage or deterioration is evident.<br />
3 Check that all the mounting's fasteners are<br />
securely tightened; use a torque wrench to<br />
check if possible.<br />
4 Using a large screwdriver or a crowbar,<br />
check for wear in the mounting by carefully<br />
levering against it to check for free play.<br />
Where this is not possible enlist the aid of an<br />
assistant to move the engine/transmission<br />
back and forth, or from side to side, while you<br />
watch the mounting. While some free play is<br />
to be expected even from new components,<br />
excessive wear should be obvious. If<br />
13.7 Engine right-hand mounting<br />
(seen from below) - through-bolt arrowed<br />
12.11a Refit the mounting plate and<br />
flywheel bolts ...<br />
excessive free play is found, check first that<br />
the fasteners are correctly secured, then<br />
renew any worn components as described<br />
below.<br />
Renewal<br />
Note: Left and right are as seen from the<br />
driver's seat.<br />
Right-hand mounting<br />
5 Raise the front of the vehicle and support<br />
on axle stands (see Jacking and vehicle<br />
support).<br />
6 Place a trolley jack beneath the right-hand<br />
side of the engine, with a block of wood on<br />
the jack head. Raise the jack until it is<br />
supporting the weight of the engine.<br />
7 Working from below, unscrew the throughbolt<br />
(and washers) securing the engine<br />
bracket to the mounting (see illustration).<br />
8 Lower the engine sufficiently to disengage<br />
the engine bracket from the mounting, then<br />
remove the bolts securing the mounting to the<br />
body, and remove it.<br />
9 Locate the new mounting on the body, then<br />
insert the mounting-to-body bolts and tighten<br />
by hand.<br />
10 Raise the engine and locate the bracket<br />
on the mounting. Refit the through-bolt (and<br />
washers) and tighten to the specified torque,<br />
then tighten the mounting-to-body bolts.<br />
11 Remove the trolley jack and lower the<br />
vehicle to the ground.<br />
Rear mounting<br />
12 Raise the front of the vehicle and support<br />
on axle stands (see Jacking and vehicle<br />
support).<br />
13.14 Removing the engine rear mounting<br />
through-bolt<br />
12.11b ... and tighten the bolts to the<br />
specified torque<br />
13 Place a trolley jack beneath the transmission,<br />
with a block of wood on the jack<br />
head. Raise the jack until it is supporting the<br />
weight of the engine/transmission.<br />
14 Unscrew the through-bolt securing the<br />
transmission bracket to the mounting, and<br />
recover the washer (see illustration).<br />
15 Unscrew the two bolts securing the<br />
mounting to the subframe.<br />
16 Lower the transmission sufficiently to<br />
remove the mounting from the transmission<br />
bracket.<br />
17 Locate the new mounting in position, and<br />
loosely refit the mounting-to-body bolts.<br />
18 Raise the engine/transmission and refit<br />
the through-bolt (and washer) securing the<br />
bracket to the mounting. Tighten the bolt to<br />
the specified torque, then tighten the<br />
mounting-to-subframe bolts.<br />
19 Remove the trolley jack and lower the<br />
vehicle to the ground.<br />
Left-hand mounting<br />
20 Raise the front of the vehicle and support on<br />
axle stands (see Jacking and vehicle support).<br />
21 Place a trolley jack beneath the engine/<br />
transmission flange, with a block of wood on<br />
the jack head. Raise the jack until it is<br />
supporting the weight of the engine and<br />
transmission.<br />
22 Working from below, unscrew the<br />
through-bolt securing the bracket to the<br />
mounting (see illustration).<br />
23 Lower the engine sufficiently to disengage<br />
the bracket from the mounting, then remove the<br />
bolts securing the mounting to the body, and<br />
remove it.<br />
13.22 Engine left-hand mounting<br />
(seen from below)


