

Bravo & Brava • 1995 To 2000
Bravo & Brava • 1995 To 2000
Bravo & Brava • 1995 To 2000

Create successful ePaper yourself
Turn your PDF publications into a flip-book with our unique Google optimized e-Paper software.
2014 1.6 litre engine in-car repair procedures<br />
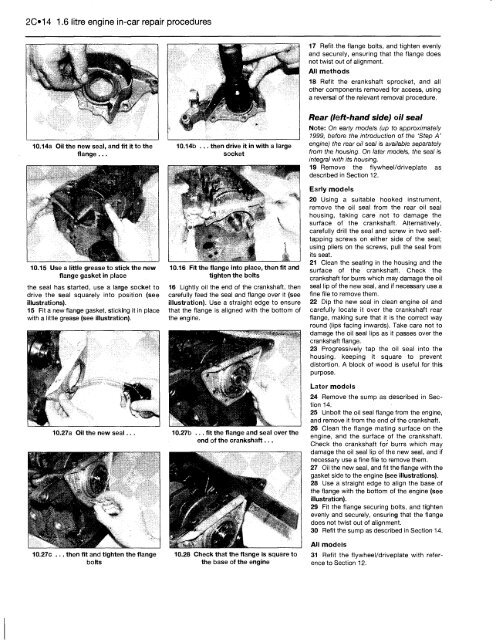
10.14a Oil the new seal, and fit it to the<br />
flange...<br />
10.15 Use a little grease to stick the new<br />
flange gasket in place<br />
the seal has started, use a large socket to<br />
drive the seal squarely into position (see<br />
illustrations).<br />
15 Fit a new flange gasket, sticking it in place<br />
with a little grease (see illustration).<br />
10.27a Oil the new seal...<br />
10.27c ... then fit and tighten the flange<br />
bolts<br />
10.14b ... then drive it in with a large<br />
socket<br />
10.16 Fit the flange into place, then fit and<br />
tighten the bolts<br />
16 Lightly oil the end of the crankshaft, then<br />
carefully feed the seal and flange over it (see<br />
illustration). Use a straight edge to ensure<br />
that the flange is aligned with the bottom of<br />
the engine.<br />
10.27b ... fit the flange and seal over the<br />
end of the crankshaft...<br />
10.28 Check that the flange is square to<br />
the base of the engine<br />
17 Refit the flange bolts, and tighten evenly<br />
and securely, ensuring that the flange does<br />
not twist out of alignment.<br />
All methods<br />
18 Refit the crankshaft sprocket, and all<br />
other components removed for access, using<br />
a reversal of the relevant removal procedure.<br />
Rear (left-hand side) oil seal<br />
Note: On early models (up to approximately<br />
1999, before the introduction of the 'Step A'<br />
engine) the rear oil seal is available separately<br />
from the housing. On later models, the seal is<br />
integral with its housing.<br />
19 Remove the flywheel/driveplate as<br />
described in Section 12.<br />
Early models<br />
20 Using a suitable hooked instrument,<br />
remove the oil seal from the rear oil seal<br />
housing, taking care not to damage the<br />
surface of the crankshaft. Alternatively,<br />
carefully drill the seal and screw in two selftapping<br />
screws on either side of the seal;<br />
using pliers on the screws, pull the seal from<br />
its seat.<br />
21 Clean the seating in the housing and the<br />
surface of the crankshaft. Check the<br />
crankshaft for burrs which may damage the oil<br />
seal lip of the new seal, and if necessary use a<br />
fine file to remove them.<br />
22 Dip the new seal in clean engine oil and<br />
carefully locate it over the crankshaft rear<br />
flange, making sure that it is the correct way<br />
round (lips facing inwards). Take care not to<br />
damage the oil seal lips as it passes over the<br />
crankshaft flange.<br />
23 Progressively tap the oil seal into the<br />
housing, keeping it square to prevent<br />
distortion. A block of wood is useful for this<br />
purpose.<br />
Later models<br />
24 Remove the sump as described in Section<br />
14.<br />
25 Unbolt the oil seal flange from the engine,<br />
and remove it from the end of the crankshaft.<br />
26 Clean the flange mating surface on the<br />
engine, and the surface of the crankshaft.<br />
Check the crankshaft for burrs which may<br />
damage the oil seal lip of the new seal, and if<br />
necessary use a fine file to remove them.<br />
27 Oil the new seal, and fit the flange with the<br />
gasket side to the engine (see illustrations).<br />
28 Use a straight edge to align the base of<br />
the flange with the bottom of the engine (see<br />
illustration).<br />
29 Fit the flange securing bolts, and tighten<br />
evenly and securely, ensuring that the flange<br />
does not twist out of alignment.<br />
30 Refit the sump as described in Section 14.<br />
All models<br />
31 Refit the flywheel/driveplate with reference<br />
to Section 12.


