

Bravo & Brava • 1995 To 2000
Bravo & Brava • 1995 To 2000
Bravo & Brava • 1995 To 2000

Create successful ePaper yourself
Turn your PDF publications into a flip-book with our unique Google optimized e-Paper software.
Starting and charging systems 5A»3<br />
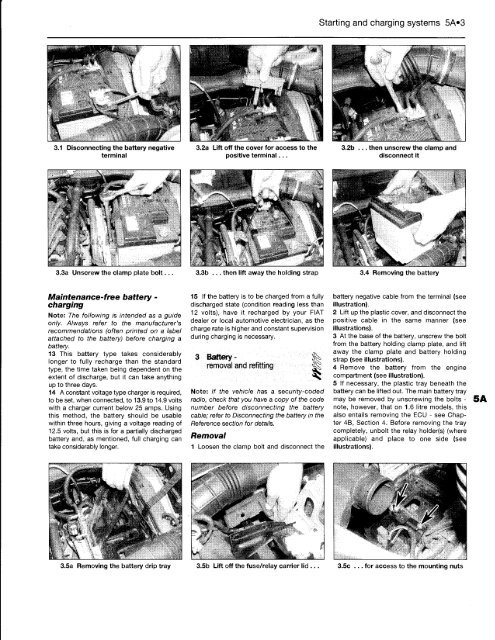
3.3a Unscrew the clamp plate bolt... 3.3b ... then lift away the holding strap 3.4 Removing the battery<br />
Maintenance-free battery -<br />
charging<br />
Note: The following is intended as a guide<br />
only. Always refer to the manufacturer's<br />
recommendations (often printed on a label<br />
attached to the battery) before charging a<br />
battery.<br />
13 This battery type takes considerably<br />
longer to fully recharge than the standard<br />
type, the time taken being dependent on the<br />
extent of discharge, but it can take anything<br />
up to three days.<br />
14 A constant voltage type charger is required,<br />
to be set, when connected, to 13.9 to 14.9 volts<br />
with a charger current below 25 amps. Using<br />
this method, the battery should be usable<br />
within three hours, giving a voltage reading of<br />
12.5 volts, but this is for a partially discharged<br />
battery and, as mentioned, full charging can<br />
take considerably longer.<br />
3.5a Removing the battery drip tray<br />
15 If the battery is to be charged from a fully<br />
discharged state (condition reading less than<br />
12 volts), have it recharged by your FIAT<br />
dealer or local automotive electrician, as the<br />
charge rate is higher and constant supervision<br />
during charging is necessary.<br />
3 Batteryremoval<br />
and refitting ^<br />
Note: If the vehicle has a security-coded<br />
radio, check that you have a copy of the code<br />
number before disconnecting the battery<br />
cable; refer to Disconnecting the battery in the<br />
Reference section for details.<br />
Removal<br />
1 Loosen the clamp bolt and disconnect the<br />
3.5b Lift off the fuse/relay carrier lid ...<br />
battery negative cable from the terminal (see<br />
illustration).<br />
2 Lift up the plastic cover, and disconnect the<br />
positive cable in the same manner (see<br />
illustrations).<br />
3 At the base of the battery, unscrew the bolt<br />
from the battery holding clamp plate, and lift<br />
away the clamp plate and battery holding<br />
strap (see illustrations).<br />
4 Remove the battery from the engine<br />
compartment (see illustration).<br />
5 If necessary, the plastic tray beneath the<br />
battery can be lifted out. The main battery tray<br />
may be removed by unscrewing the bolts -<br />
note, however, that on 1.6 litre models, this<br />
also entails removing the ECU - see Chapter<br />
4B, Section 4. Before removing the tray<br />
completely, unbolt the relay holder(s) (where<br />
applicable) and place to one side (see<br />
illustrations).<br />
3.5c ... for access to the mounting nuts


