

Bravo & Brava • 1995 To 2000
Bravo & Brava • 1995 To 2000
Bravo & Brava • 1995 To 2000

Create successful ePaper yourself
Turn your PDF publications into a flip-book with our unique Google optimized e-Paper software.
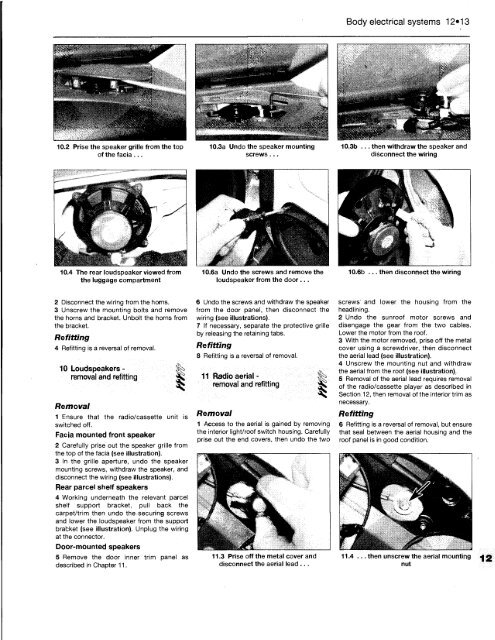
10.2 Prise the speaker grille from the top<br />
of the facia ...<br />
10.4 The rear loudspeaker viewed from<br />
the luggage compartment<br />
2 Disconnect the wiring from the horns.<br />
3 Unscrew the mounting bolts and remove<br />
the horns and bracket. Unbolt the horns from<br />
the bracket.<br />
Refitting<br />
4 Refitting is a reversal of removal.<br />
10 Loudspeakers -<br />
removal and refitting<br />
Removal<br />
1 Ensure that the radio/cassette unit is<br />
switched off.<br />
Facia mounted front speaker<br />
2 Carefully prise out the speaker grille from<br />
the top of the facia (see illustration).<br />
3 In the grille aperture, undo the speaker<br />
mounting screws, withdraw the speaker, and<br />
disconnect the wiring (see illustrations).<br />
Rear parcel shelf speakers<br />
4 Working underneath the relevant parcel<br />
shelf support bracket, pull back the<br />
carpet/trim then undo the securing screws<br />
and lower the loudspeaker from the support<br />
bracket (see illustration). Unplug the wiring<br />
at the connector.<br />
Door-mounted speakers<br />
5 Remove the door inner trim panel as<br />
described in Chapter 11.<br />
10.3a Undo the speaker mounting<br />
screws...<br />
10.6a Undo the screws and remove the<br />
loudspeaker from the door ...<br />
6 Undo the screws and withdraw the speaker<br />
from the door panel, then disconnect the<br />
wiring (see illustrations).<br />
7 If necessary, separate the protective grille<br />
by releasing the retaining tabs.<br />
Refitting<br />
8 Refitting is a reversal of removal.<br />
11 Radio aerial - ^<br />
removal and refitting Sfc<br />
Removal<br />
1 Access to the aerial is gained by removing<br />
the interior light/roof switch housing. Carefully<br />
prise out the end covers, then undo the two<br />
11.3 Prise off the metal cover and<br />
disconnect the aerial lead ...<br />
Body electrical systems 12*13<br />
10.3b ... then withdraw the speaker and<br />
disconnect the wiring<br />
10.6b ... then disconnect the wiring<br />
screws' and lower the housing from the<br />
headlining.<br />
2 Undo the sunroof motor screws and<br />
disengage the gear from the two cables.<br />
Lower the motor from the roof.<br />
3 With the motor removed, prise off the metal<br />
cover using a screwdriver, then disconnect<br />
the aerial lead (see illustration).<br />
4 Unscrew the mounting nut and withdraw<br />
the aerial from the roof (see illustration),<br />
5 Removal of the aerial lead requires removal<br />
of the radio/cassette player as described in<br />
Section 12, then removal of the interior trim as<br />
necessary.<br />
Refitting<br />
6 Refitting is a reversal of removal, but ensure<br />
that seal between the aerial housing and the<br />
roof panel is in good condition.<br />
11.4 ... then unscrew the aerial mounting<br />
nut


