

Bravo & Brava • 1995 To 2000
Bravo & Brava • 1995 To 2000
Bravo & Brava • 1995 To 2000

Create successful ePaper yourself
Turn your PDF publications into a flip-book with our unique Google optimized e-Paper software.
3*4 Cooling, heating and ventilation systems<br />
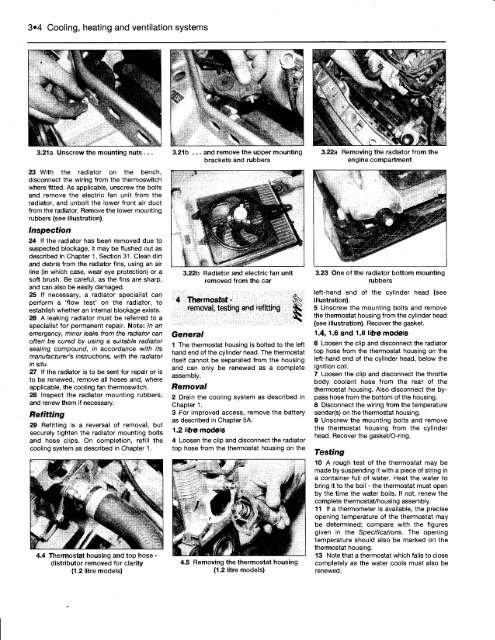
3.21a Unscrew the mounting nuts ...<br />
23 With the radiator on the bench,<br />
disconnect the wiring from the thermoswitch<br />
where fitted. As applicable, unscrew the bolts<br />
and remove the electric fan unit from the<br />
radiator, and unbolt the lower front air duct<br />
from the radiator. Remove the lower mounting<br />
rubbers (see illustration).<br />
Inspection<br />
24 If the radiator has been removed due to<br />
suspected blockage, it may be flushed out as<br />
described in Chapter 1, Section 31. Clean dirt<br />
and debris from the radiator fins, using an air<br />
line (in which case, wear eye protection) or a<br />
soft brush. Be careful, as the fins are sharp,<br />
and can also be easily damaged.<br />
25 If necessary, a radiator specialist can<br />
perform a 'flow test' on the radiator, to<br />
establish whether an internal blockage exists.<br />
26 A leaking radiator must be referred to a<br />
specialist for permanent repair. Note: In an<br />
emergency, minor leaks from the radiator can<br />
often be cured by using a suitable radiator<br />
sealing compound, in accordance with its<br />
manufacturer's instructions, with the radiator<br />
in situ.<br />
27 If the radiator is to be sent for repair or is<br />
to be renewed, remove all hoses and, where<br />
applicable, the cooling fan thermoswitch.<br />
28 Inspect the radiator mounting rubbers,<br />
and renew them if necessary.<br />
Refitting<br />
29 Refitting is a reversal of removal, but<br />
securely tighten the radiator mounting bolts<br />
and hose clips. On completion, refill the<br />
cooling system as described in Chapter 1.<br />
4.4 Thermostat housing and top hose -<br />
distributor removed for clarity<br />
(1.2 litre models)<br />
3.21b ... and remove the upper mounting<br />
brackets and rubbers<br />
3.22b Radiator and electric fan unit<br />
removed from the car<br />
4 Thermostat -<br />
removal, testing and refitting<br />
General<br />
1 The thermostat housing is bolted to the left<br />
hand end of the cylinder head. The thermostat<br />
itself cannot be separated from the housing<br />
and can only be renewed as a complete<br />
assembly.<br />
Removal<br />
2 Drain the cooling system as described in<br />
Chapter 1.<br />
3 for improved access, remove the battery<br />
as described in Chapter 5A.<br />
1.2 litre models<br />
4 Loosen the clip and disconnect the radiator<br />
top hose from the thermostat housing on the<br />
4.5 Removing the thermostat housing<br />
(1.2 litre models)<br />
3.22a Removing the radiator from the<br />
engine compartment<br />
3.23 One of the radiator bottom mounting<br />
rubbers<br />
left-hand end of the cylinder head (see<br />
illustration).<br />
5 Unscrew the mounting bolts and remove<br />
the thermostat housing from the cylinder head<br />
(see illustration). Recover the gasket.<br />
1.4,1.6 and 1.8 litre models<br />
6 Loosen the clip and disconnect the radiator<br />
top hose from the thermostat housing on the<br />
left-hand end of the cylinder head, below the<br />
ignition coil.<br />
7 Loosen the clip and disconnect the throttle<br />
body coolant hose from the rear of the<br />
thermostat housing. Also disconnect the bypass<br />
hose from the bottom of the housing.<br />
8 Disconnect the wiring from the temperature<br />
sender(s) on the thermostat housing.<br />
9 Unscrew the mounting bolts and remove<br />
the thermostat housing from the cylinder<br />
head. Recover the gasket/O-ring.<br />
Testing<br />
10 A rough test of the thermostat may be<br />
made by suspending it with a piece of string in<br />
a container full of water. Heat the water to<br />
bring it to the boil - the thermostat must open<br />
by the time the water boils. If not, renew the<br />
complete thermostat/housing assembly.<br />
11 If a thermometer is available, the precise<br />
opening temperature of the thermostat may<br />
be determined; compare with the figures<br />
given in the Specifications. The opening<br />
temperature should also be marked on the<br />
thermostat housing.<br />
13 Note that a thermostat which fails to close<br />
completely as the water cools must also be<br />
renewed.


