

Bravo & Brava • 1995 To 2000
Bravo & Brava • 1995 To 2000
Bravo & Brava • 1995 To 2000

Create successful ePaper yourself
Turn your PDF publications into a flip-book with our unique Google optimized e-Paper software.
6.17 Withdrawing one of the camshafts<br />
16 Make a note of the position of each tappet,<br />
as they must be fitted to the same valves on<br />
reassembly - accelerated wear leading to early<br />
failure may result if they are interchanged.<br />
17 Carefully withdraw the camshafts from<br />
their respective housings, turning them as<br />
necessary so that the camshaft lobes do not<br />
hang up on the bearings inside the housing<br />
(see illustration). Keep the camshaft<br />
horizontal as it is withdrawn; force should not<br />
be used, or required, otherwise the camshaft<br />
and bearings could be damaged.<br />
18 Suitably mark the camshafts (and housings)<br />
to avoid confusion when refitting. The camshafts<br />
may be found to be marked A and S,<br />
which stands for Aspirazione (Inlet) and Scario<br />
(Exhaust). Note that the inlet camshaft is<br />
nearest to the front facing side of the engine. On<br />
the car seen in the workshop, the inlet camshaft<br />
had a blue paint mark, while the exhaust<br />
camshaft was marked with green paint.<br />
Inspection<br />
19 Examine the camshaft bearing surfaces<br />
and cam lobes for signs of wear ridges and<br />
scoring. Renew the camshafts if any of these<br />
conditions are apparent. As far as possible,<br />
check the condition of the bearing surfaces in<br />
the camshaft housings. If suitable measuring<br />
equipment is available, camshaft bearing<br />
journal wear can be checked by direct<br />
measurement.<br />
20 Examine the tappet bearing surfaces which<br />
contact the camshaft lobes for wear ridges and<br />
scoring. Renew any tappet on which these<br />
conditions are apparent. If a tappet bearing<br />
surface is badly scored, also examine the<br />
6.28a Offer the housing into position on its<br />
side...<br />
<strong>•</strong> f<br />
6.21 Oil the camshaft lobes as the<br />
camshaft is inserted<br />
corresponding lobe on the camshaft for wear,<br />
as it is likely that both will be worn. Renew<br />
worn components as necessary.<br />
Refitting<br />
21 Liberally lubricate the camshaft lobes, and<br />
as far as possible, the bearing surfaces in<br />
each camshaft housing (see illustration).<br />
22 Carefully insert the camshafts back into<br />
their respective housings, taking the same<br />
precautions described in paragraph 17.<br />
23 At this stage, it is advisable to check the<br />
camshaft endfloat using a dial gauge mounted<br />
on the camshaft housing, with its probe in<br />
contact with the camshaft being checked.<br />
Move the camshaft one way, zero the gauge,<br />
then move the camshaft as far as it will go the<br />
other way. Record the reading on the dial<br />
gauge, and repeat on the other camshaft and<br />
housing. FIAT do not quote a figure for<br />
camshaft endfloat, but the figure given in the<br />
Specifications can be used as a guide. If<br />
either of the readings exceeds the tolerance<br />
given, a pair of new camshaft housings will<br />
probably be required.<br />
24 Clean all traces of gasket from the mating<br />
faces on the housings and cylinder head, then<br />
place new gaskets in position over the<br />
locating dowels (see illustration).<br />
25 Fit the hydraulic tappets back in their<br />
original positions (see illustration).<br />
26 If the FIAT special tools for holding the<br />
camshafts were not available, turn the camshafts<br />
(if necessary) so that the marks made<br />
on removal are aligned, and try not to let the<br />
camshafts turn as the housings are refitted.<br />
>.28b . . using a ruler to keep the tappets<br />
from falling out<br />
1.6 litre engine in-car repair procedures 2011<br />
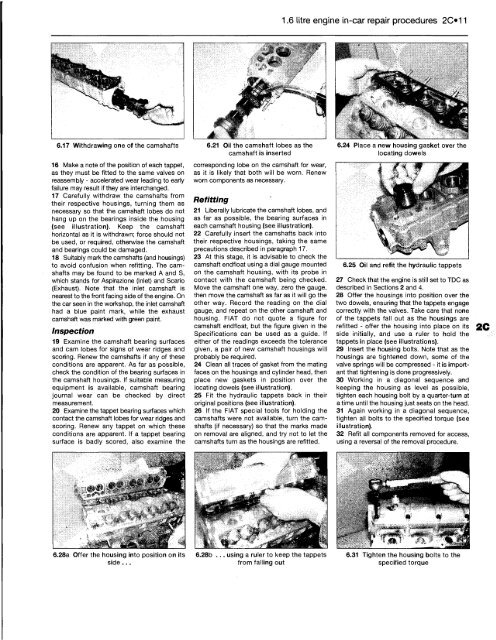
6.24 Place a new housing gasket over the<br />
locating dowels<br />
6.25 Oil and refit the hydraulic tappets<br />
27 Check that the engine is still set to TDC as<br />
described in Sections 2 and 4.<br />
28 Offer the housings into position over the<br />
two dowels, ensuring that the tappets engage<br />
correctly with the valves. Take care that none<br />
of the tappets fall out as the housings are<br />
refitted - offer the housing into place on its<br />
side initially, and use a ruler to hold the<br />
tappets in place (see illustrations).<br />
29 Insert the housing bolts. Note that as the<br />
housings are tightened down, some of the<br />
valve springs will be compressed - it is important<br />
that tightening is done progressively.<br />
30 Working in a diagonal sequence and<br />
keeping the housing as level as possible,<br />
tighten each housing bolt by a quarter-turn at<br />
a time until the housing just seats on the head.<br />
31 Again working in a diagonal sequence,<br />
tighten all bolts to the specified torque (see<br />
illustration).<br />
32 Refit all components removed for access,<br />
using a reversal of the removal procedure.<br />
6.31 Tighten the housing bolts to the<br />
specified torque


