

Bravo & Brava • 1995 To 2000
Bravo & Brava • 1995 To 2000
Bravo & Brava • 1995 To 2000

You also want an ePaper? Increase the reach of your titles
YUMPU automatically turns print PDFs into web optimized ePapers that Google loves.
12*16 Body electrical systems<br />
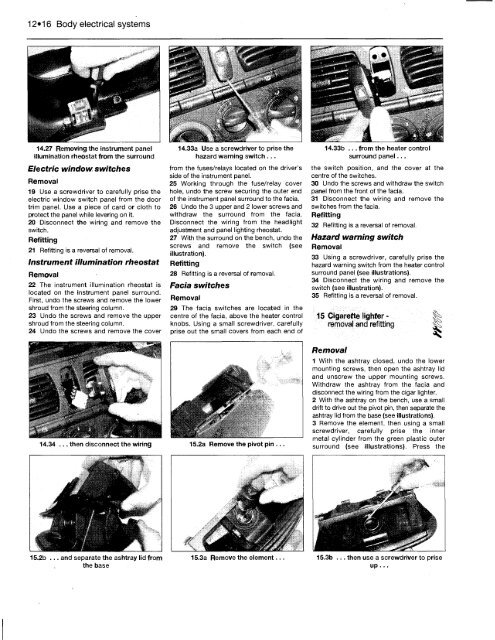
14.27 Removing the instrument panel<br />
illumination rheostat from the surround<br />
Electric window switches<br />
Removal<br />
19 Use a screwdriver to carefully prise the<br />
electric window switch panel from the door<br />
trim panel. Use a piece of card or cloth to<br />
protect the panel while levering on it.<br />
20 Disconnect the wiring and remove the<br />
switch.<br />
Refitting<br />
21 Refitting is a reversal of removal.<br />
Instrument illumination rheostat<br />
Removal<br />
22 The instrument illumination rheostat is<br />
located on the instrument panel surround.<br />
First, undo the screws and remove the lower<br />
shroud from the steering column.<br />
23 Undo the screws and remove the upper<br />
shroud from the steering column.<br />
24 Undo the screws and remove the cover<br />
14.34 ... then disconnect the wiring<br />
15.2b ... and separate the ashtray lid from<br />
the base<br />
14.33a Use a screwdriver to prise the<br />
hazard warning switch ...<br />
from the fuses/relays located on the driver's<br />
side of the instrument panel.<br />
25 Working through the fuse/relay cover<br />
hole, undo the screw securing the outer end<br />
of the instrument panel surround to the facia.<br />
26 Undo the 3 upper and 2 lower screws and<br />
withdraw the surround from the facia.<br />
Disconnect the wiring from the headlight<br />
adjustment and panel lighting rheostat.<br />
27 With the surround on the bench, undo the<br />
screws and remove the switch (see<br />
illustration).<br />
Refitting<br />
28 Refitting is a reversal of removal.<br />
Facia switches<br />
Removal<br />
29 The facia switches are located in the<br />
centre of the facia, above the heater control<br />
knobs. Using a small screwdriver, carefully<br />
prise out the small covers from each end of<br />
15.3a Remove the element...<br />
14.33b ... from the heater control<br />
surround panel...<br />
the switch position, and the cover at the<br />
centre of the switches.<br />
30 Undo the screws and withdraw the switch<br />
panel from the front of the facia.<br />
31 Disconnect the wiring and remove the<br />
switches from the facia.<br />
Refitting<br />
32 Refitting is a reversal of removal.<br />
Hazard warning switch<br />
Removal<br />
33 Using a screwdriver, carefully prise the<br />
hazard warning switch from the heater control<br />
surround panel (see illustrations).<br />
34 Disconnect the wiring and remove the<br />
switch (see illustration).<br />
35 Refitting is a reversal of removal.<br />
15 Cigarette lighter - |^<br />
Removal<br />
removal and refitting |k<br />
1 With the ashtray closed, undo the lower<br />
mounting screws, then open the ashtray lid<br />
and unscrew the upper mounting screws.<br />
Withdraw the ashtray from the facia and<br />
disconnect the wiring from the cigar lighter.<br />
2 With the ashtray on the bench, use a small<br />
drift to drive out the pivot pin, then separate the<br />
ashtray lid from the base (see illustrations).<br />
3 Remove the element, then using a small<br />
screwdriver, carefully prise the inner<br />
metal cylinder from the green plastic outer<br />
surround (see illustrations). Press the<br />
15.3b ... then use a screwdriver to prise


