

Bravo & Brava • 1995 To 2000
Bravo & Brava • 1995 To 2000
Bravo & Brava • 1995 To 2000

You also want an ePaper? Increase the reach of your titles
YUMPU automatically turns print PDFs into web optimized ePapers that Google loves.
eveal a faulty hose, it must be renewed as<br />
described in the following paragraphs.<br />
2 First drain the cooling system (see Chapter 1).<br />
If the coolant is not due for renewal, it may be reused,<br />
providing it is collected in a clean<br />
container.<br />
3 <strong>To</strong> disconnect a hose, use a screwdriver to<br />
slacken the clips, then move them along the<br />
hose, clear of the relevant inlet/outlet.<br />
Carefully work the hose free. The hoses can<br />
be removed with relative ease when new - on<br />
an older car, they may have stuck.<br />
4 If a hose proves to be difficult to remove, try<br />
to release it by twisting its ends before<br />
attempting to free it. Gently prise the end of<br />
the hose with a blunt instrument (such as a<br />
flat-bladed screwdriver), but do not apply too<br />
much force, and take care not to damage the<br />
pipe stubs or hoses. Note in particular that the<br />
radiator inlet stub is fragile; do not use<br />
excessive force when attempting to remove<br />
the hose. If all else fails, cut the hose with a<br />
sharp knife, then slit it so that it can be peeled<br />
off in two pieces. Although this may prove<br />
expensive if the hose is otherwise<br />
undamaged, it is preferable to buying a new<br />
radiator. Check first, however, that a new<br />
hose is readily available.<br />
5 When fitting a hose, first slide the clips onto<br />
the hose, then ease the hose into position.<br />
CTTTTTB If the hose is stiff, use a little<br />
" « !* soapy water as a lubricant,<br />
I t r or soften the hose by<br />
soaking it in hot water. Do<br />
not use oil or grease, which may attack<br />
the rubber.<br />
6 Ensure the hose is correctly routed, then<br />
slide each clip back along the hose until it<br />
passes over the end of the relevant<br />
inlet/outlet, before tightening the clip securely.<br />
7 Refill the cooling system with reference to<br />
Chapter 1.<br />
8 Check thoroughly for leaks as soon as<br />
possible after disturbing any part of the<br />
cooling system.<br />
I<br />
3 Radiator -<br />
removal, inspection<br />
and refitting<br />
Removal<br />
Note: If leakage is the reason for removing the<br />
radiator, bear in mind that minor leaks can<br />
often be cured using proprietary radiator<br />
sealing compound, with the radiator in situ.<br />
1 Disconnect the battery negative (earth) lead<br />
(see Disconnecting the battery).<br />
2 Drain the cooling system as described in<br />
Chapter 1.<br />
1.2 litre models<br />
3 Loosen the clips and disconnect the top<br />
and bottom coolant hoses from the radiator.<br />
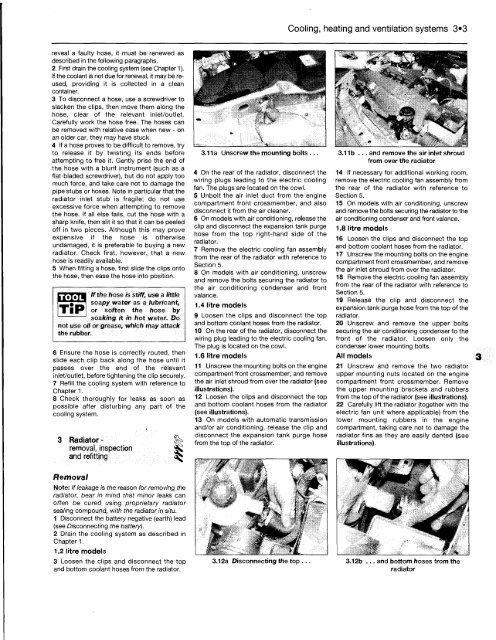
3.11a Unscrew the mounting bolts ...<br />
4 On the rear of the radiator, disconnect the<br />
wiring plugs leading to the electric cooling<br />
fan. The plugs are located on the cowl.<br />
5 Unbolt the air inlet duct from the engine<br />
compartment front crossmember, and also<br />
disconnect it from the air cleaner.<br />
6 On models with air conditioning, release the<br />
clip and disconnect the expansion tank purge<br />
hose from the top right-hand side of the<br />
radiator.<br />
7 Remove the electric cooling fan assembly<br />
from the rear of the radiator with reference to<br />
Section 5.<br />
8 On models with air conditioning, unscrew<br />
and remove the bolts securing the radiator to<br />
the air conditioning condenser and front<br />
valance.<br />
1.4 litre models<br />
9 Loosen the clips and disconnect the top<br />
and bottom coolant hoses from the radiator.<br />
10 On the rear of the radiator, disconnect the<br />
wiring plug leading to the electric cooling fan.<br />
The plug is located on the cowl.<br />
1.6 litre models<br />
11 Unscrew the mounting bolts on the engine<br />
compartment front crossmember, and remove<br />
the air inlet shroud from over the radiator (see<br />
illustrations).<br />
12 Loosen the clips and disconnect the top<br />
and bottom coolant hoses from the radiator<br />
(see illustrations).<br />
13 On models with automatic transmission<br />
and/or air conditioning, release the clip and<br />
disconnect the expansion tank purge hose<br />
from the top of the radiator.<br />
Cooling, heating and ventilation systems 3»3<br />
3.11b ... and remove the air inlet shroud<br />
from over the radiator<br />
14 If necessary for additional working room,<br />
remove the electric cooling fan assembly from<br />
the rear of the radiator with reference to<br />
Section 5.<br />
15 On models with air conditioning, unscrew<br />
and remove the bolts securing the radiator to the<br />
air conditioning condenser and front valance.<br />
1.8 litre models<br />
16 Loosen the clips and disconnect the top<br />
and bottom coolant hoses from the radiator.<br />
17 Unscrew the mounting bolts on the engine<br />
compartment front crossmember, and remove<br />
the air inlet shroud from over the radiator.<br />
18 Remove the electric cooling fan assembly<br />
from the rear of the radiator with reference to<br />
Section 5.<br />
19 Release the clip and disconnect the<br />
expansion tank purge hose from the top of the<br />
radiator.<br />
20 Unscrew and remove the upper bolts<br />
securing the air conditioning condenser to the<br />
front of the radiator. Loosen only the<br />
condenser lower mounting bolts.<br />
All models<br />
21 Unscrew and remove the two radiator<br />
upper mounting nuts located on the engine<br />
compartment front crossmember. Remove<br />
the upper mounting brackets and rubbers<br />
from the top of the radiator (see illustrations).<br />
22 Carefully lift the radiator (together with the<br />
electric fan unit where applicable) from the<br />
lower mounting rubbers in the engine<br />
compartment, taking care not to damage the<br />
radiator fins as they are easily dented (see<br />
illustrations).<br />
3.12a Disconnecting the top .. 3.12b ... and bottom hoses from the<br />
radiator


