- Page 1 and 2:
BRAVO & BRAVA • 1995 to 2000 (N t
- Page 3 and 4:
Contents LIVING WITH YOUR FIAT BRAV
- Page 5 and 6:
o.4 Introduction The 3-door FIAT Br
- Page 7 and 8:
o.6 Roadside repairs The following
- Page 9 and 10:
o.8 Roadside repairs Wheel changing
- Page 11 and 12:
o«io Weekly checks Introduction Th
- Page 13 and 14:
o-i2 Weekly checks Engine oil level
- Page 15 and 16:
o.i4 Weekly checks Tyre condition a
- Page 17 and 18:
o.i6 Weekly checks Washer fluid lev
- Page 19 and 20:
Chapter 1 Routine maintenance & ser
- Page 21 and 22:
Torque wrench settings (continued)
- Page 23 and 24:
1 Washer reservoir 2 Inlet manifold
- Page 25 and 26:
1 Introduction General information
- Page 27 and 28:
A - -A 6.3 Topping-up the battery e
- Page 29 and 30:
7.21 Set the belt tension, then tig
- Page 31 and 32:
Try to move the pipes and silencers
- Page 33 and 34:
18.6 Pull the HT leads off the spar
- Page 35 and 36:
5 Before removing the filter, note
- Page 37 and 38:
2 To fully check the operation of t
- Page 39 and 40: 31.3a Opening the radiator bleed sc
- Page 41 and 42: Chapter 12 Body electrical systems
- Page 43 and 44: 1 General information and precautio
- Page 45 and 46: to release the clip, then withdraw
- Page 47 and 48: Body electrical systems 12»7 4.35a
- Page 49 and 50: 14 Extract the festoon-type bulb fr
- Page 51 and 52: 6.18a Unscrew the mounting bolts ..
- Page 53 and 54: 10.2 Prise the speaker grille from
- Page 55 and 56: Body electrical systems 12»15 14.4
- Page 57 and 58: 15.3c ... and remove the inner meta
- Page 59 and 60: 18.6b Wiper mounting bolt located o
- Page 61 and 62: 22.3b Disconnect the yellow wiring
- Page 63 and 64: Key to symbols — t ; j^g. Item nu
- Page 65 and 66: Wire colours W White R Red Y Yellow
- Page 67 and 68: Wire colours W White O Orange R Red
- Page 69 and 70: Wire colours W White O Orange R Red
- Page 71 and 72: Wire colours W R Y Br P Bl Gr G B V
- Page 73 and 74: Wire colours Key to items w R Y Br
- Page 75 and 76: 11 »2 Bodywork and fittings which
- Page 77 and 78: 11 »4 Bodywork and fittings 6 Fron
- Page 79 and 80: '\'\»6 Bodywork and fittings the c
- Page 81 and 82: 11 »8 Bodywork and fittings 10.11
- Page 83 and 84: 11*10 Bodywork and fittings 7 If wo
- Page 85 and 86: 11*12 Bodywork and fittings 16.10 R
- Page 87 and 88: 11*14 Bodywork and fittings 18.3a U
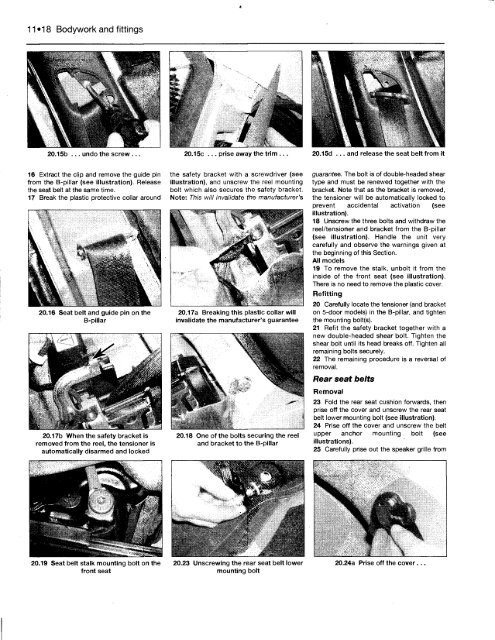
- Page 89: 11*16 Bodywork and fittings 18.23a
- Page 93 and 94: 11 »20 Bodywork and fittings 23.3
- Page 95 and 96: 11 »22 Bodywork and fittings 16 Wi
- Page 97 and 98: 11 »24 Bodywork and fittings 23.27
- Page 99 and 100: 10*2 Suspension and steering system
- Page 101 and 102: 10*4 Suspension and steering system
- Page 103 and 104: 10*6 Suspension and steering system
- Page 105 and 106: 1f>8 Suspension and steering system
- Page 107 and 108: 10*10 Suspension and steering syste
- Page 109 and 110: 10«12 Suspension and steering syst
- Page 111 and 112: 10*14 Suspension and steering syste
- Page 113 and 114: 9*2 Braking system Anti-lock brakin
- Page 115 and 116: 9*4 Braking system 4.2 Disconnectin
- Page 117 and 118: 9*6 Braking system 5 Unhook the sel
- Page 119 and 120: 9*8 Braking system 5.27 Removing th
- Page 121 and 122: 9*10 Braking system 8.4 Disconnecti
- Page 123 and 124: 9»12 Braking system K-0 10.13 Cros
- Page 125 and 126: 9»14 Braking system 25 Working ins
- Page 127 and 128: 9*16 Braking system 2 Unbolt the ex
- Page 129 and 130: 8*2 Driveshafts 1 General informati
- Page 131 and 132: 8*4 Driveshafts 3.23a Extract the c
- Page 133 and 134: 8*6 Driveshafts 4.7 Unbolt the inte
- Page 135 and 136: Chapter 7 Part B: Automatic transmi
- Page 137 and 138: 2.19a Two of the six bolts securing
- Page 139 and 140: S§^)/ H31468 6.11 Selector lever p
- Page 141 and 142:
Chapter 7 Part A: Manual transmissi
- Page 143 and 144:
2 Gearchange lever and linkage remo
- Page 145 and 146:
hoist to the left-hand end of the i
- Page 147 and 148:
) Apply a smear of high-melting-poi
- Page 149 and 150:
6*2 Clutch 1 General information Ve
- Page 151 and 152:
6«4 Clutch 6.4 Clutch slave cylind
- Page 153 and 154:
Chapter 5 Part B: Ignition system C
- Page 155 and 156:
2.8 Diagnostic connector plug locat
- Page 157 and 158:
4.4 Pull the HT leads off the spark
- Page 159 and 160:
6.1 Crankshaft sensor on 1.6 litre
- Page 161 and 162:
Chapter 5 Part A: Starting and char
- Page 163 and 164:
Starting and charging systems 5A»3
- Page 165 and 166:
5.13a Unscrew the bolts securing th
- Page 167 and 168:
6 Unscrew and remove the starter mo
- Page 169 and 170:
402 Exhaust and emission control sy
- Page 171 and 172:
404 Exhaust and emission control sy
- Page 173 and 174:
Chapter 4 Part B: Fuel system - mul
- Page 175 and 176:
2.5 Disconnecting the breather hose
- Page 177 and 178:
4.3c Disconnecting the throttle pot
- Page 179 and 180:
Refitting 20 Refit the injectors an
- Page 181 and 182:
Unplug the wiring connectors and un
- Page 183 and 184:
5.10a Once the base of the unit has
- Page 185 and 186:
8.8b ... and remove this wiring har
- Page 187 and 188:
Chapter 4 Part A: Fuel system - sin
- Page 189 and 190:
6 Slacken and withdraw the securing
- Page 191 and 192:
5.1 Disconnect the breather hose fr
- Page 193 and 194:
Refitting 17 Refitting is a reversa
- Page 195 and 196:
Fuel system - single-point injectio
- Page 197 and 198:
Disconnect the inlet manifold coola
- Page 199 and 200:
Chapter 3 Cooling, heating and vent
- Page 201 and 202:
eveal a faulty hose, it must be ren
- Page 203 and 204:
Refitting 14 Ensure that the cylind
- Page 205 and 206:
36 Unbolt and remove the timing bel
- Page 207 and 208:
Cooling, heating and ventilation sy
- Page 209 and 210:
Chapter 2 Part E: Engine removal an
- Page 211 and 212:
Crankshaft Main bearing journal dia
- Page 213 and 214:
2.20a Removing the cover from the b
- Page 215 and 216:
2.33 Removing the left-hand wheelar
- Page 217 and 218:
Automatic transmission models 64 Re
- Page 219 and 220:
4.20 Look for cracking between the
- Page 221 and 222:
4.45a Locate the inner . 4.45b ...
- Page 223 and 224:
5.24a Using a small screwdriver ...
- Page 225 and 226:
5.47 Tightening the big-end bearing
- Page 227 and 228:
8.14 Three bore measurement points
- Page 229 and 230:
11.19 Lubricate the crankcase main
- Page 231 and 232:
2D»2 1.8 litre engine in-car repai
- Page 233 and 234:
Location of TDC on No 1 cylinder 1
- Page 235 and 236:
4.13a Removing No 3 exhaust camshaf
- Page 237 and 238:
camshaft oil seals for signs of lea
- Page 239 and 240:
14 If necessary, remove and clean t
- Page 241 and 242:
37 Again working in sequence, tight
- Page 243 and 244:
^^^^^ 13.8 Using an impact screwdri
- Page 245 and 246:
202 1.6 litre engine in-car repair
- Page 247 and 248:
204 1.6 litre engine in-car repair
- Page 249 and 250:
206 1.6 litre engine in-car repair
- Page 251 and 252:
208 1.6 litre engine in-car repair
- Page 253 and 254:
2O10 1.6 litre engine in-car repair
- Page 255 and 256:
2012 1.6 litre enginein-car repair
- Page 257 and 258:
2014 1.6 litre engine in-car repair
- Page 259 and 260:
2016 1.6 litre engine in-car repair
- Page 261 and 262:
2018 1.6 litre engine in-car repair
- Page 263 and 264:
2O20 1.6 litre engine in-car repair
- Page 265 and 266:
Chapter 2 Part B: 1.4 litre engine
- Page 267 and 268:
6 Once pressure is felt, continue t
- Page 269 and 270:
4.17 FIAT special tool used to lock
- Page 271 and 272:
Section 4. It is essential that an
- Page 273 and 274:
paragraph 17), then remove the heat
- Page 275 and 276:
to the downpipe. The safest option
- Page 277 and 278:
13.8 Using an impact screwdriver to
- Page 279 and 280:
2A«2 1.2 litre engine in-car repai
- Page 281 and 282:
2A«4 1.2 litre engine in-car repai
- Page 283 and 284:
2A»6 1.2 litre engine in-car repai
- Page 285 and 286:
2A»8 1.2 litre engine in-car repai
- Page 287 and 288:
2A»10 1.2 litre engine in-car repa
- Page 289 and 290:
2A»12 1.2 litre engine in-car repa
- Page 291 and 292:
2A»14 1.2 litre engine in-car repa
- Page 293 and 294:
REF-2 Conversion factors Length (di
- Page 295 and 296:
REF.4 Vehicle identification number
- Page 297 and 298:
REF.6 Disconnecting the battery Sev
- Page 299 and 300:
REF.8 Tools and working facilities
- Page 301 and 302:
REF.10 MOT test checks This is a gu
- Page 303 and 304:
REF«12 MOT test checks Exhaust sys
- Page 305 and 306:
REF.14 Fault finding Engine • Eng
- Page 307 and 308:
REF.16 Fault finding Engine (contin
- Page 309 and 310:
REF.18 Fault finding Clutch Note: T
- Page 311 and 312:
REF.20 Fault finding Braking system
- Page 313 and 314:
REF.22 Fault finding Electrical sys
- Page 315 and 316:
REF.24 Glossary of technical terms
- Page 317 and 318:
REF.26 Glossary of technical terms
- Page 319 and 320:
REF.28 Glossary of technical terms
- Page 321 and 322:
REF
- Page 323 and 324:
REF