

Bravo & Brava • 1995 To 2000
Bravo & Brava • 1995 To 2000
Bravo & Brava • 1995 To 2000

Create successful ePaper yourself
Turn your PDF publications into a flip-book with our unique Google optimized e-Paper software.
2012 1.6 litre enginein-car repair procedures<br />
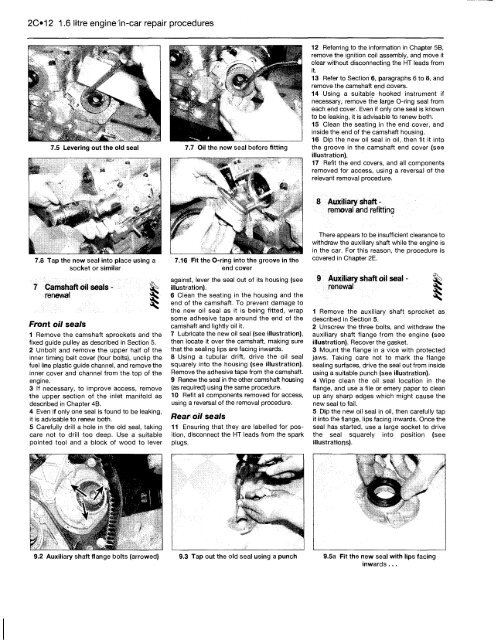
7.8 Tap the new seal into place using a<br />
socket or similar<br />
7 Camshaft oil seals - gfe><br />
renewal<br />
Front oil seals<br />
1 Remove the camshaft sprockets and the<br />
fixed guide pulley as described in Section 5.<br />
2 Unbolt and remove the upper half of the<br />
inner timing belt cover (four bolts), unclip the<br />
fuel line plastic guide channel, and remove the<br />
inner cover and channel from the top of the<br />
engine.<br />
3 If necessary, to improve access, remove<br />
the upper section of the inlet manifold as<br />
described in Chapter 4B.<br />
4 Even if only one seal is found to be leaking,<br />
it is advisable to renew both.<br />
5 Carefully drill a hole in the old seal, taking<br />
care not to drill too deep. Use a suitable<br />
pointed tool and a block of wood to lever<br />
9.2 Auxiliary shaft flange bolts (arrowed)<br />
7.7 Oil the new seal before fitting<br />
7.16 Fit the O-ring into the groove in the<br />
end cover<br />
against, lever the seal out of its housing (see<br />
illustration).<br />
6 Clean the seating in the housing and the<br />
end of the camshaft. <strong>To</strong> prevent damage to<br />
the new oil seal as it is being fitted, wrap<br />
some adhesive tape around the end of the<br />
camshaft and lightly oil it.<br />
7 Lubricate the new oil seal (see illustration),<br />
then locate it over the camshaft, making sure<br />
that the sealing lips are facing inwards.<br />
8 Using a tubular drift, drive the oil seal<br />
squarely into the housing (see illustration).<br />
Remove the adhesive tape from the camshaft.<br />
9 Renew the seal in the other camshaft housing<br />
(as required) using the same procedure.<br />
10 Refit all components removed for access,<br />
using a reversal of the removal procedure.<br />
Rear oil seals<br />
11 Ensuring that they are labelled for position,<br />
disconnect the HT leads from the spark<br />
plugs.<br />
9.3 Tap out the old seal using a punch<br />
12 Referring to the information in Chapter 5B,<br />
remove the ignition coil assembly, and move it<br />
clear without disconnecting the HT leads from<br />
it.<br />
13 Refer to Section 6, paragraphs 6 to 8, and<br />
remove the camshaft end covers.<br />
14 Using a suitable hooked instrument if<br />
necessary, remove the large O-ring seal from<br />
each end cover. Even if only one seal is known<br />
to be leaking, it is advisable to renew both.<br />
15 Clean the seating in the end cover, and<br />
inside the end of the camshaft housing.<br />
16 Dip the new oil seal in oil, then fit it into<br />
the groove in the camshaft end cover (see<br />
illustration).<br />
17 Refit the end covers, and all components<br />
removed for access, using a reversal of the<br />
relevant removal procedure.<br />
8 Auxiliary shaft -<br />
removal and refitting<br />
There appears to be insufficient clearance to<br />
withdraw the auxiliary shaft while the engine is<br />
in the car. For this reason, the procedure is<br />
covered in Chapter 2E.<br />
9 Auxiliary shaft oil seal -<br />
renewal «<br />
1 Remove the auxiliary shaft sprocket as<br />
described in Section 5.<br />
2 Unscrew the three bolts, and withdraw the<br />
auxiliary shaft flange from the engine (see<br />
illustration). Recover the gasket.<br />
3 Mount the flange in a vice with protected<br />
jaws. Taking care not to mark the flange<br />
sealing surfaces, drive the seal out from inside<br />
using a suitable punch (see illustration).<br />
4 Wipe clean the oil seal location in the<br />
flange, and use a file or emery paper to clean<br />
up any sharp edges which might cause the<br />
new seal to fail.<br />
5 Dip the new oil seal in oil, then carefully tap<br />
it into the flange, lips facing inwards. Once the<br />
seal has started, use a large socket to drive<br />
the seal squarely into position (see<br />
illustrations).<br />
€ 3 ^<br />
9.5a Fit the new seal with lips facing<br />
inwards...


