

Bravo & Brava • 1995 To 2000
Bravo & Brava • 1995 To 2000
Bravo & Brava • 1995 To 2000

You also want an ePaper? Increase the reach of your titles
YUMPU automatically turns print PDFs into web optimized ePapers that Google loves.
2B«2 1.4 litre engine in-car repair procedures<br />
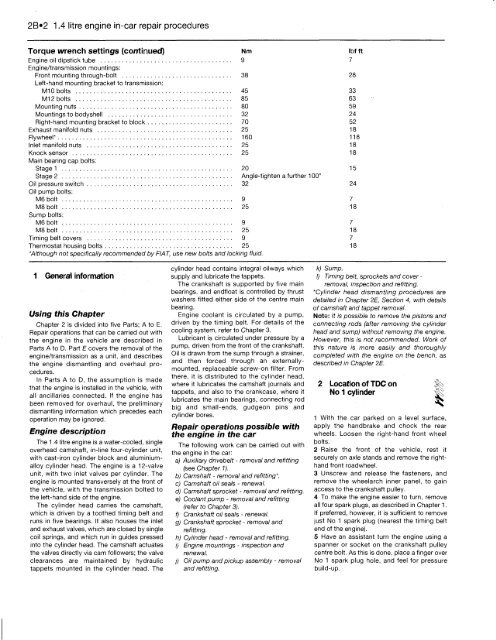
<strong>To</strong>rque wrench settings (continued) Nm Ibf ft<br />
Engine oil dipstick tube 9 7<br />
Engine/transmission mountings:<br />
Front mounting through-bolt 38 28<br />
Left-hand mounting bracket to transmission:<br />
M10 bolts 45 33<br />
M12 bolts 85 63<br />
Mounting nuts 80 59<br />
Mountings to bodyshell 32 24<br />
Right-hand mounting bracket to block 70 52<br />
Exhaust manifold nuts 25 18<br />
Flywheel* 160 118<br />
Inlet manifold nuts 25 18<br />
Knock sensor 25 18<br />
Main bearing cap bolts:<br />
Stage 1 20 15<br />
Stage 2 Angle-tighten a further 100°<br />
32 24<br />
Oil pump bolts:<br />
M6bolt 9 7<br />
M8bolt 25 18<br />
Sump bolts:<br />
M6bolt 9 7<br />
M8bolt 25 18<br />
Timing belt covers 9 7<br />
Thermostat housing bolts 25 18<br />
"Although not specifically recommended by FIAT, use new bolts and locking fluid.<br />
1 General information<br />
Using this Chapter<br />
Chapter 2 is divided into five Parts; A to E.<br />
Repair operations that can be carried out with<br />
the engine in the vehicle are described in<br />
Parts A to D. Part E covers the removal of the<br />
engine/transmission as a unit, and describes<br />
the engine dismantling and overhaul procedures.<br />
In Parts A to D, the assumption is made<br />
that the engine is installed in the vehicle, with<br />
all ancillaries connected. If the engine has<br />
been removed for overhaul, the preliminary<br />
dismantling information which precedes each<br />
operation may be ignored.<br />
Engine description<br />
The 1.4 litre engine is a water-cooled, single<br />
overhead camshaft, in-line four-cylinder unit,<br />
with cast-iron cylinder block and aluminiumalloy<br />
cylinder head. The engine is a 12-valve<br />
unit, with two inlet valves per cylinder. The<br />
engine is mounted transversely at the front of<br />
the vehicle, with the transmission bolted to<br />
the left-hand side of the engine.<br />
The cylinder head carries the camshaft,<br />
which is driven by a toothed timing belt and<br />
runs in five bearings. It also houses the inlet<br />
and exhaust Valves, which are closed by single<br />
coil springs, and which run in guides pressed<br />
into the cylinder head. The camshaft actuates<br />
the valves directly via cam followers; the valve<br />
clearances are maintained by hydraulic<br />
tappets mounted in the cylinder head. The<br />
cylinder head contains integral oilways which<br />
supply and lubricate the tappets.<br />
The crankshaft is supported by five main<br />
bearings, and endfloat is controlled by thrust<br />
washers fitted either side of the centre main<br />
bearing.<br />
Engine coolant is circulated by a pump,<br />
driven by the timing belt. For details of the<br />
cooling system, refer to Chapter 3.<br />
Lubricant is circulated under pressure by a<br />
pump, driven from the front of the crankshaft.<br />
Oil is drawn from the sump through a strainer,<br />
and then forced through an externallymounted,<br />
replaceable screw-on filter. From<br />
there, it is distributed to the cylinder head,<br />
where it lubricates the camshaft journals and<br />
tappets, and also to the crankcase, where it<br />
lubricates the main bearings, connecting rod<br />
big and small-ends, gudgeon pins and<br />
cylinder bores.<br />
Repair operations possible with<br />
the engine in the car<br />
The following work can be carried out with<br />
the engine in the car:<br />
a) Auxiliary drivebelt - removal and refitting<br />
(see Chapter 1).<br />
b) Camshaft - removal and refitting*.<br />
c) Camshaft oil seals - renewal.<br />
d) Camshaft sprocket - removal and refitting.<br />
e) Coolant pump - removal and refitting<br />
(refer to Chapter 3).<br />
f) Crankshaft oil seals - renewal.<br />
g) Crankshaft sprocket - removal and<br />
refitting.<br />
h) Cylinder head - removal and refitting.<br />
i) Engine mountings - inspection and<br />
renewal.<br />
j) Oil pump and pickup assembly - removal<br />
and refitting.<br />
k) Sump.<br />
I) Timing belt, sprockets and cover -<br />
removal, inspection and refitting.<br />
"Cylinder head dismantling procedures are<br />
detailed in Chapter 2E, Section 4, with details<br />
of camshaft and tappet removal.<br />
Note: It is possible to remove the pistons and<br />
connecting rods (after removing the cylinder<br />
head and sump) without removing the engine.<br />
However, this is not recommended. Work of<br />
this nature is more easily and thoroughly<br />
completed with the engine on the bench, as<br />
described in Chapter 2E.<br />
2 Location of TDC on<br />
No 1 cylinder _3§<br />
1 With the car parked on a level surface,<br />
apply the handbrake and chock the rear<br />
wheels. Loosen the right-hand front wheel<br />
bolts.<br />
2 Raise the front of the vehicle, rest it<br />
securely on axle stands and remove the righthand<br />
front roadwheel.<br />
3 Unscrew and release the fasteners, and<br />
remove the wheelarch inner panel, to gain<br />
access to the crankshaft pulley.<br />
4 <strong>To</strong> make the engine easier to turn, remove<br />
all four spark plugs, as described in Chapter 1.<br />
If preferred, however, it is sufficient to remove<br />
just No 1 spark plug (nearest the timing belt<br />
end of the engine).<br />
5 Have an assistant turn the engine using a<br />
spanner or socket on the crankshaft pulley<br />
centre bolt. As this is done, place a finger over<br />
No 1 spark plug hole, and feel for pressure<br />
build-up.


