

Bravo & Brava • 1995 To 2000
Bravo & Brava • 1995 To 2000
Bravo & Brava • 1995 To 2000

You also want an ePaper? Increase the reach of your titles
YUMPU automatically turns print PDFs into web optimized ePapers that Google loves.
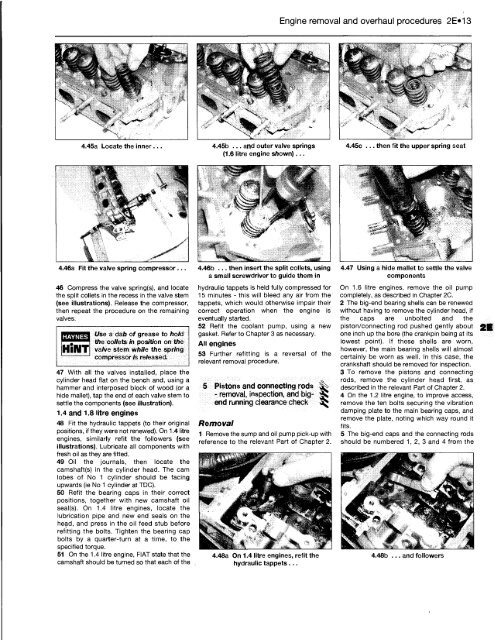
4.45a Locate the inner . 4.45b ... and outer valve springs<br />
(1.6 litre engine shown)...<br />
4.46a Fit the valve spring compressor ...<br />
46 Compress the valve spring(s), and locate<br />
the split collets in the recess in the valve stem<br />
(see illustrations). Release the compressor,<br />
then repeat the procedure on the remaining<br />
valves.<br />
HAYNES<br />
Use a dab of grease to hold<br />
the collets in position on the<br />
valve stem while the spring<br />
compressor is released.<br />
47 With all the valves installed, place the<br />
cylinder head flat on the bench and, using a<br />
hammer and interposed block of wood (or a<br />
hide mallet), tap the end of each valve stem to<br />
settle the components (see illustration).<br />
1.4 and 1.8 litre engines<br />
48 Fit the hydraulic tappets (to their original<br />
positions, if they were not renewed). On 1.4 litre<br />
engines, similarly refit the followers (see<br />
illustrations). Lubricate all components with<br />
fresh oil as they are fitted.<br />
49 Oil the journals, then locate the<br />
camshaft(s) in the cylinder head. The cam<br />
lobes of No 1 cylinder should be facing<br />
upwards (ie No 1 cylinder at TDC).<br />
50 Refit the bearing caps in their correct<br />
positions, together with new camshaft oil<br />
seal(s). On 1.4 litre engines, locate the<br />
lubrication pipe and new end seals on the<br />
head, and press in the oil feed stub before<br />
refitting the bolts. Tighten the bearing cap<br />
bolts by a quarter-turn at a time, to the<br />
specified torque.<br />
51 On the 1.4 litre engine, FIAT state that the<br />
camshaft should be turned so that each of the<br />
4.46b ... then insert the split collets, using<br />
a small screwdriver to guide them in<br />
hydraulic tappets is held fully compressed for<br />
15 minutes - this will bleed any air from the<br />
tappets, which would otherwise impair their<br />
correct operation when the engine is<br />
eventually started.<br />
52 Refit the coolant pump, using a new<br />
gasket. Refer to Chapter 3 as necessary.<br />
All engines<br />
53 Further refitting is a reversal of the<br />
relevant removal procedure.<br />
5 Pistons and connecting rods ^<br />
- removal, inspection, and bigend<br />
running clearance check 3Q<br />
Removal<br />
1 Remove the sump and oil pump pick-up with<br />
reference to the relevant Part of Chapter 2.<br />
4.48a On 1.4 litre engines, refit the<br />
hydraulic tappets ...<br />
Engine removal and overhaul procedures 2E«13<br />
4.45c ... then fit the upper spring seat<br />
4.47 Using a hide mallet to settle the valve<br />
components<br />
On 1.6 litre engines, remove the oil pump<br />
completely, as described in Chapter 2C.<br />
2 The big-end bearing shells can be renewed<br />
without having to remove the cylinder head, if<br />
the caps are unbolted and the<br />
piston/connecting rod pushed gently about<br />
one inch up the bore (the crankpin being at its<br />
lowest point). If these shells are worn,<br />
however, the main bearing shells will almost<br />
certainly be worn as well. In this case, the<br />
crankshaft should be removed for inspection.<br />
3 <strong>To</strong> remove the pistons and connecting<br />
rods, remove the cylinder head first, as<br />
described in the relevant Part of Chapter 2.<br />
4 On the 1.2 litre engine, to improve access,<br />
remove the ten bolts securing the vibration<br />
damping plate to the main bearing caps, and<br />
remove the plate, noting which way round it<br />
fits.<br />
5 The big-end caps and the connecting rods<br />
should be numbered 1, 2, 3 and 4 from the<br />
4.48b , and followers


