

Bravo & Brava • 1995 To 2000
Bravo & Brava • 1995 To 2000
Bravo & Brava • 1995 To 2000

Create successful ePaper yourself
Turn your PDF publications into a flip-book with our unique Google optimized e-Paper software.
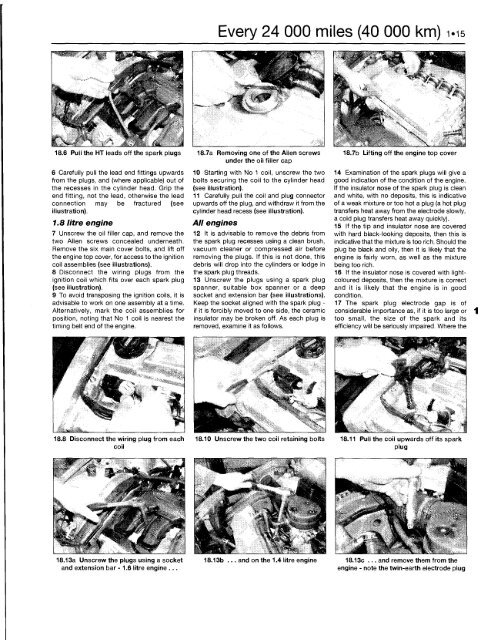
18.6 Pull the HT leads off the spark plugs<br />
6 Carefully pull the lead end fittings upwards<br />
from the plugs, and (where applicable) out of<br />
the recesses in the cylinder head. Grip the<br />
end fitting, not the lead, otherwise the lead<br />
connection may be fractured (see<br />
illustration).<br />
1.8 litre engine<br />
7 Unscrew the oil filler cap, and remove the<br />
two Allen screws concealed underneath.<br />
Remove the six main cover bolts, and lift off<br />
the engine top cover, for access to the ignition<br />
coil assemblies (see illustrations).<br />
8 Disconnect the wiring plugs from the<br />
ignition coil which fits over each spark plug<br />
(see illustration).<br />
9 <strong>To</strong> avoid transposing the ignition coils, it is<br />
advisable to work on one assembly at a time.<br />
Alternatively, mark the coil assemblies for<br />
position, noting that No 1 coil is nearest the<br />
timing belt end of the engine.<br />
18.8 Disconnect the wiring plug from each<br />
coil<br />
18.13a Unscrew the plugs using a socket<br />
and extension bar -1.6 litre engine ...<br />
Every 24 000 miles (40 000 km) 1.15<br />
18.7a Removing one of the Allen screws<br />
under the oil filler cap<br />
10 Starting with No 1 coil, unscrew the two<br />
bolts securing the coil to the cylinder head<br />
(see illustration).<br />
11 Carefully pull the coil and plug connector<br />
upwards off the plug, and withdraw it from the<br />
cylinder head recess (see illustration).<br />
All engines<br />
12 It is advisable to remove the debris from<br />
the spark plug recesses using a clean brush,<br />
vacuum cleaner or compressed air before<br />
removing the plugs. If this is not done, this<br />
debris will drop into the cylinders or lodge in<br />
the spark plug threads.<br />
13 Unscrew the plugs using a spark plug<br />
spanner, suitable box spanner or a deep<br />
socket and extension bar (see illustrations).<br />
Keep the socket aligned with the spark plug -<br />
if it is forcibly moved to one side, the ceramic<br />
insulator may be broken off. As each plug is<br />
removed, examine it as follows.<br />
18.7b Lifting off the engine top cover<br />
14 Examination of the spark plugs will give a<br />
good indication of the condition of the engine.<br />
If the insulator nose of the spark plug is clean<br />
and white, with no deposits, this is indicative<br />
of a weak mixture or too hot a plug (a hot plug<br />
transfers heat away from the electrode slowly,<br />
a cold plug transfers heat away quickly).<br />
15 If the tip and insulator nose are covered<br />
with hard black-looking deposits, then this is<br />
indicative that the mixture is too rich. Should the<br />
plug be black and oily, then it is likely that the<br />
engine is fairly worn, as well as the mixture<br />
being too rich.<br />
16 If the insulator nose is covered with lightcoloured<br />
deposits, then the mixture is correct<br />
and it is likely that the engine is in good<br />
condition.<br />
17 The spark plug electrode gap is of<br />
considerable importance as, if it is too large or<br />
too small, the size of the spark and its<br />
efficiency will be seriously impaired. Where the<br />
18.10 Unscrew the two coil retaining bolts 18.11 Pull the coil upwards off its spark<br />
plug<br />
18.13b ... and on the 1.4 litre engine 18.13c ... and remove them from the<br />
engine - note the twin-earth electrode plug


