

Bravo & Brava • 1995 To 2000
Bravo & Brava • 1995 To 2000
Bravo & Brava • 1995 To 2000

Create successful ePaper yourself
Turn your PDF publications into a flip-book with our unique Google optimized e-Paper software.
9*4 Braking system<br />
4.2 Disconnecting the brake pad wear sensor wiring 4.3 Removing the anti-rattle spring from the front brake caliper<br />
master cylinder reservoir cap, then tighten the<br />
cap down onto a piece of polythene to obtain<br />
an airtight seal. Alternatively, flexible hoses<br />
can be sealed, if required, using a proprietary<br />
brake hose clamp. Metal brake pipe unions<br />
can be plugged (if care is taken not to allow<br />
dirt into the system) or capped immediately<br />
they are disconnected. Place a wad of rag<br />
under any union that is to be disconnected, to<br />
catch any spilt fluid.<br />
2 If a flexible hose is to be disconnected,<br />
unscrew the brake pipe union nut before<br />
removing the spring clip which secures the<br />
hose to its mounting bracket.<br />
3 <strong>To</strong> unscrew the union nuts, it is preferable<br />
to obtain a special brake pipe split spanner.<br />
These are available from most motor<br />
accessory shops. Failing this, a close-fitting<br />
open-ended spanner will be required, though<br />
if the nuts are tight or corroded, their flats may<br />
be rounded-off if the spanner slips. In such a<br />
case, a self-locking wrench is often the only<br />
way to unscrew a stubborn union, but it<br />
follows that the pipe and the damaged nuts<br />
must be renewed on reassembly. Always<br />
clean a union and surrounding area before<br />
disconnecting it. If disconnecting a<br />
component with more than one union, make a<br />
careful note of the connections before<br />
disturbing any of them.<br />
4 If a brake pipe is to be renewed, it can be<br />
obtained, cut to length and with the union<br />
4.4 Releasing the hydraulic line support<br />
grommet from the strut<br />
nuts and end flares in place, from FIAT<br />
dealers. All that is then necessary is to bend it<br />
to shape, following the line of the original,<br />
before fitting it to the vehicle. Alternatively,<br />
most motor accessory shops can make up<br />
brake pipes from kits, but this requires very<br />
careful measurement of the original, to ensure<br />
that the replacement is of the correct length.<br />
The safest answer is usually to take the<br />
original to the shop as a pattern.<br />
5 On refitting, do not overtighten the union<br />
nuts. If possible, use a torque wrench to<br />
ensure they are tightened correctly.<br />
6 Ensure that the pipes and hoses are<br />
correctly routed, with no kinks, and that they<br />
are secured in the clips or brackets provided.<br />
After fitting, remove the polythene from the<br />
reservoir, and bleed the hydraulic system as<br />
described in Section 2. Wash off any spilt<br />
fluid, and check carefully for fluid leaks.<br />
4 Front brake pads -<br />
renewal<br />
A<br />
Warning: Renew BOTH sets of<br />
front brake pads at the same<br />
time - NEVER renew the pads on<br />
only one wheel, as uneven<br />
braking may result. Note that the dust<br />
created by wear of the pads may contain<br />
4.5 Removing the guide bush end caps<br />
asbestos, which is a health hazard. Never<br />
blow it out with compressed air, and don't<br />
inhale any of it. An approved filtering mask<br />
should be worn when working on the<br />
brakes. DO NOT use petrol or petroleumbased<br />
solvents to clean brake parts; use<br />
proprietary brake cleaner or methylated<br />
spirit only.<br />
1 Apply the handbrake, then jack up the front<br />
of the vehicle and support it on axle stands<br />
(see Jacking and vehicle support). Remove<br />
the front roadwheels.<br />
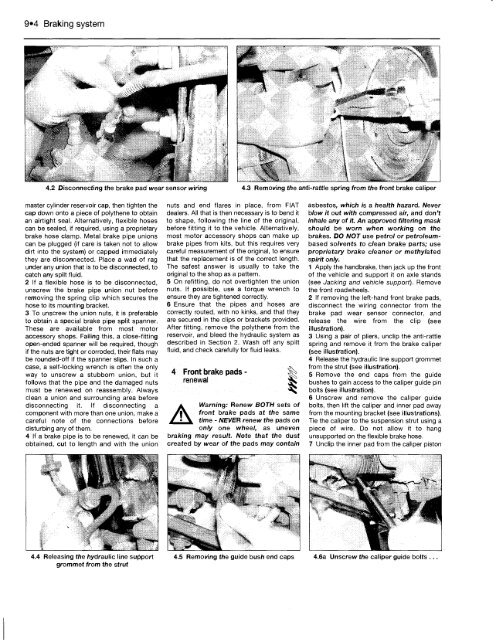
2 If removing the left-hand front brake pads,<br />
disconnect the wiring connector from the<br />
brake pad wear sensor connector, and<br />
release the wire from the clip (see<br />
illustration).<br />
3 Using a pair of pliers, unclip the anti-rattle<br />
spring and remove it from the brake caliper<br />
(see illustration).<br />
4 Release the hydraulic line support grommet<br />
from the strut (see illustration).<br />
5 Remove the end caps from the guide<br />
bushes to gain access to the caliper guide pin<br />
bolts (see illustration).<br />
6 Unscrew and remove the caliper guide<br />
bolts, then lift the caliper and inner pad away<br />
from the mounting bracket (see illustrations).<br />
Tie the caliper to the suspension strut using a<br />
piece of wire. Do not allow it to hang<br />
unsupported on the flexible brake hose.<br />
7 Unclip the inner pad from the caliper piston<br />
4.6a Unscrew the caliper guide bolts ...


