

Bravo & Brava • 1995 To 2000
Bravo & Brava • 1995 To 2000
Bravo & Brava • 1995 To 2000

You also want an ePaper? Increase the reach of your titles
YUMPU automatically turns print PDFs into web optimized ePapers that Google loves.
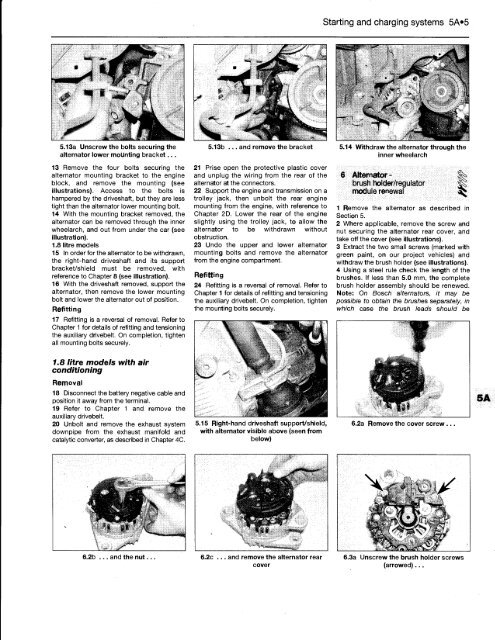
5.13a Unscrew the bolts securing the<br />
alternator lower mounting bracket...<br />
13 Remove the four bolts securing the<br />
alternator mounting bracket to the engine<br />
block, and remove the mounting (see<br />
illustrations). Access to the bolts is<br />
hampered by the driveshaft, but they are less<br />
tight than the alternator lower mounting bolt.<br />
14 With the mounting bracket removed, the<br />
alternator can be removed through the inner<br />
wheelarch, and out from under the car (see<br />
illustration).<br />
1.8 litre models<br />
15 In order for the alternator to be withdrawn,<br />
the right-hand driveshaft and its support<br />
bracket/shield must be removed, with<br />
reference to Chapter 8 (see illustration).<br />
16 With the driveshaft removed, support the<br />
alternator, then remove the lower mounting<br />
bolt and lower the alternator out of position.<br />
Refitting<br />
17 Refitting is a reversal of removal. Refer to<br />
Chapter 1 for details of refitting and tensioning<br />
the auxiliary drivebelt. On completion, tighten<br />
all mounting bolts securely.<br />
1.8 litre models with air<br />
conditioning<br />
Removal<br />
18 Disconnect the battery negative cable and<br />
position it away from the terminal.<br />
19 Refer to Chapter 1 and remove the<br />
auxiliary drivebelt.<br />
20 Unbolt and remove the exhaust system<br />
downpipe from the exhaust manifold and<br />
catalytic converter, as described in Chapter 4C.<br />
6.2b ... and the nut...<br />
5.13b ... and remove the bracket<br />
21 Prise open the protective plastic cover<br />
and unplug the wiring from the rear of the<br />
alternator at the connectors.<br />
22 Support the engine and transmission on a<br />
trolley jack, then unbolt the rear engine<br />
mounting from the engine, with reference to<br />
Chapter 2D. Lower the rear of the engine<br />
slightly using the trolley jack, to allow the<br />
alternator to be withdrawn without<br />
obstruction.<br />
23 Undo the upper and lower alternator<br />
mounting bolts and remove the alternator<br />
from the engine compartment.<br />
Refitting<br />
24 Refitting is a reversal of removal. Refer to<br />
Chapter 1 for details of refitting and tensioning<br />
the auxiliary drivebelt. On completion, tighten<br />
the mounting bolts securely.<br />
5.15 Right-hand driveshaft support/shield,<br />
with alternator visible above (seen from<br />
below)<br />
6.2c ... and remove the alternator rear<br />
cover<br />
Starting and charging systems 5A»5<br />
5.14 Withdraw the alternator through the<br />
inner wheelarch<br />
6 Alternator - ^<br />
brush holder/regulator ^<br />
module renewal 3^<br />
1 Remove the alternator as described in<br />
Section 5.<br />
2 Where applicable, remove the screw and<br />
nut securing the alternator rear cover, and<br />
take off the cover (see illustrations).<br />
3 Extract the two small screws (marked with<br />
green paint, on our project vehicles) and<br />
withdraw the brush holder (see illustrations).<br />
4 Using a steel rule check the length of the<br />
brushes. If less than 5.0 mm, the complete<br />
brush holder assembly should be renewed.<br />
Note: On Bosch alternators, it may be<br />
possible to obtain the brushes separately, in<br />
which case the brush leads should be<br />
6.2a Remove the cover screw ...<br />
6.3a Unscrew the brush holder screws<br />
(arrowed)...


