

Bravo & Brava • 1995 To 2000
Bravo & Brava • 1995 To 2000
Bravo & Brava • 1995 To 2000

Create successful ePaper yourself
Turn your PDF publications into a flip-book with our unique Google optimized e-Paper software.
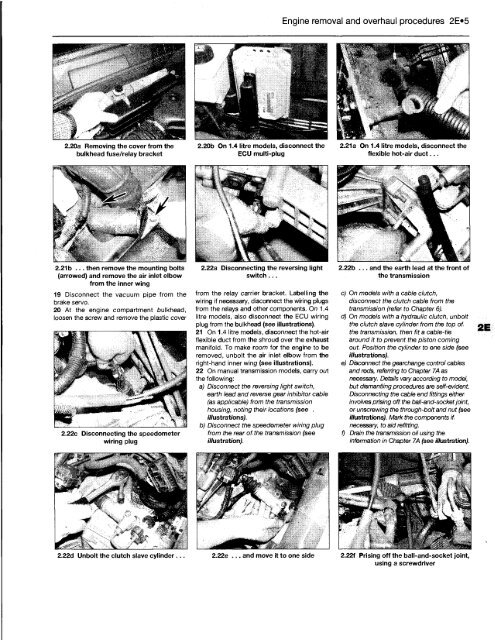
2.20a Removing the cover from the<br />
bulkhead fuse/relay bracket<br />
2.21b ... then remove the mounting bolts<br />
(arrowed) and remove the air inlet elbow<br />
from the inner wing<br />
19 Disconnect the vacuum pipe from the<br />
brake servo.<br />
20 At the engine compartment bulkhead,<br />
loosen the screw and remove the plastic cover<br />
2.22c Disconnecting the speedometer<br />
wiring plug<br />
2.20b On 1.4 litre models, disconnect the<br />
ECU multi-plug<br />
2.22a Disconnecting the reversing light<br />
switch...<br />
from the relay carrier bracket. Labelling the<br />
wiring if necessary, disconnect the wiring plugs<br />
from the relays and other components. On 1.4<br />
litre models, also disconnect the ECU wiring<br />
plug from the bulkhead (see illustrations).<br />
21 On 1.4 litre models, disconnect the hot-air<br />
flexible duct from the shroud over the exhaust<br />
manifold. <strong>To</strong> make room for the engine to be<br />
removed, unbolt the air inlet elbow from the<br />
right-hand inner wing (see illustrations).<br />
22 On manual transmission models, carry out<br />
the following:<br />
a) Disconnect the reversing light switch,<br />
earth lead and reverse gear inhibitor cable<br />
(as applicable) from the transmission<br />
housing, noting their locations (see .<br />
illustrations).<br />
b) Disconnect the speedometer wiring plug<br />
from the rear of the transmission (see<br />
illustration).<br />
Engine removal and overhaul procedures 2E»5<br />
2.21a On 1.4 litre models, disconnect the<br />
flexible hot-air duct...<br />
2.22b .. and the earth lead at the front of<br />
the transmission<br />
c) On models with a cable clutch,<br />
disconnect the clutch cable from the<br />
transmission (refer to Chapter 6).<br />
d) On models with a hydraulic clutch, unbolt<br />
the clutch slave cylinder from the top of<br />
the transmission, then fit a cable-tie<br />
around it to prevent the piston coming<br />
out. Position the cylinder to one side (see<br />
illustrations).<br />
e) Disconnect the gearchange control cables<br />
and rods, referring to Chapter 7A as<br />
necessary. Details vary according to model,<br />
but dismantling procedures are self-evident.<br />
Disconnecting the cable end fittings either<br />
involves prising off the ball-and-socket joint,<br />
or unscrewing the through-bolt and nut (see<br />
illustrations). Mark the components if<br />
necessary, to aid refitting.<br />
f) Drain the transmission oil using the<br />
information in Chapter 7A (see illustration).<br />
2.22d Unbolt the clutch slave cylinder . 2.22e ... and move it to one side 2.22f Prising off the ball-and-socket joint,<br />
using a screwdriver


